Related Resources: Fingerless Gloves and Wrist Warmers | Crochet Accessories | V Stitch
About This Crochet Project:
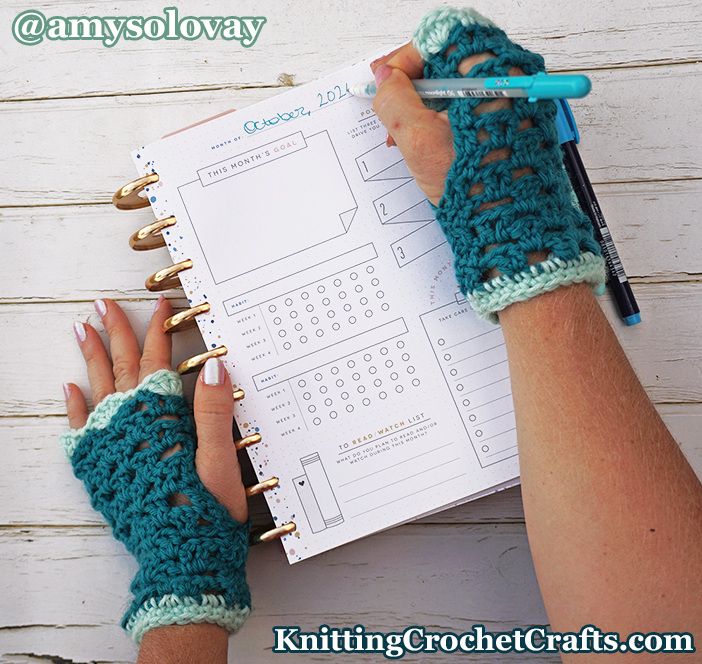
I’m enchanted by the laciness of these fingerless gloves. At the same time, they have a wooly, outdoorsy quality that I also find appealing.
Of course, if you use a smoother, non-wool yarn to crochet your own version of this pattern, that wooly quality will disappear. However, I’d use caution with substituting fibers because other fibers don’t necessarily have wool’s marvelous resilience — which means that you might need to experiment with the amount of ease you incorporate into your pair of fingerless gloves.
Either way, the gloves work up quickly, and I think they’re quite pretty.
Over the years, I’ve experimented with crocheting several different versions of this pattern using different brands of wool yarn and different edgings at the upper and lower edges of the fingerless gloves.
The version you see in the photo above is a relatively new one, which we photographed on September 19, 2024. Even though this pattern is now around 15 years old, I still love it and think it remains wearable. It is one of those classic designs that (in my admittedly biased opinion!) are worth the investment of time and yarn.
Skill Level: Easy

Gauge
Don’t necessarily worry about matching my gauge. Instead, worry about making your grouping of stitches match your hand circumference, aiming for about 1/4″ – 1/2″ of negative ease.
Supplies You Will Need to Crochet The Lacy Fingerless Gloves:
2 Colors of Yarn:
To make fingerless gloves like the ones you see in the photo above, use any two contrasting colors of Cascade 220 worsted weight wool yarn. Cascade 220 is currently my suggested yarn for this pattern.
I originally crocheted my first project samples of this design using yarn from a small farm in New Zealand. It is now impossible to get yarn exactly like it. I worked the largest part of the gloves in brown wool, and the edgings in off-white wool.
Crochet Hook: I crocheted the sample gloves using a size G / 4.25 mm crochet hook.
Other: Tapestry needle for weaving in ends
Finished Sizes:
I originally only worked out one size for these fingerless gloves; the starting chain is 33 stitches and the finished fingerless glove circumference is 6.5″.There are general instructions below for adjusting your starting chain to make different sizes beyond these, but I’m currently testing additional, larger sizes to make the pattern more inclusive. Please drop me a comment in the comments section if you’d like to help me test your size. Thanks in advance!
You’ll want to measure your hand circumference at its widest point around your knuckles.
Before finishing, each glove is a rectangle with an edging added. Then you sew the side seams to create fingerless gloves.
If you want to crochet a pair of these fingerless gloves for yourself or a friend, your goal is to create a similar rectangle that will fit your hand (or your friend’s) comfortably. If you crochet your gloves out of wool, as I did, you’ll want to make the gloves slightly smaller than your actual hand measurement, because wool stretches.
For example, my hand measures about 7 inches around, and my sample gloves measured about 6.5 inches square before finishing.
Crochet Abbreviations List for This Pattern
- ch = chain
- dc = double crochet
- sl st = slip stitch
- st = stitch
How to Crochet the Lacy Fingerless Gloves
Work a square of v stitch in brick repeat, taking care to measure the piece and check the measurement against your actual hand measurement after you’ve crocheted several inches.
How to Crochet the V-Stitch in Brick Repeat:
Ch 33
Row 1: dc in 4th ch from hook, (ch 1, skip next 3 chs, work a V stitch in 4th chain from hook.) Repeat sequence inside parentheses 5 more times. Ch 1, skip next 3 chs, work 1 dc in each of the last 2 sts.
Row 2: ch 2, turn. Dc in next dc, ch 3, skip 1st chain and 1st V stitch, (work a V stitch in the next space between V stitches, ch 1.) Repeat sequence inside parentheses 3 more times. Work one more V stitch, ch 3, skip next V stitch, work 1 dc in next dc, work 1 dc in turning chain of previous row.
Row 3: ch 2, turn. Dc in next dc, ch 1, work V stitch in next space, (ch 1, work V stitch in the next space between the V stitches that you worked in the previous row.) Repeat the sequence inside the parentheses 4 more times. Ch 1, dc in next dc, dc in turning chain.
Rows 4 and up: Repeat rows 2 and 3 again as many times as necessary to make your mitt as tall as you want it to be.
End off and weave in your loose ends. Block if desired.
To Make Fingerless Gloves in a Different Size
The starting chain will be a multiple of 4 + 9. In other words, you will need to start out with a number of chains that can be divided by 4; then take that number and add 9 more chains to it. This ensures that you will also have enough chains to use for crocheting the dc stitches at the beginning and end of each row.
To create my sample gloves, I used the instructions above for crocheting a swatch of the fabric. My starting chain was 33 stitches.
However, if your hands are larger than 7 inches around, and you’re using yarn that’s comparable to the yarn I used in my project sample, you’ll want to add onto the starting chain in increments of 4 stitches. If you’re using comparable yarn, and your hands are smaller than 7 inches, subtract chains from the starting chain in increments of 4 stitches.
Finishing:
The next step is to add an edging in a contrasting color to both upper and lower edges of the square you crocheted. If you like the edging I used, feel free to use it on your gloves. If not, feel free to choose a different one. It helps if you can find a similar edging in a multiple of 4 stitches. Otherwise, you’ll have to do some increasing, decreasing and / or plain old fudging to get your stitch repeat right.
Pictured Edging Pattern:
At upper edges of your fingerless gloves: Before working the last step of the last st in the final row of your fingerless gloves, change to color B. One shell stitch = 5 dc sts; alternate 1 shell st and 1 sc st all the way across the top of your fingerless glove. All together, I have 5 shells and 4 sc sts, but depending on how big you make your fingerless gloves, you might need to work a different number of shells.
Sew the side seams.
At lower edges of your fingerless gloves: After stitching the side seams, use color B to loosely work 2 rounds of sc st at the lower edge.
Important note: Do not crochet this edging too tightly, or your fingerless gloves end up too tight and unwearable. Also do not decrease the number of stitches; when in doubt, err on the side of crocheting too many stitches rather than too few.
Original Edging Pattern (not pictured): Using Color B / your edging color, make a slip knot of yarn on your crochet hook, then work a sl st in the first st. [ch 2, dc in next st, ch 3, sl st in third ch from hook, dc in next st, ch 2, sl st in next st, sl st in next st.] Rep the instructions in brackets all the way across the side you are working on.
Then repeat the same instructions on the other edge.
Block if desired.
Whip stitch the side seam, leaving an opening of about 2 inches for your thumb hole.
Make 2 identical gloves.
So there you have it: That’s how you crochet lacy fingerless gloves using the v-stitch in brick repeat stitch pattern. If you actually crochet this pattern, we hope you’ll enjoy your new fingerless gloves.
Over to You:
Did you crochet this pattern? If so, how did it turn out?
Do you have any questions about the pattern? Let us know, and we’ll try our best to answer them.
Your feedback is appreciated! Please feel free to let us know your thoughts in the comments section below.
Thanks for Visiting!
We’re glad you dropped by today, and we invite you to take advantage of all the free and paid resources our website has to offer. We make bunches of free patterns and tutorials available for you.
Find More Patterns for Fingerless Gloves
We’ve posted bunches more crochet accessory patterns, including more crochet patterns for fingerless gloves and wrist warmers. Check ’em out:
More Crochet Resources

- Best Crochet Patterns for the Home
- 8 of the Best Womenswear Crochet Pattern Books
- Crochet Edging Patterns
- Crochet Appliques
- Granny Square Patterns
- Crochet 101: All About Crochet
More Craft Techniques You Might Enjoy
Find Our Main Directory of Craft Ideas HERE.
By Amy Solovay
About the Author: Amy Solovay is a content creator and educator who holds a bachelor’s degree with a studio art minor; she has also earned a separate degree in textile design. Amy learned to crochet as a small child, and she still enjoys crocheting all these years later. Beyond that, she enjoys introducing other crafters to the best new craft supplies, and she also loves helping crafters learn new techniques for making the most of the craft supplies they buy.
As an educator, Amy Solovay used to teach in-person college courses in trend forecasting, marketing and surface design at California Design College in Los Angeles.
Nowadays, Amy uses online platforms to teach digital courses to craft pattern designers, content creators and influencers all over the world.
Thanks for visiting!
This page was last updated on 9-20-2024.
5 1393851600 Wrist Warmers
clothingandaccessories
Fingerless Gloves Crocheted With V Stitch in Brick Repeat Lacy v stitches add to the appeal of these feminine fingerless gloves. 5 1393851600 Free Crochet Patterns for Clothing and Accessories
womens-crochet-patterns
Crochet Fingerless Gloves Made With V Stitch in Brick Repeat Ladies will love the lacy simplicity of these pretty two-tone fingerless gloves. 10 1393851600 Women’s Wear
easy-crochet-patterns
Crochet Fingerless Gloves Made With V Stitch in Brick Repeat These are pretty, lacy two-tone gloves crocheted in an easy, repetitive stitch pattern. 15 1393851600 Easy Patterns