You Can Save Money on Fabrics for Quilting, Sewing and Fiber Art with These Methods for Upcycling Old Clothes
Do you have old clothes that your kids have outgrown? Or maybe you have old clothes that aren’t your style any more, or you’ve torn them, stained them or otherwise abused them beyond repair.
Don’t toss these treasures in the trash. Upcycle them!
There are zillions of different ways you can upcycle old clothes. Here I’m going to share several different ways I do this. However, these are not the only ways to reclaim the fabric from old clothes. Feel free to adapt these ideas to your own sewing, quilting or fiber art.
When you look at a piece of clothing you want to upcycle, you’re likely to have your own ideas for what to do with it — and it is totally rewarding to just trust those instincts and go for it, even if you aren’t totally sure how it is going to turn out. You aren’t risking much when you cut up a piece of clothing you were never going to wear again anyway — right?
3 Basic Methods You Can Use for Upcycling Old Clothes
IMPORTANT! Regardless of which of these methods you use, be sure to use knitted fabrics ONLY with other knitted fabrics, and woven fabrics ONLY with other woven fabrics. If you use knitted fabrics, sew them with a zigzag stitch or a serger; DO NOT use straight stitches with knitted fabrics!!
- Method 1: Cut the clothes apart at the seams, trimming off the seams and maximizing the size of each piece to the greatest extent possible. If the resulting pieces are big enough to use with whatever pattern you have in mind, great — use them. But, often, especially if you’re upcycling kids’ clothes, you’ll find that they’re too small to do much of anything with without patching them together. In that case, you can use one or more quilter’s templates to cut squares or other shapes. Then you can stitch the pieces together at random to make hippie-style clothes, fabric yardage or quilts.
- Method 2: First you overdye bunches of mismatched clothing pieces to make them all coordinate and complement each other. Check out the pages on this website about fabric dyeing for information on how to do this. Then proceed with reclaiming the fabric in the same ways mentioned above; you cut the clothes apart at the seams and then proceed to sew pieces together to make yardage that you then use in whatever projects you like — or you can cut squares or other shapes to use in patchwork or quilting projects.
- Method 3: Cut the clothing pieces into strips. Sew the strips together end to end and wind the resulting longer lengths of strips into balls (these are known as “rag balls”; you can find a free step-by-step tutorial for making rag balls HERE). Then use them to crochet or knit with. You can turn your reclaimed fabric strips into rag rugs, rag bag purses, baskets, jewelry pieces and all kinds of other useful items. This technique works really well with old t-shirts where you can cut strips horizontally across the body of the t-shirt. Check out ideas below:
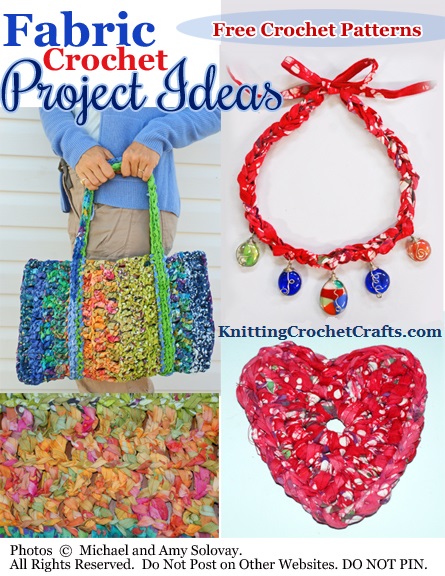
If this is the approach you’d like to take, I invite you to check out my page about fabric crochet to find a bunch more insights, plus free patterns you can use for making all kinds of useful items like trivets, coasters, tote bags and rag rugs.
Read on for additional insights on these different methods for how to upcycle clothes:
Upcycle Your Old Clothes to Use in Quilts or Other Patchwork Projects
There are many possible ways to approach the task of cutting apart an old garment so you can re-use the fabric for making quilts or patchwork projects. I typically start by grabbing a garment, a marking pen, a pair of fabric shears, and a square template or other template. There are fabric marking pens you can use for this purpose where the ink disappears; this is ideal to use. However, it’s not a necessity. I’ve often used regular ballpoint pens to do my marking. For most quilting projects, your pen marks won’t be visible in your finished quilt; if you’re planning to quilt traditionally, by stitching your blocks together and then inserting batting and a backing, no one will ever see your pen marks.
The next step is to use your template and trace around it onto the fabric of your garment as many times as possible. Then you cut apart the pieces and either use them or organize them with your craft supplies stash for the next time you’re ready to start a quilting project.
Upcycle Your Old Clothes, Thrift Store Clothes or Other Clothes Using Fabric Dyes
The thrift stores close to me have an abundance of clothing. Much of it is stained, torn, not my size, and unwearable, but that doesn’t stop me from buying it. Why? Because I can reclaim it and turn it into beautiful fiber art projects, including quilts, fabric paintings, patchwork clothing, wall hangings, rag rugs, and other things.
I discovered these methods when I was teaching surface design to fashion design students. At the time, I was teaching them how to dye fabrics, and how to paint on fabric. So, these methods focus on creatively transforming the reclaimed fabrics, which is not always a necessary step in the process. The cheapest thing to do is to use the fabrics as-is, without dyeing them. BUT overdyeing them is a fabulous idea if the fabric colors are hideous, or if the clothing has obvious stains on it that you’d like to camouflage, or if it’s do-or-die for you to make a new piece of clothing using a bunch of different fabrics that clash with each other.
When I shop for reclaim-able fabrics at thrift stores, I look for long cotton skirts, the kind that are gathered at the waist but don’t have actual pleats. I think these were popular in the 1980s. These skirts have lots of useable fabric, and there is not much waste when you cut them apart. I try to buy these skirts in sizes large and extra large, but I’ll buy cotton skirts of any size if the print is beautiful or if they have a decent amount of fabric I can reclaim.
Extra seams like darts and pleats mean that the fabric in these areas may go to waste, so in most cases I prefer skirts to dresses. But, I do sometimes buy dresses also, if it looks like a particular dress will have enough fabric that can be reclaimed.
Sometimes large-sized cotton button-down shirts and pants are also worth buying, if the price is low enough and the fabric nice enough.
If you intend to quilt with, or dye, your reclaimed fabrics, I recommend using only cotton garments, and avoiding blends and most synthetics.
I don’t worry one bit if the colors are ugly or the prints outdated; using my methods, the fabrics will look completely different by the time I’m finished with them anyway.
Many people don’t realize that fabric can be over-dyed. I learned this while working in the textile industry. Often, if a commercial dye house is not able to achieve the correct color the first time, they will take the same roll of fabric and dye it again.
You can use this to your advantage when you are reclaiming thrift store fabrics. Most printed cotton fabrics can be successfully over-dyed.
When I want to upcycle the fabric from a bunch of skirts to use in the same quilt or project, I like to over-dye them all the same color; I pick a color that is likely to harmonize well with all of them. Use your good judgment here. One tip: Avoid using light-colored dyes, because in most cases a light color will not be powerful enough to tie the diverse prints together successfully. Use a strong, vibrant color, or perhaps a dark color. Usually, the color you choose will not completely obscure the existing print on any of your skirts or garments. So, when you are finished dyeing, the fabrics in the garments will harmonize, but in most cases they’ll still be pretty different.
After I have a bunch of assorted skirts and other garments, I take them home and sort them. I decide which item will be used together. I sort them into various piles for dyeing.
Then when I’ve finished dyeing them, it’s time to cut them apart. Usually I do the dyeing before I do the cutting, but you could reverse this process. I dye first and cut later with skirts, where there isn’t much fabric that will be wasted. With dresses, it’s often better to cut first and then dye, because you don’t want to waste dye on fabric that will be tossed in the trash. But if you cut first, you risk having the cut edges unravel during the washing and dyeing process.
I cut each skirt open at the seams using either a seam ripper or pair of scissors, whichever is more appropriate to the seaming method used. (Serged seams get cut with scissors, usually.)
Then if I am going to use the fabric in a quilt, I’ll use my templates and patterns to cut out my quilt squares and quilt blocks.
You can also paint on the fabric or embellish it in other ways. The possibilities are vast, and fun to explore.
Happy creating!
See Also: Quilting
By Amy Solovay
About the Author: Amy Solovay is a crochet pattern designer, craft blogger and educator who learned to quilt and sew as a young child. She holds a degree in textile design and spent about a decade working in the textile industry. She taught apparel marketing, trend forecasting and textile design courses to aspiring fashion industry professionals at California Design College. For five years, she worked as the Crochet Expert at TheSpruceCrafts.com, a web property owned by Dotdash Meredith, which is America’s largest publisher. Nowadays, she helps crafters improve their skills, and she uses the internet and digital platforms to connect with crafters, textile designers, content creators and other creative people for the purposes of sharing ideas, knowledge and creative inspiration.
Page last updated on 4-24-2026. Thanks for visiting!