Recycle Old Paper and Junk Mail into New Paper You Can Use for Art and Crafts
This guide is an introduction to how to make handmade paper, or, more accurately, how to recycle old junk paper into new paper to use in your greeting cards, scrapbooking pages, altered art, love letters, Christmas cards, Valentines, or other artistic and crafty creations. I learned how to do this as part of a college printmaking course I took, but I think that it will be of interest to artists and crafters who work in a variety of media. It will also be of interest to anyone who is interested in eco-friendly practices, and recycling to conserve the earth’s resources.
The first thing you need to know: Your new paper will only be as good as the paper you start with. The better quality paper that you start with, the better you will end up with. In my experience it is not worth recycling old newspapers into handmade paper.
Examples of good papers to use:
- Resume paper from outdated resumes.
- Art papers that you messed up (old drawings that didn’t work out, etc.)
- Pages from old books can be good to use, depending on the book.
- Old stationery can be good too.
- Scrapbooking papers that have become too creased, crinkled or damaged to use in your scrapbook
It doesn’t matter if these papers already have writing all over them. In fact, it is desirable to start with paper that has already been used and is no longer needed for its original purpose.
In some, but not all, cases you can recycle your junk mail into beautiful handmade paper. Take a good look at the paper before deciding to use it. Do not use glossy paper for this project. Old magazine pages, while they do work, don’t usually give the best results. A paper that has coating on it is not desirable. If it looks like good quality uncoated paper then give it a try. In addition to lots of papers to recycle, you will need:
- A blender
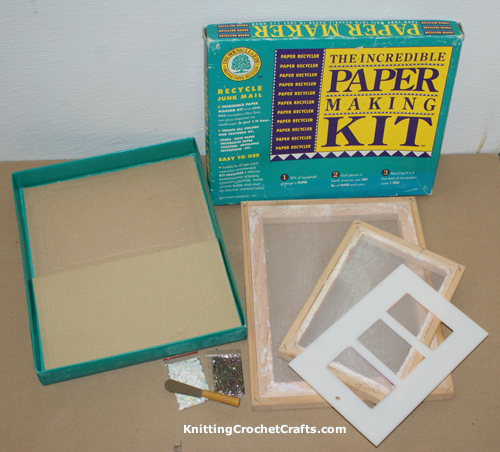
- A mold and deckle (usually these can be found on Amazon by searching for a “paper making kit”).
- Optional: Additional interesting bits to add to your paper such as glitter, seeds, dried flowers, confetti, small paper punchies, or little bits of thread (cut threads into tiny pieces- about a quarter of an inch long or less.) Be creative! You can probably think up many more interesting additions.
- A dishpan,shallow tub or similar item. It comes in handy to have more than one.
- Pieces of Felt that are slightly larger than your mold & deckle. Wool felt works best.
- A sponge
- Material that can be used as a strainer- nylon pantyhose, cheesecloth fabric or something similar
How To Make the Paper:
Step 1: Tear the paper up into small pieces. Ideally the pieces will be smaller than 2 inches and roughly square.
Step 2: Add some water to the bottom of the dishpan and have it handy for when it is needed.
Step 3: Put a small amount of the paper in the blender along with some water. About 10 parts water to one part paper is a good ratio to go by.
Step 4: Your enhancements (glitter, dried flowers, etc) can be added at this stage and blended in if you wish, or you can wait and add them later.
Step 5: Use the blender’s lowest setting to blend the mixture for 5-10 seconds or so. Your paper’s appearance and consistency will be affected by how long you blend for. I have achieved some really interesting effects with 5 second blends starting with papers that had lots of text on them. The end result was that some random letters, which had not been obliterated by the blending process, were irregularly scattered over the surface of the finished paper. If you prefer not to have that happen, blend your mixture a bit longer so that the writing on it will be obscured.
Step 6: If you haven’t already added your enhancements you can add them now.
Step 7: Position the mold and deckle horizontally, inside the dishpan so that they are just slightly in the water.
Step 8: Pour the paper pulp mixture into the mold and deckle. Pour slowly and as evenly as possible so that the paper pulp is evenly distributed. Make sure to hold the mold and deckle steady and keep them together and horizontal.
Step 9: Lift the mold and deckle straight up out of the dishpan and allow the water to drain. Be patient, because it will drip for awhile. You want to let as much of the water drain out as possible.
Step 10: Carefully remove the mold from the deckel without removing the paper. Your new piece of paper still requires some attention. It is in fragile condition, so be careful with it. Set it down on a horizontal surface.
Step 11: Carefully place one of your pieces of felt overtop of the paper.
Step 12: Use the sponge to press down on top of the felt and blot out as much water as possible. You might need to wring out the sponge several times before you are finished this part of the process.
Step 13: At this point you can attempt to remove the piece of paper if you wish. You might not want to remove it yet if your papermaking kit allows for oven drying- if so, you can just follow the directions for your kit and put it in the oven for the specified amount of time. I prefer not to oven dry my paper, so I usually remove mine at this point. In order to remove it, all you have to do is carefully peel up the wool felt, making sure that the paper is attached to it. BE CAREFUL, or you will rip the paper.
Step 14: You have several options for drying the paper. You can dry the paper with a hot iron- do not use steam. Many papermakers recommend that paper be dried under pressure. You can sandwich it between pieces of felt and then put it under a stack of books, or a press. If you don’t dry the paper under pressure you will need to flatten it later. A printmaker’s press is ideal for flattening paper, if you have access to one.
Step 15: Cleaning up: there will be leftover paper pulp in your dishpan. Do not pour it down the drain! Instead, strain it into a ziplock bag and refrigerate for using later, or properly dispose of it.
Step 16: Allow the paper to dry for at least 24 hours (longer under humid conditions.)
Step 17: Use and Enjoy!
This paper works better for some things than it does for others. It is wonderful for printmaking and scrapbooking, but it is not an ideal drawing paper. Hand recycled paper is also not recommended for watercolor painting or for use with any paints that require a lot of water; the water could potentially damage the paper and cause it to fall apart. I like painting on these papers with Lumiere metallic paints by Jacquard Products. Lumiere can be used at full strength or diluted with water, but you will have better results on handmade paper if you use the Lumiere at full strength. Handmade papers are also wonderful to collage with, and to use in altered art or mixed media pieces.
I hope you will be able to use the information in this guide to make lots of lovely handmade papers! You can feel good about making something creative and artistic, plus helping the environment by recycling and conserving resources at the same time.
Enjoy!
By Amy Solovay
Find More Creative Craft Ideas:
Check Out More of the Best Craft Supplies:
This page was last updated on 7-6-2021.