Tunisian Crochet Tutorial: Learn How to Do the Afghan Stitch, Otherwise Known as “Tunisian Simple Stitch”
Welcome to our complete guide to afghan stitch, a vintage crochet stitch that’s more than 100 years old. Find the definition of afghan stitch; learn how to crochet afghan stitch; and
discover a wide variety of afghan stitch crochet patterns and projects to get started working on. Whatever your motivation for seeking afghan stitch information, this page will help.
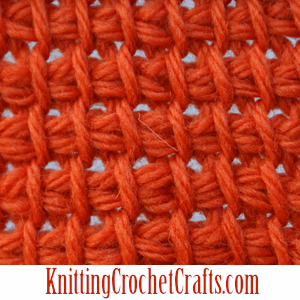
What Is Afghan Stitch?
When people say “afghan stitch,” there are different things they could mean:
- They could be referring to a basic, easy Tunisian crochet stitch.
“Afghan stitch” is one of the most popular names for the stitch, but over the years it has acquired other names including “Tunisian simple stitch”. If this is the stitch you want information about, keep reading to find step-by-step afghan stitch instructions plus links to afghan stitch patterns and project ideas. - People also use the word “afghan” in a more literal sense to refer to an afghan, blanket or throw.
In this case, “afghan stitch” could mean any knit or crochet stitch that would work for making a nice afghan or blanket. If that’s what you’re looking for, the afghan stitch is worth checking out; it is definitely useful for crocheting blankets, throws and afghans. You’ll also want to visit our main directory of knitting and crochet stitches. There you’ll find tutorials and instructions for bunches of fantastic stitches you can use for making afghans and whatever other kinds of projects you might want to knit or crochet.
The Afghan Crochet Hook, Also Known as a Tunisian Crochet Hook
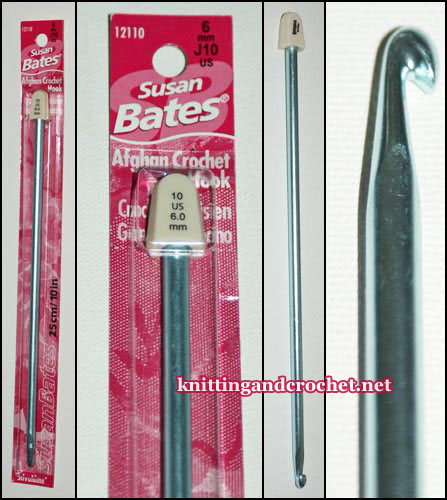
A traditional crochet hook doesn’t work well with the Tunisian crochet technique, so you’ll have to use a special kind of crochet hook for working the afghan stitch. Here are some of the problems with using a traditional crochet hook for afghan stitch:
- The traditional crochet hook is too short to hold all the active loops needed for working typical Tunisian crochet projects.
- The thumb rest on a traditional crochet hook can interfere with the smooth movement of the Tunisian crochet stitches over the hook as you are crocheting.
- Active loops can fall off the end of a traditional crochet hook too easily.
The design of a Tunisian crochet hook solves all these problems.
Two of the most popular kinds of Tunisian crochet hooks are as follows:
- A long tool measuring at least 8″ with a stopper at one end and a hook at the other; it resembles a knitting needle, except it has a hook instead of the pointed knitting needle end. This tool is best suited to making projects that either are narrower than the width of the hook or can be seamed to create wider projects. For example, on a ten-inch Tunisian crochet hook, you could crochet bunches of nine-inch panels and then seam them together to create a large blanket.
- A hook with a flexible extension and a stopper at the end; this tool is appropriate for making wide projects like blankets without requiring seaming.
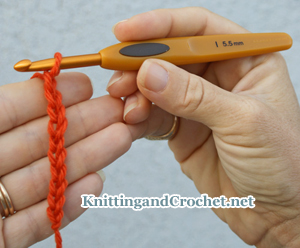
How to Hold a Tunisian Crochet Hook
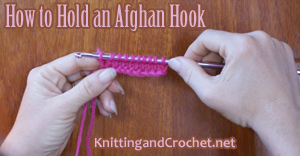
Hold the hook in your dominant hand using a loose, easy overhand grip that allows you to manipulate both the hook and the work as you crochet.
There are two basic grips in crochet, the pencil grip and the knife grip.
The pencil grip doesn’t work well with Tunisian crochet, so you’ll want to get comfortable with the knife grip. The Tunisian crochet hook needs to be able to rotate and move freely inside your hand as you are working. You’ll probably need to use both your hands for manipulating the work-in-progress and for moving stitches along the hook in one direction or the other as you crochet.
How to Crochet Afghan Stitch: Free Step-By-Step Tutorial and Instructions
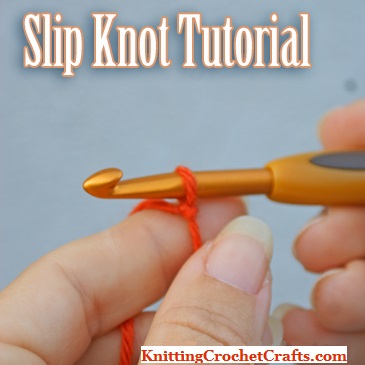
Begin by making a slip knot and placing it on your crochet hook. If you don’t already know how to make a slip knot, check out our step-by-step slip knot instructions and photo tutorial.
Crochet a Starting Chain:
The next step is to crochet a starting chain.
You may find it most comfortable to work your starting chain using a traditional crochet hook; after you’ve finished crocheting your chain, you can transfer it to your Tunisian crochet hook. It is also possible to crochet your chain with your Tunisian crochet hook if you prefer.
Crochet a Practice Project in Afghan Stitch
Want to crochet along with me as I teach you how to crochet afghan stitch? If so, grab a size J Tunisian crochet hook and chain 30 to make this pretty afghan stitch potholder.
I recommend using worsted weight wool or organic cotton yarn for this project; DO NOT use acrylic yarn or polyester yarn, because acrylic and polyester are not heat safe. They can scorch, drip, melt and / or emit toxic vapors when heated.
A couple of fantastic choices for this project include Knit Picks Wool of the Andes or Cascade 220 worsted weight wool yarn. I like using wool for potholders because it is self-extinguishing. If you accidentally do something dumb like get it near a flame, the fiber is unlikely to burn; the flame will go out on its own.
Decide Which Part of the Chain to Crochet Into
Before you start crocheting the first row in afghan stitch, you need to decide which part of the chain stitch you want to work into. You have a couple of options for this. You can crochet into the top loops of each chain, or you can crochet into the back bumps of the chain stitches.
Afghan stitch has a tendency to curl; some Tunisian crochet experts believe that crocheting into the back bumps can help to reduce the amount of curling. I haven’t personally found this to be the case; however, everyone’s crochet is a little different, and it is possible you might find this option could help you to reduce curling, even though my experience has been different.
I prefer to crochet into the back bumps when I plan to add an edging all the way around the entire piece — for example, I start in this way when I am crocheting blankets, placemats, potholders, dishcloths and pillows. Crocheting into the back bumps leaves two loops free for crocheting into later when you are ready to add your edging.
It’s also preferable to crochet into the back bumps of your chains in cases where you don’t plan to add any further finishing. The completed piece will look more elegant and finished than it would if you were to crochet into the top loops of your chains.
I usually prefer to crochet into the top loop in cases when I am going to have a visible seam and I want to avoid drawing attention to it. For example, I make bunches of Tunisian crochet headbands where I whipstitch the top and the bottom of each piece together to form a tube. When I need to stitch the seam, there’s only one visible loop left for stitching into, which reduces bulk in that area and makes the seam a little slimmer. You might wish to choose to crochet into the top loop if you’re crocheting a headband, hat, cowl, infinity scarf or any project where the top of the work will be stitched to the bottom to form a tube.
In the following photos, I’ll be crocheting into the back bumps of the chain stitches. Please feel free to do it either way in your own crochet projects.
The First Row of Afghan Stitch, Starting With the “Forward” / “Forward Pass”
Defining a Row in Afghan Stitch
There are two parts to each row of any Tunisian crochet stitch: the forward and the return, also known as the “forward pass” and the “return pass”.
Er, that’s one way of looking at it — and it’s the way I prefer, so I write my crochet patterns using that approach.
Experts are not all in agreement about what constitutes a “row” of Tunisian crochet. So there’s another way of looking at it: You could also think of the first forward pass as row 1, the first return pass as row 2, the second forward pass as row 3, the second return pass as row 4, etc.
Either way, you do not turn your work in between rows as you do when you’re working in the traditional crochet technique. The right side of the work always faces you unless you’re instructed differently in a crochet pattern you want to work.
Your First Active Loop in the Row Counts as a Stitch
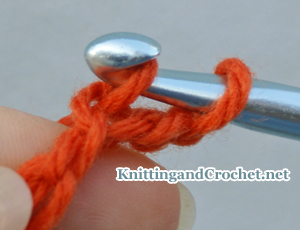
At the beginning of forward pass rows, the active loop on your hook is going to count as the first stitch in the row. You don’t need to do anything else to it at this point. You’ll start by inserting your hook into the second chain from your hook.
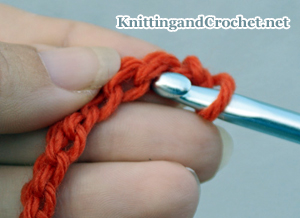
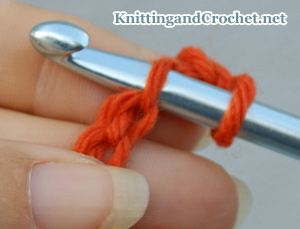
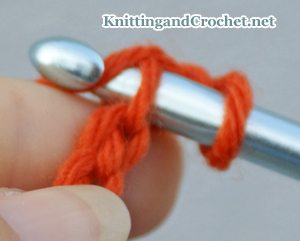
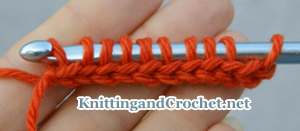
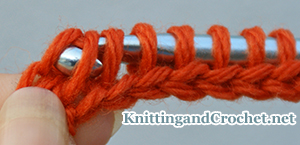
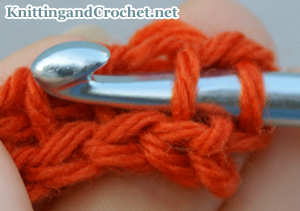
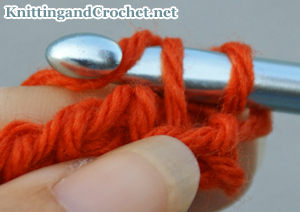
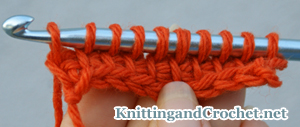
Pull Up a Loop in Each Chain Stitch Across the Row:
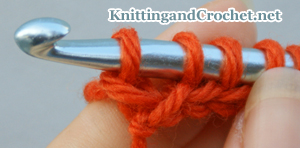
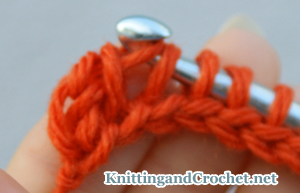
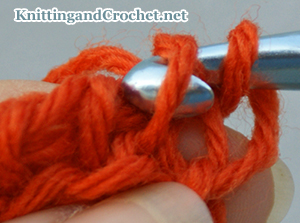
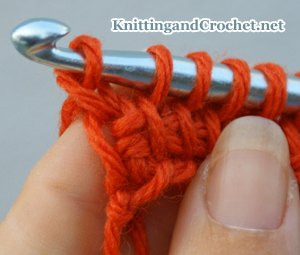
Afghan Stitch Standard Return, Also Known as the “Return Pass”
The return pass in Tunisian crochet is similar to the process of binding off in knitting. Some people call it “working off the loops”, and some people call it “closing the loops” or simply “closing”.
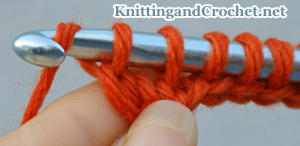
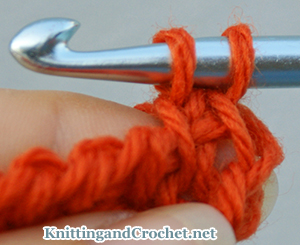
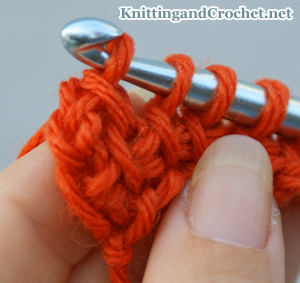
The Return Pass Is Complete:
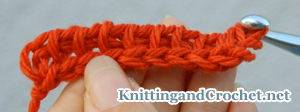
Crochet Another Row of Afghan Stitch: Work Into Each Vertical Bar Across the Row
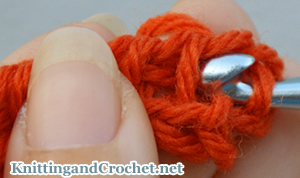
Forward Pass Complete; Begin the Next Return Pass
Finish the Last Row of Afghan Stitch by Working 1 Slip Stitch into Each Stitch Across the Row.
That’s it! Now you know how to crochet afghan stitch.
If you started the potholder, be sure to grab the free pattern so you can finish it up. You’ll need to crochet 2 afghan stitch squares for each potholder you want to make.
Want to see some of your other options for afghan stitch crochet patterns? Check these out:
- Color Mix Afghan Stitch Potholders
- Color Mix Afghan Stitch Dishcloth
- Striped Crochet Christmas Potholders: Free Pattern
- Afghan Stitch Bangle Bracelet Crocheted With Wire — This pattern pushes the limits of what it is possible to do with the afghan stitch.
See Also: How to increase in afghan stitch and how to decrease in afghan stitch.
Learn More About Tunisian Crochet:
Learn More Crochet Techniques.
Learn More About Crochet:
- How to Crochet (for Beginners)
- Learn Crochet Stitches
- Check Out Yarn for Crochet, Knitting, Weaving, and Fiber Arts
- Learn All About Crochet Hooks
Discover Other Needlework Techniques: Knitting, Sewing, Embroidery, Quilting and More
- Click here to get updated on the latest craft supplies.
- Click here to learn about knitting.
- Click here to find our beginner’s guide to knitting needles.
- Click here to find outstanding craft project ideas.
Posted By: Amy Solovay
Page last updated on 9-18-2024. Thanks for visiting!
Permalink
Permalink
Amy
Permalink
Permalink