Learn Sketching for Fashion Designing:
Here’s How to Draw a Fashion Illustration. The Following Instructions Teach You How to Draw a Female Fashion Croquis and Also Give You Some Tips for Creating Finished Fashion Illustrations, Either for Fun or for Use in the Fashion Industry.
Years ago, I took a fashion illustration course at Otis School of Design. Later, I took classes in other subjects at the Fashion Institute of Design and Merchandising, and I taught classes in other subjects at California Design College; but since fashion illustration has always been an interest of mine, I spent a lot of time checking out books on fashion illustration from both of those college libraries. I have literally read every fashion illustration book that was in their collections. Here’s a brief summary of what I’ve learned on the topic of how to do fashion sketches and draw fashion illustrations:
Step 1: Choose Your Media
Media for Fashion Sketches and Fashion Illustrations:

The first step in fashion sketching is choosing the media you will use to create your fashion illustrations. You can do fashion illustrations and fashion sketches using just about any media. However, some media are better than others for fashion sketching.
I first learned to do fashion illustration using gouache paint. You can do the underlying drawing with graphite pencil and then paint all the colors and details using gouache.
Winsor & Newton gouache is ideal for fashion illustrations — but if that brand is too pricey for you, you can get a similar effect using cheap poster paints. If you’re brand new to art of any kind, you can save a bundle by doing your practicing with cheap poster paints; then when you’re ready to start doing work for your portfolio, switch to using the Winsor-Newton gouache for those illustrations.
I also took a workshop in fashion illustration with markers at The Fashion Institute of Design and Merchandising. We used Prismacolor markers to create our illustrations in that workshop.
If you don’t already have other art supplies you can use for fashion illustration, I recommend using either of the above-mentioned approaches to start out with.
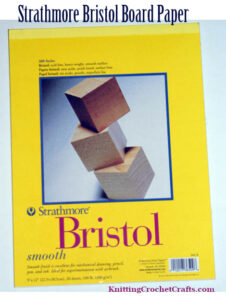
For paper to use with your gouache paints, I recommend using Strathmore Bristol board; that’s the paper that was recommended to me by my instructor at Otis when I first took a fashion illustration class, and that’s the paper I have been using ever since. For paper to use with your markers, I recommend using Canson marker paper.
In our class we also used significant amounts of pencil and tracing paper, and a light table. You can do your initial sketches on tracing paper. When you need to make a change in your drawing, place another piece of tracing paper overtop of the initial drawing; then trace the parts you want to keep, and change the parts that need updating.
When you’re satisfied with your drawing, you can transfer it to your Bristol board using a light table. If you don’t have a light table, you can tape the entire project to a sunny window during daylight hours (use a repositionable adhesive); of course, you’ll be drawing at a funky angle if you do it that way. If that’s not workable for you, you could adhere your project to a glass table top and put a desk lamp under the glass. But if you’re doing a significant amount of fashion illustration, it’s worth it to just buy a light table or light box.
Other Media for Fashion Illustration
Crayons and Chroma Stix
It’s possible to use ordinary crayons for fashion drawing. You’ll also want to be aware of a brand called Fashion Angels; some of the Fashion Angels products include a special type of crayon known as “Chroma Stix” that are specifically designed for fashion sketching. There are some Fashion Angels kits and sets that come packaged with the Chroma Stix, but not all the Fashion Angels products have them. My niece has several Fashion Angels sets, and we love making fashion sketches with them. The range of colors isn’t spectacular, but it’s workable for someone who is just doing this for fun and not as part of their job description in the fashion industry.
How to Create the Look of Tie-Dyed Fabric in Your Fashion Sketches
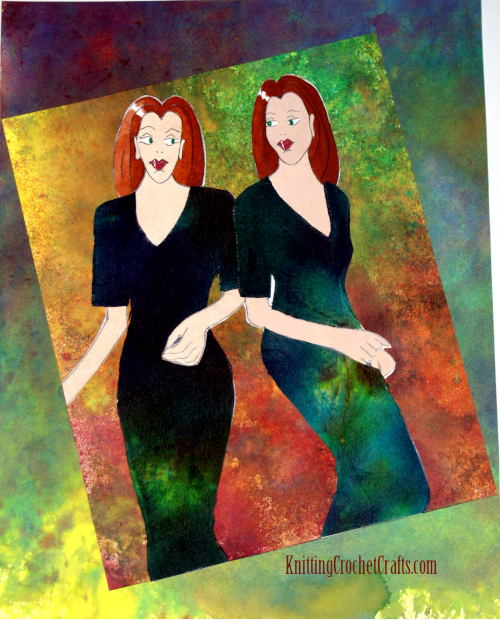
It’s totally OK to get creative when you choose the media you’ll use for creating your fashion illustrations. Gouache paint and markers aren’t the best media to use in cases where you want to create certain effects — perhaps you need to re-create the look of a metallic fabric, or in the case of the illustration of the illustration pictured above, a tie-dyed fabric.
I used to teach surface design classes to fashion design majors, and tie-dyeing was one of the techniques we worked on in the class. After a tie-dyeing session one day, we were cleaning up with paper towels, and I couldn’t bear to throw away the gorgeous dye-stained paper towels we were left with at the end of the class. The colors were so vibrant and beautiful that they inspired me to create this illustration.
I ended up using them in the models’ clothing you see pictured in the illustration shown above. I drew the shapes on paper, then used tracing paper to make a template for cutting the garment shapes out of the paper towels.
If you do any tie-dyeing, you can also put the leftover dyes into squirt bottles and squirt them on paper to create vibrant and detailed works of art. Some of my hand-dyed papers are also included in this fashion illustration; you can see them in the background of the piece.
Of course, if you do things like this in your own fashion illustrations, you have to understand that the resulting projects are not likely to be archival-quality. They aren’t likely to last forever, but they’ll look amazing in your portfolio in the short-term.
If you need to replicate the look of a shiny or metallic fabric on paper, you can use metallic paints such as lumiere metallic paints to get the right look. There are bunches of other paints you can use to achieve different effects, so feel free to experiment to get the look you need for whatever ideas you are trying to illustrate.
Your choice of media can be one of the things that helps to differentiate your unique designs from everyone else’s. If you’re consistent about working at fashion sketching, over time you will develop your own recognizable style — and your choice of media is an important part of that.
Fashion Sketching, Step 2: Create a Fashion Croquis You Can Use Multiple Times
After you’ve chosen your media, the second step in fashion sketching is to create or choose a fashion croquis. A croquis is a bit like a template. It’s a drawing of a basic fashion figure that you can re-use any time you want to create a new fashion illustration. You can trace your croquis or transfer it to Bristol board any time you want to illustrate a new fashion ensemble.
If you want to take a shortcut, you could use croquis that another artist has already made available. There are numerous resources available for this; my current favorite is the Fashion Angels series of sketch portfolios. One of them is pictured further up, towards the top of this page. Some, but not all, of the Fashion Angels sets have excellent fashion croquis you could use to create your own fashion designs. You have to look for the ones that are specifically intended to be fashion sketch sets; they also have sets that are all about cute animals, and one which is an architectural drawing set, which wouldn’t help you with fashion sketching.
The Fashion Angels sets are especially fun because, in addition to the croquis, many of them (again, not all of them) come with stencils and stickers you can use for creating your own fashion illustrations. The stencils make it super easy even for total beginners to create realistic-looking fashion sketches and finished illustrations. For example, my five-year-old niece has been able to produce some pretty cool fashion illustrations (although the Fashion Angels sketch portfolios aren’t actually intended for use by kids that young.) The Fashion Angels sets I’ve seen have come with multiple croquis designs, and you get multiple copies of each, so you can do quite a few different fashion sketches for the price you pay for each set.
If you just want to have fun with fashion sketching, the Fashion Angels sets are a fantastic way to get started. I highly recommend them.
If you want to draw your own croquis instead of using another illustrator’s work, here’s how to do it:
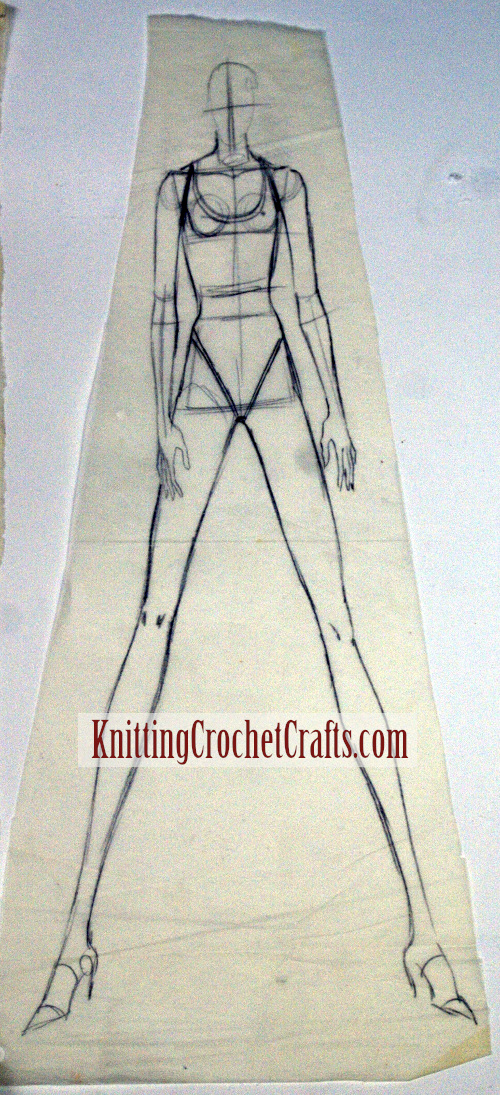
Draw a Straight Vertical Line
You can grab a pencil and use a piece of tracing paper, a page from your sketch pad or a piece of Bristol board to do this. Draw a long vertical line in the middle of your paper. This line is going to be the balance line you use for ensuring your fashion figure will look balanced. This line should divide her head in half, extending down through the center of her neck; from there it will descend to the ground.
Draw the Head
Towards the top of your paper, draw your croquis’ head, placing it symmetrically, with the line you already drew dividing it in half vertically.
Measure the Head
Use a ruler to measure the head you’ve drawn.
Calculate the Body Height
Fashion models are typically taller than other people are; and so fashion figures are also drawn to look taller and more elongated than ordinary human figures are. A living human being is usually somewhere around 7 heads tall. You’ll want to make your fashion figure taller than that; a fashion figure is typically drawn to be 8-10 heads high. You can work out the proportions using your fashion figure’s head measurement to determine what her finished height will be; then indicate that measurement on your drawing.
Draw the Body Using Your Balance Line as a Frame of Reference
You can use the vertical line you drew as a basis for evaluating how your fashion figure will be balanced. If you’ll draw her with her weight placed on one leg, that one leg should line up with the balance line. If you’ll draw her with her weight evenly distributed onto both legs, the legs should both be equally far from the balance line.
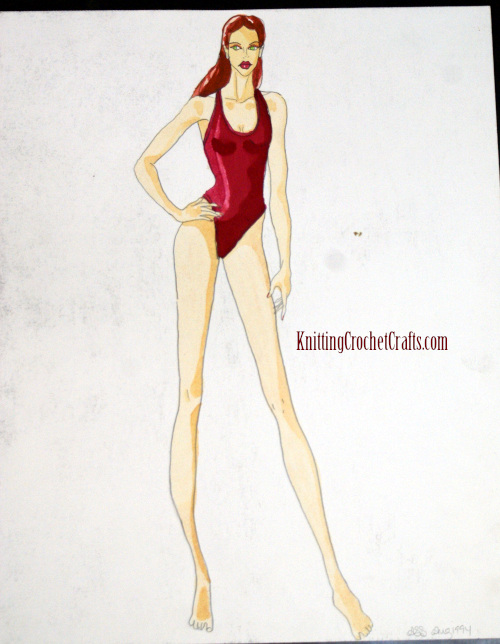
If you’re drawing a croquis that you want to re-use multiple times, you’ll probably want to draw her wearing underwear or a swimsuit; that will give you maximum versatility when you re-use her later. However, you do have other options. For example, if you’re a t-shirt designer, you might want to make a few different croquis, one for every t-shirt silhouette your company makes available.
The upper torso and the hips are both sort of like boxes that oppose each other in how they are tilted. To start with, the easiest thing to do is to draw a fashion figure whose legs are straight, spine is straight and upper torso and hips aligned symmetrically along the balance line. However, this doesn’t necessarily make for the most interesting fashion figure possible.
If you draw your fashion figure with a tilted upper torso, her hips will have to be drawn tilted in the opposing direction.
Draw the Features on Your Fashion Figure: Eyes, Eyebrows, Nose, Mouth and Ears
Drawing the face on your croquis is optional but highly recommended; you can convey the idea of a garment design without drawing all the features on the model’s face — but, assuming you do a good job with the drawing, I think that having all the features on the illustration does help other people to perceive your design in a more positive light.
Treat Hair as a Solid Shape
Human hair really isn’t a solid shape; it’s zillions of thin, fine individual shapes. But, when you’re drawing or painting hair, you should never draw individual hairs. Instead, visualize the hair as one solid shape, and represent it as such in your final illustration.
A Shortcut to Perfectly Symmetrical Garment Illustrations: Fold Your Sketches in Half
Some clothing pieces are symmetrical. When you’re drawing symmetrical pieces, start with a piece of tracing paper folded in half. Draw the first half of the garment you’re illustrating, and then turn the paper over and trace the other half so you have an exact match. Then you can transfer the entire drawing to your Bristol board to create the finished illustration.
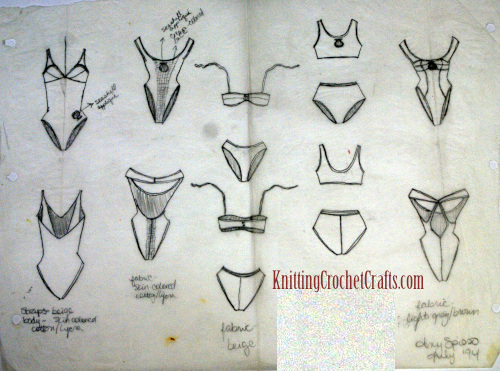
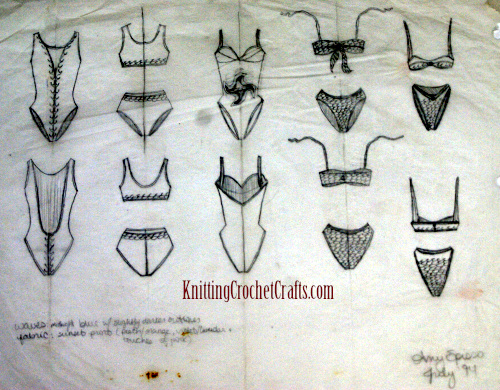
If you look carefully at the swimsuit collection above, you can see evidence that I used this method; there are creases along the symmetry line in the tracing paper in a few of these swimsuits (of course, there are other irrelevant creases just because these pieces of tracing paper are old and they’ve been stored for a long time).
However, it’s not ideal to do this with your croquis’ faces, because human faces are never precisely symmetrical. Your croquis will look like freaks if you draw their faces with precise symmetry.
So there you have it: Those are some of the most important basics you need to know about fashion sketching. There’s a lot more that can be said about this topic — in fact, entire books have been written about it. I will work on expanding this article in the future to add some book recommendations and also to include some more pictures and additional notes. In the meanwhile, if you have questions or insights you want to share, please feel free to leave a comment. Thanks so much for your interest!
More Arts and Craft Pages You Might Enjoy:
- Drawing
- Drawing With Markers
- Painting
- Paper
- Fine Art
- Art and Craft Supplies
- Jewelry Making
- Best Tools for Jewelry Making
- Beadwork
- Sewing
- Sewing Appliques
- Button Crafts
- Paper Crafts
Find More Craft Project Ideas HERE!
Posted By: Amy Solovay
This page was last updated on 8-2-2023.
I second the recommendation for the Fashion Angels sets. The stencils they include in those sets make it so easy to draw your ideas. I have bought 3 of the sets so far. I’d definitely buy more of them too, just a little short on cash right now so I haven’t got the other sets I still want. I like mixing and matching the pieces to make even more ensembles. I agree that the Fashion Angels give you a great shortcut for fashion sketching so you don’t have to draw everything yourself. However, I would love to learn how to do fashion sketching and fashion illustrations from scratch, so I have bookmarked this page and I will be back again soon. Also wanted to say, I really like the swimsuit designs, those are fantastic!
Hi Elisa,
Thanks for the info on your experiences with the Fashion Angels sets. That’s fantastic! Also, thanks for your compliment on the swimsuit designs. I am glad you found this page helpful. I appreciate the feedback.
I SO want to learn how to do fashion sketching. Thanks for the free tutorial. I thought I would need expensive supplies to do it, but now I realize I can just use the pencils and tracing paper I already have at home. Can’t wait to get started.
Hi Kelly,
Thanks for the comment, and you are welcome for the free tutorial. Best wishes with your fashion sketching. Please let us know how it goes for you.
Amy, can you use Copic markers for fashion sketching? Or is Prismacolor better?
Hi Desiree,
Thanks for the comment. Yes, you can absolutely use Copic markers for fashion sketching. Copic offers a fantastic color line, and the range of skin tones is one of the highest priority considerations when you choose which markers you want to use to draw fashion figures. Most cheaper markers are simply unsuitable because they do not offer a broad enough range of acceptable skin tones.
I think it’s a matter of personal preference as to which brand of markers is “better” for fashion sketching. If your budget allows you to try both and compare how you like them, I’d recommend doing that.
I personally never tried Copics because my instructor recommended Prismacolor to me when I first learned how to do fashion sketching, and also because Copics were not readily available to me at the time I first learned how to do it. I didn’t learn about Copic markers until 2009, and I learned how to do fashion sketching sometime in the 1990s, I think it was.
At the time I became aware of Copic markers, I really wanted to try them, but I had a hard time justifying a purchase because I already had other markers I could use. Copic markers are relatively expensive. They offer a marker that’s refillable, which is a great feature; For that aspect alone, I think they are probably worth the price. I’d still be interested in acquiring a set of Copics; I just always seem to have other, higher priority purchases, and so I haven’t yet got around to trying Copics yet.
You make it look easy, which I am sure it is not. I’m going to try the Fashion Angels. Thanks for the recommendation.
XOXOXOXO,
Felicia Jones
Hi Felicia! You’re welcome. Thanks for the comment! I appreciate your interest.
If you get really good at fashion sketching, do you think it’s possible to earn a living doing it?
Hi Gwendolyn! Great question. I’m not sure about the answer. If anyone reading has actual experience with this one way or the other, please comment; we’d love to have your feedback.
The guy who taught me how to do fashion sketching was making a living teaching the subject at the college level. If you have a talent for teaching the skill to others in addition to just doing the sketching, you are likely to be able to earn a living at it. If that’s your goal, please keep in mind that it’s usually necessary to earn an advanced degree in order to teach college (although there are exceptions. For example, I taught college courses, and I do not have an advanced degree; I had more than a decade’s worth of industry experience in the courses I was teaching. But that is really not the norm.)
When I used to work as a textile designer, many of the fashion designers who were my company’s customers were skilled at fashion sketching. However, their job descriptions consisted of many other duties besides sketching. I would say that sketching was not even close to being the thing they spent most of their time on.
Aside from teaching, I think if you were going to try to make a living at fashion sketching, you might have to approach it more as an artist or illustrator does. Artists like Jane Davenport have made a career of drawing female faces and figures. I think it is possible to earn a living that way, but it’s not at all easy to do it.
Even if you’re absolutely certain that fashion sketching is how you want to earn your living, I’d definitely advise you to develop other skills in addition to fashion sketching skills. Marketing would also be an important skill to focus on.