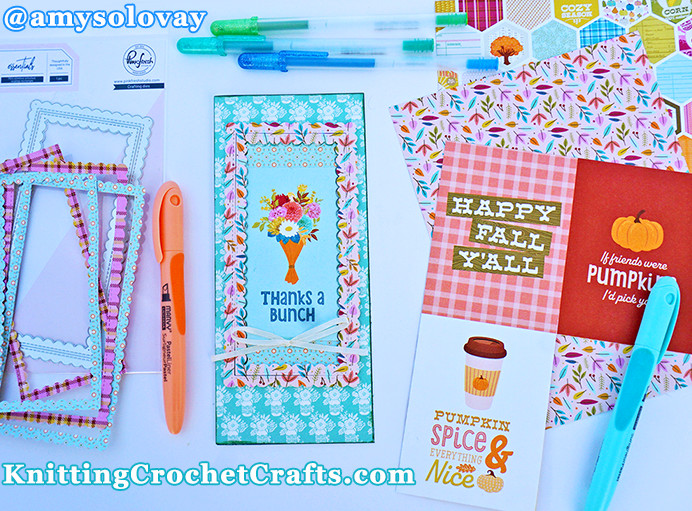
Category Archives: Simple Stories

Sailing Themed 6”x8” Pocket Page Scrapbooking Layout: Feel the Fear and Do It Anyway

An Easy Pocket Page Scrapbooking Layout for Beginners to Paper Crafting

Update 11-2-2023: When I originally made the video for this project and shared this blog post, I was waiting for some of my photos to put in the photo pockets for the left-hand side of the spread. I didn’t have the entire two-page layout ready to show you at that time. However, I just finished the left-hand side of the page, so I’m updating this post to show you how both pages look together. The video only covers the right-hand side of the page, but as you can see, the left-hand side is easy; it’s mostly photos in the photo pockets with just a little bit of extra embellishing.

6x8 Sailing Themed Pocket Page Scrapbooking Layout Featuring Supplies by Graphic 45, Altenew, Pinkfresh Studio, Simple Stories and Tim Holtz for Ranger Industries

6×8 Sailing Themed Pocket Page Scrapbooking Layout Featuring Supplies by Graphic 45, Altenew, Pinkfresh Studio, Simple Stories and Tim Holtz for Ranger Industries

Free Video Tutorial for How to Create This Sailing Themed 6”x8” Pocket Page Scrapbooking Layout

Type of Project: Paper Crafts Project


Skill Level: Easy Enough for Total Beginners


My husband, Mike, and I sailed from Colonial Beach, Virginia all the way to Ashkelon, Israel in a 10 meter / 34’ sailboat called Viva. I’m making a series of mini scrapbook albums to document the experiences from our journey.


This is a pocket page scrapbooking layout that I created to fit in a 6”x8” page protector made by Scrapbook.com. This configuration features two 3”x4”pockets stacked on top of each other on the right-hand side of the page and one taller 3”x8” pocket on the left-hand side of the page.


On the facing page is another pocket page; the page is mostly made up of photos in pockets, and I didn’t do much embellishing to them. So on this page, I’m going to devote most of the space to journaling blocks so I have space to write about all the photos from both pages.


This layout is a super easy paper crafts project that is reasonably quick to put together. If you want to try making a scrapbooking layout similar to this one, you’ll need a photo, a 6”x8” page protector, a 6”x8” album to put your page in, some adhesive, and whichever pretty papers and embellishments you’d like to use for telling your story.


I used stamps, inks, a die cutter, and dies to use for decorating my pages, but these are not necessities. You might prefer to use stickers, washi tapes or actual memorabilia from your life; I think it’s better to use embellishments from your actual adventures, in cases where you have them, than purchasing ready-made embellishments. You can embellish your pages from meaningful things in your life; use items like concert tickets or theater tickets from an event you attended, bits of confetti from a wedding or party you went to, or bits of dried botanicals saved from a bouquet your sweetheart gave you.


Below, I’ve provided a complete list of supplies I used in case you want to duplicate any of the elements shown on this page; however, there are many other options that would probably be better suited to complement your photos when you document your own life experiences. So please use the supplies that would work best for you.


Craft Supplies You’ll Need for Duplicating This Scrapbooking Layout:

Craft Supplies for Making a 6x8-inch Pocket Page Scrapbooking Layout Featuring a Sailing Photo and Ocean-Themed Scrapbooking Supplies

Craft Supplies for Making a 6×8-inch Pocket Page Scrapbooking Layout Featuring a Sailing Photo and Ocean-Themed Scrapbooking Supplies


Stamps Needed for Making the Sailing Themed Pocket Page Scrapbooking Layout

Stamps Needed for Making the Sailing Themed Pocket Page Scrapbooking Layout


Ink Pads for Making This 6x8-Inch Pocket Page Scrapbooking Layout

Ink Pads for Making This 6×8-Inch Pocket Page Scrapbooking Layout


Full Disclosure: Some (but not all!!) of the products I used to make this layout were provided to me for free by Graphic 45, Pinkfresh Studio and Scrapbook.com. I love all 3 of these companies’ products and typically pay the usual asking price for them; I am not recommending them because I got them for free, but because they are absolutely perfect for my projects and because I really, truly, wholeheartedly love them!!


Also, please be aware that the links I’ve used in this post are affiliate links. What that means: I will make a small commission, at no additional cost to you, if you click through these links and make a purchase. My heartfelt thanks to the many readers who support this blog with your purchases! I am truly grateful!

Put a Photo in the Upper Right-Hand Page Protector:

This pocket page layout features a picture of me that Mike took of me standing on the deck of our boat with the sails down. I put this picture in the upper right-hand pocket of the page. Easy peasy! But you can embellish your photo if you like; sometimes if I have a photo with lots of “dead space” in it, I’ll adhere a stamped embellishment, a sticker or a group of enamel dots onto it to dress it up a bit. In this case, I just put the plain picture into the pocket protector and called it good.

How to Make the 3″x4″ Journaling Block to Put in the Lower 3″x4″ Pocket:

In the lower right-hand pocket, I made a layered journaling block. Follow these steps to make a similar journaling block for your own layout:

  • Make the Lower Layer: Cut a piece of patterned paper to 3″x4″ and ink around the edges with a coordinating ink color. I used the “Sail Away” paper from Graphic 45’s 8″x8″ “Sun Kissed” Collector Edition pad, but you can use any patterned paper you like.


  • Make the Middle Layer: Cut a piece of solid-colored cardstock to 2.5″ x 3.5″ and ink around the edges with a coordinating color. I used a piece of cardstock from the “Warms” collection by Scrapbook.com and “Carved Pumpkin” Distress Oxide ink by Tim Holtz for Ranger Industries.


  • Make the Upper Layer: Stamp a journaling block image and a sentiment together onto the same piece of white cardstock using a dark color of ink. I used Altenew’s Sapphire ink for this (not pictured). The stamps I used are Altenew’s Journal Card Builder stamp set (now discontinued) and Altenew’s Magical Memories Outlines Stamp Set. Die cut the stamped cardstock into an interesting shaped journaling block. I used one of the label dies from Echo Park’s Happy Day Labels Die Set, but there are many other dies that could work for this.


    You can add emphasis around the edges of the die-cut shape by drawing around the edge with a marker; however, I recommend doing this with a marker that is getting dried out and close to the end of its life, because this technique can wreak havoc on your markers. You don’t want to wreck a brand new, expensive marker by doing this.


Tape the 3 layers together, complete your journaling, and add the journaling block to your page protector.

How to Make the 3″x8″ Journaling Block:

To fill the pocket that extends down the entire left-hand side of the page, I made a separate layered journaling block using the “Turtle Time” patterned paper from Graphic 45’s Sun Kissed 8”x8” Collector’s Edition Pack, plus a die-cut frame, die cut ephemera, stamped images and stickers.


Follow these steps to make a similar journaling block:

  • Cut your background paper to 3″x8″.
  • Ink around the edges of your background paper and set it aside until the ink is thoroughly dry.
  • Attach a border sticker close to the upper edge of the background paper. I used a cardstock sticker from Graphic 45’s “Make a Splash” collection, but there are many outstanding border stickers or similar embellishments like washi tape that you could use for this.
  • Make two die cut pieces using Pinkfresh Studio’s Mini Slimline Stitched Scalloped Rectangles: You’ll make the inner piece using ordinary lined paper and the frame piece using the Graphic 45 “Make a Splash” navy blue paper, or the papers of your choice. Attach them at an angle to the background paper using paper-friendly adhesive.
  • Stick a sticker at the lower edge of the framed journaling block. I used a sticker that says “Sail Away” from the Simple Vintage Seas sticker book by Simple Stories.
  • Stamp a sentiment, cut it out and attach it near the top of your journaling block. I stamped “Feel the Fear and Do It Anyway” on white cardstock using Weathered Wood Distress Ink.
  • Stamp an oval label using “Carved Pumpkin” Distress Oxide. Allow it to dry.
  • Stamp a sentiment using “Pearlescent Sky Blue” Brilliance ink onto the stamped oval label image. Allow it to dry.
  • Cut out the stamped oval label image using your decorative scissors or the die that corresponds to your oval label stamp.
  • Attach your stamped sentiments and die-cut embellishments to your background paper, layering them over each other and over the other elements on the paper.
  • Complete your journaling and put the finished journaling block in its pocket.

Finishing Touches for This Pocket Page Scrapbooking Layout

I have a love/hate relationship with pocket page scrapbooking. I really love the ease and simplicity of this approach to scrapbooking, but there are a couple of things about it that drive me bonkers. First, I hate it that you can see the page beneath the one you’re looking at through the seams of the pockets. And second, I sometimes get annoyed at the rigidity of the grid-style layouts.


There’s a simple solution for both of these annoyances: Don’t feel limited to sticking your page elements inside the pockets. You can embellish outside the pockets, too. Once I figured this out, I started to enjoy pocket page scrapbooking a LOT more.


On this page, after all three of my pockets were filled, I stuck a sticker strip in between the two 3″x4″ pockets.


I didn’t stick any stickers overtop of that other gap between page elements because I still have to make a layout for the other side of this page protector, and I will need to use the opening to add stuff to the other side. The jury is out on whether I will stick more stickers overtop of this opening or leave well enough alone. We’ll see how it goes!


So go ahead and stick some extra stickers on the outsides of your pockets if you want to (or not). Just don’t block the opening to the other side if you want to have a layout on the back of your page.

Voila! Your pocket page scrapbooking layout is now complete. I hope you’ll enjoy adding it to your scrapbook and reliving your memories as you look at it.

Thanks so much for taking a look at my project. I hope you enjoyed it, and I appreciate your interest!

Find More Sailing and Travel Themed Scrapbooking Projects:

Posted By: Amy Solovay


This page was last updated on 11-2-2023.

Using the We R Memory Keepers Book Binding Tool to Make a Fall-Themed Mini Album

It’s Easy to Make Your Own Mini Albums for Scrapbooking, Art Journaling, Planning, Note Taking or Whatever Other Purpose You Might Need Them for. Read on for Free Mini Album Instructions and Ideas.

Front Cover of the Pumpkin Spice Fall Themed Mini Album

Front Cover of the Pumpkin Spice Fall Themed Mini Album


Pumpkin Spice and Everything Nice: That’s What This Cute Mini Album Is Made Of!

Specifically, it is made of papers and embellishments from the “Harvest Market” and “Good Stuff” Collections by Simple Stories.


We R Memory Keepers Book Binding Tool + the First Project I've Made With It So Far: A Fall-Themed Mini Album With Saddle Stitch Binding

We R Memory Keepers Book Binding Tool + the First Project I’ve Made With It So Far: A Fall-Themed Mini Album With Saddle Stitch Binding

Pages from the Pumpkin Spice Fall Themed Mini Album Before They've Been Embellished

Pages from the Pumpkin Spice Fall Themed Mini Album Before They’ve Been Embellished

A Cute Chipmunk Is the Star of This Scrapbooking Layout Titled Nuts About You From the Pumpkin Spice Fall Themed Mini Album Featuring Craft Supplies by Simple Stories. The pages pictured here were made using papers and stickers from the Harvest Market and Good Stuff Collections, plus Happy Planner washi tape by Me & My Big Ideas.

A Cute Chipmunk Is the Star of This Scrapbooking Layout Titled “Nuts About You” From the Pumpkin Spice Fall Themed Mini Album Featuring Craft Supplies by Simple Stories. The pages pictured here were made using papers and stickers from the Harvest Market and Good Stuff Collections, plus Happy Planner washi tape by Me & My Big Ideas.

Nuts About You Layout From Pumpkin Spice Fall Themed Mini Album Featuring Craft Supplies by Simple Stories. The pages pictured here were made using papers and stickers from the Harvest Market and Good Stuff Collections, plus Happy Planner washi tape by Me & My Big Ideas.

Nuts About You Layout From Pumpkin Spice Fall Themed Mini Album Featuring Craft Supplies by Simple Stories. The pages pictured here were made using papers and stickers from the Harvest Market and Good Stuff Collections, plus Happy Planner washi tape by Me & My Big Ideas.

Here you can see a close-up picture of the chipmunk in the Nuts About You Layout From the Pumpkin Spice Fall Themed Mini Album

Here you can see a close-up picture of the chipmunk in the “Nuts About You” layout from the Pumpkin Spice Fall Themed Mini Album.

Crafting Skill Level: Easy

Craft Supplies You’ll Need for Making a Mini Album With a Saddle-Stitched Spine

  • We R Memory Keepers Book Binding Set — This set comes with a book binding tool, an awl, some waxed thread, 2 needles, a felt pouch to use for organizing everything, and an instruction sheet.

    The book binding tool is useful for helping you make straight, evenly spaced holes in your paper to stitch through. It is not a strict necessity. I highly recommend it, but if you don’t have it, you can use a ruler to mark your papers with evenly-spaced guides for placing holes in your papers. In place of the waxed thread, you can use pretty much any sewing thread, fine crochet thread, fine yarn or embroidery floss. It’s ideal to use a tapestry needle or darning needle for doing your sewing, although there are other possible needles that could work, too.
  • Scoring Board or Other Scoring Tool — I’m using a Scor-Pal tool to do the scoring for my mini albums. There are other scoring boards and scoring tools that will also work for this purpose.
  • 12″x12″ Papers — You’ll need at least 2 sheets of 12″x12″ patterned paper to use for making the pages of your mini album. I used 2 12″x12″ sheets of patterned paper from the “Good Stuff” collection by Simple Stories. This collection features one paper for each month of the year. I decided to make my project a fall-themed mini album featuring photos I took in the months of September and October — so I chose to use the September and October papers from this collection. You can use these, too, if you want your mini album to look like mine. If you want to scrap a different season, you could choose papers from some of the other months in the year as an alternative to these. Or you could choose any other papers you love.
  • Paper Cutter or Trimmer
  • Extra Papers and Embellishments — There are zillions of possible ways you can embellish your mini album. You could use stickers, die cuts, frames, washi tapes, ribbon or whatever other embellishments you like. I used stickers from the Harvest Market cardstock sticker sheet to embellish my mini album pages. I also used pocket cards from the Harvest Market 6″x8″ paper pad and handmade frames I made using papers from the same pad. I used the We R Memory Keepers Frame Punch Board to make the frames. I used Happy Planner washi tape on both the book cover and the interior pages.
  • Photos up to 4″x6″ in Size — If you want your mini album to be a scrapbook, you’ll need some photos to scrap with. This small-sized album works best with small photos; photos measuring 3″ x 4″ are ideal, but you can also use 2″x2″ photos, 2″x3″ photos, 4″x4″ photos or photos that measure 4″x6″ or any size smaller than that. A 4″x6″ photo will take up one entire page in this mini album.
  • Adhesive — You’ll need a flat, paper-friendly adhesive such as Cherry Tape, Scor Tape or Nuvo Deluxe Adhesive. It’s optional to also use a three-dimensional adhesive. I like using Scrapbook.com’s Adhesive Foam Strips to make photo frames appear to pop up from the page. I also use them to attach random embellishments to the pages to make them look more interesting. However, please do not overdo it with the foam adhesive so you can be sure of getting your book to close properly.

How to Make the Mini Album: Free Step-by-Step Instructions and Tutorial

  • Cut each of your 2 sheets of 12″x12″ paper into thirds measuring 4″ tall by 12″ wide.
  • Score each of these pieces of paper down the middle using a scoring tool.
  • Put your papers in the order you want them to appear in your mini album and stack them neatly on top of each other with the center fold lines all aligned.
  • Thread your needle with the waxed thread or whichever thread, floss, yarn or fiber you plan to use.
  • Use the book binding tool and your awl or paper piercing tool to punch evenly-spaced holes down the center fold line on your stack of papers.
  • Stitch through the holes using your threaded needle. Saddle stitch simply goes up through one hole, down through the next hole, etc. Then after you’ve stitched the entire spine of the book, you can backtrack and go back through the holes again in the other direction if you want to make the sturdiest possible binding. If you have the We R Memory Keepers Book Binding Tool, you can consult the instruction guide to see how to do this type of binding plus some other fancier bindings, too.
  • Knot your thread at the end to keep the binding from unraveling.
  • Embellish your book as desired.

So there you have it: That’s how to make a mini album using the We R Memory Keepers Book Binding Tool Set. I hope you’ll enjoy making and decorating your own mini albums! Happy crafting!

Over to You:

Have you tried making a mini album with a saddle stitched binding? If so, how did it turn out? How did you embellish it? Did you keep it for yourself or give it as a gift to a loved one? Do you have any questions about making mini albums?


The floor is open for comments — so if you have questions or feedback about this project idea, please feel free to leave a comment and we will do our best to help you if we know the answers to your questions.

Thanks so much for taking a look at this project. We appreciate your interest!

Update 4-28-2023: I am really sorry, I am going to have to close comments on this post because it is attracting many unwanted comments from ‘bots. I feel terrible about this because I really wanted your feedback. 🙁