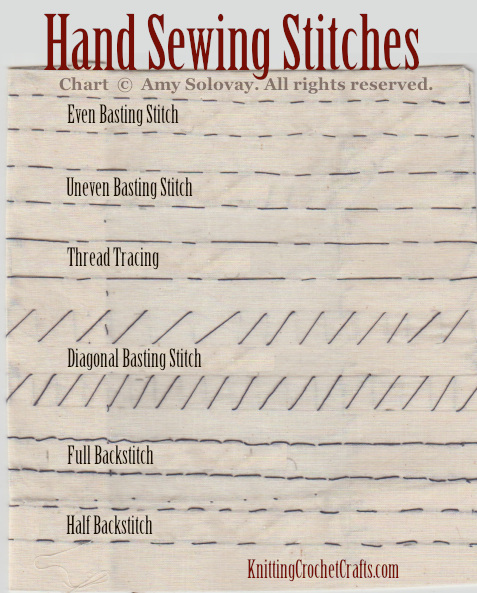
Here’s a Hand Sewing Stitches Chart; Read on to Find Instructions and More Info for Each of These Stitches.
Your Guide to Basic Hand Sewing Stitches for Beginners — Plus You Can Also Check Out Some More Advanced Hand Sewing Stitches, Too
I took an industrial sewing class in the heart of the Los Angeles garment district.
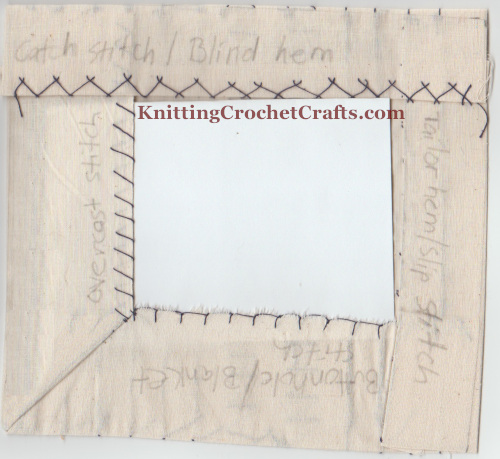
One of my first assignments in the class was making a hand sewing stitch sampler that included many of the basic hand sewing stitches, plus some more advanced hand sewing stitches. You can see the front and the back of my stitch sampler in the pictures above.
Let’s talk about each of the stitches pictured in this sampler:
Even Basting — Also Known as “Tacking”

Even basting is quick, loose, temporary stitching that’s intended to eventually be removed. The purpose of even basting: You’d usually want to use an even basting stitch to hold seams together for temporary sewing and fitting.
You could also use the basting stitch as a means for reinforcing seams or gathering fabrics. For example, you can sew a loose basting stitch and then scrunch the fabric up along the basting stitch line to make ruffles for ruffled skirts.
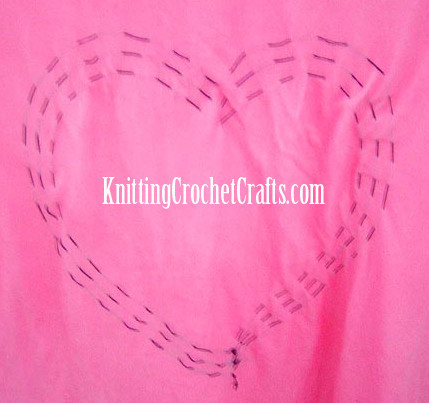
I also use basting stitches to create various tie dye designs. Here’s a photo showing you how I basted several nested heart shapes in preparation for creating a heart tie dye project:
I also use basting stitches frequently in my crochet or knitting projects. I often design knitted and crocheted hats by making a rectangle of fabric, sewing a side seam to form a tube and then basting along the upper edge of the hat.
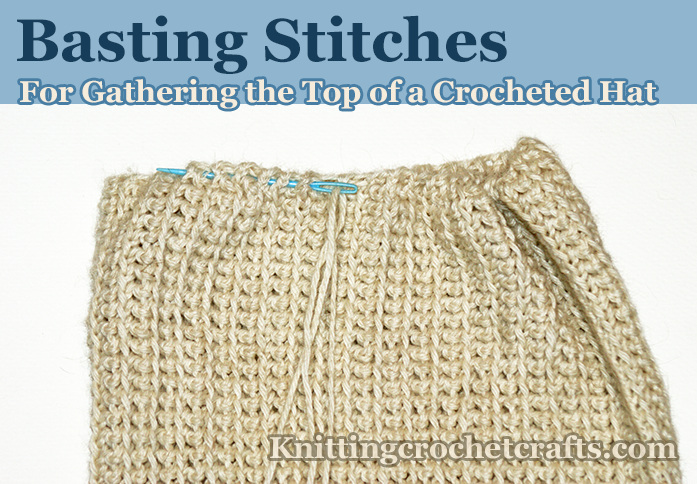
The next step is to gather the top of the hat along the basting stitch line to close it. You can then top it off with a pompom if you want to.
If you’d rather sew than knit or crochet, you could make a lightweight knitted hat by following the same steps using a rectangle of machine-made stretch knit fabric instead of a hand-knitted or crocheted rectangle of fabric.
When you’re hand sewing an even basting stitch on fabric, you aim for stitches sewn in equal measurements of about 1/4″ on both the right side and the wrong side of the fabric. When you’re doing a basting stitch for a knitting or crochet project, your stitches will be much wider than 1/4″ each.
Uneven Basting

There are multiple reasons you might want to use an uneven basting stitch. A couple of the most common uses are marking stitch lines and holding pleats. To sew uneven basting stitches, you typically alternate 1/2″ stitches on one side of the fabric and 1/4″ stitches on the other side.
Thread Tracing, Also Known as Tailor Basting”
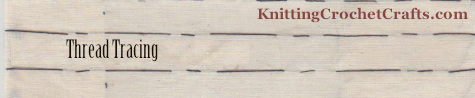
You might want to use thread tracing for making the grain lines on your fabric and making them visible. My sewing instructor recommended doing this before you cut your pattern pieces out; it gives you a visible indication of where your fabric’s grain line is. Fashion industry professionals typically do thread tracing in a pattern as follows: 1″ stitch, 1/4″ stitch, 1/4″ stitch, 1/4″ stitch, repeat.
Full Backstitch, Otherwise Known Simply as “Backstitch”

Backstitch is one of the most frequently used hand sewing stitches. It’s useful for multiple purposes:
- Sewing seams on clothes or other projects
- Using decoratively on cross stitch and embroidery projects
- Making repairs
Fashion industry professionals use backstitch for making quick repairs and for beginning and ending rows of permanent hand-sewn stitches. You might hear them refer to this as “full backstitch” to differentiate this version of the stitch from the similar “half backstitch”, which is explained below.
Half Backstitch

The half backstitch is best used decoratively. For example, you might want to use it around the edges of a suit jacket collar or tailored blouse, especially if you are adding other embroidered details to the collar. You can also incorporate this stitch into cross stitch and embroidery projects.
Overcast stitch
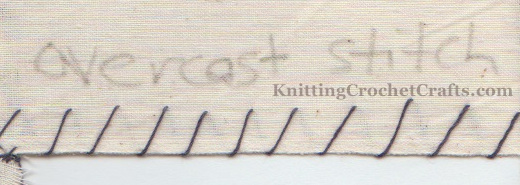
You can use this stitch for enclosing or finishing off raw edges on your fabric or along seamed edges.
Back tack
This is a backward stitch you can use to anchor tacking or basting.
Buttonhole Stitch / Blanket Stitch

This stitch is both practical and decorative. You can use it for reinforcing buttonholes and attempting to prevent cut fabrics from unraveling (as you can see from my sample, it isn’t necessarily going to be totally effective at keeping a fabric from unraveling if that fabric is loosely woven and prone to unraveling. That said, it beats leaving a raw edge totally unfinished).
Consider using this stitch to finish unhemmed edges around blankets or other projects; I only recommend this in cases where you’re working with a fabric that isn’t likely to fray much (think Ultrasuede or other fabrics of that ilk.) You can also use it around the edges of knitted or crocheted blankets. This stitch is also suitable for use in cross stitch and embroidery projects.
Catch Stitch / Blind Hem Stitch
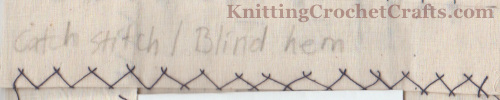
This flat-looped stitch is my favorite stitch to use for hemming pants, skirts and dresses. I think it’s absolutely the best choice of stitches to use when you want to hem pants or other garments made out of stretch fabrics, because it offers a lot of “give”. I even prefer this hem to machine-sewn hems, because I find it easier to make a catch-stitch hem look flawless.
In the picture here, you can see how the catch stitch stitch looks on the wrong side of the fabric. On the right side of the fabric, this stitch is invisible if you do it correctly.
Chain Stitch
This is a multipurpose stitch you can use in multiple ways:
- It can be functional; it’s useful for sewing seams on certain projects.
- It can be decorative; this stitch frequently makes appearances in embroidery projects. You can use it to make outlines, plant stems, and things like that. This stitch is easily incorporated into all kinds of other interesting imagery.
- I use the chain stitch frequently in projects where you want to adhere a bit of crochet to a machine-made fabric. For example, you can take a kitchen dishcloth and sew a row of chain stitch along the lower edge; then you have a handy spot to use for crocheting an edging along the lower edge of the towel. You could also do this along the top edges of sheets or around the outer edges of pillowcases. It’s a LOT easier to do this than it is to poke your crochet hook through the fabric in the spot where you want to work your edgings. The hand-sewn chain stitch looks identical to, and is functionally similar to, surface crochet slip stitch, which you could also use for exactly the same purposes. On machine-sewn fabric, I find it far easier to use needle and thread to do this than it is to use a crochet hook.
Cross-Stitch
When you think of cross stitch, you probably think of colored cross-stitched embroidery projects like samplers that crafters often work on aida fabric. However, you can also use cross-stitch to sew sturdy seams.
Darning stitch
This is the ideal stitch to use for repairing holes or worn areas in socks or all kinds of other textiles.
Pad stitch
You can use this stitch for securing two or more layers of fabric together.
Pick stitch
When you sew this stitch, you catch only a few threads on the wrong side of the fabric. It’s ideally used for hemming pants, shorts, skirts, dresses and other garments.
Running stitch
This is a useful hand stitch that’s ideal for sewing seams and gathering fabrics for ruffles or easing sleeves.
Slip stitch, Also Known as Tailor’s Hem Stitch
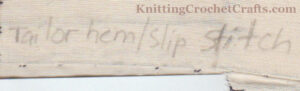
Hand Sewing Stitches: Tailor Hem / Slip Stitch
This is a variation of blind stitch you can use for fastening two pieces of fabric together from the right side without your thread being visible.
Straight stitch
This is the basic stitch in hand-sewing and embroidery.
Tent stitch
You work this diagonal embroidery stitch at a 45-degree angle.
Topstitch
Use a topstitch around necklines or hems at times when you want to create a crisply finished edge. You can also use this stitch to help facings stay in place so they don’t wander around and look pathetic.
Whipstitch
Whipstitch is useful for a variety of purposes. You can use it to protect fabric edges, and you can also use it to sew pieces together. This is one of my most frequently used hand sewing stitches for crochet; I use it to sew granny squares together and stitch bunches of other pieces together. Here are a few quick pictures of whip stitch in action on crochet projects:
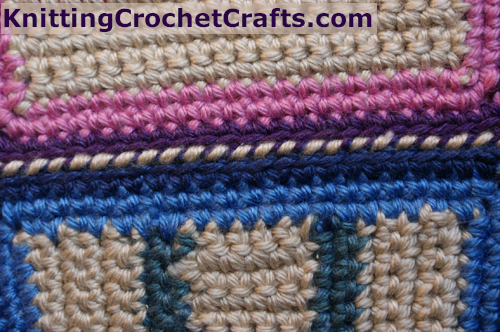
Color Blocked Afghan Squares Joined With Whip Stitch
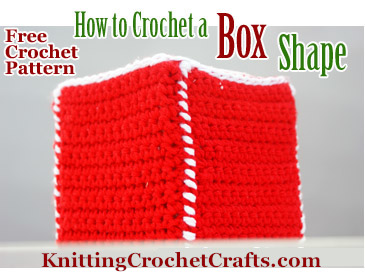
I used whip stitch for sewing the seams on this crocheted box shape. See the white stitches at the corner of the box? Those are whip stitches. Learn How to Join Crocheted Granny Squares With Whip Stitch to Make a Blanket or Other Project
Ladder stitch or mattress stitch
You can use this stitch for invisibly closing seams from the outside. For example, after you stuff a pillow or a child’s plush toy, you could sew a ladder stitch seam to close it up.
So there you have it: Those are the most important hand sewing stitches you need to know about. We hope you enjoyed this guide to hand sewing stitches, and that you found all the photos and instructions useful.
0ver to Y0u:
Did you find the answers to your questions about hand sewing stitches on this page? If not, please drop me a comment and let me know what your questions are. If I know the answers, I’ll help you to the best of my ability.
If you found this page helpful, I invite you to return to this site often for more craft tutorials, project ideas and inspiration! You can make sure you keep this site on your radar by signing up for my newsletter and community at Substack. .
Basic subscriptions are free; I send out regular newsletters to let my subscribers know about new craft articles and tutorials as they are posted. I also share details about the craft projects I’m working on, and invite my readers to share their projects, too. So there is no need to feel like it’s just you, crafting all alone at home. I’d love to have you join us! You’re invited!!
By Amy Solovay
Please Visit My Ko-Fi Shop HERE to Find My Sample Sale, Destash Sale and Digital PDF Pattern Downloads for Sale.
About the Author:

Amy Solovay
Amy Solovay is a real, live, human content creator and educator who holds a Bachelor of Arts degree in mathematics from Sweet Briar College; she has also earned a separate Associate of Arts degree in textile design from FIDM LA (The Fashion Institute of Design and Merchandising, Los Angeles). She is NOT a robot and does not use artificial intelligence (AI) to write book reviews or articles for this website.
Amy learned to sew as a child in 4-H club, and she still enjoys sewing and stitching all these years later.

I’m excited about this book, Delicate Crochet by Sharon Hernes Silverman! ! I am super proud of the 2 patterns I contributed to this pattern collection. I hope you’ll check out the fingerless gloves and the beaded necklace I designed for this book. Thanks for taking a look at them!
As an educator, Amy Solovay used to teach in-person college courses in trend forecasting, marketing and surface design at California Design College in Los Angeles.
Nowadays, Amy uses online platforms to teach digital courses to craft pattern designers, content creators and influencers all over the world.
This page was last updated on 10-16-2024.