There are many reasons you might want to make jewelry using freshwater pearls. They are affordable but lovely, and they are broadly available at craft stores and online. Their neutral colors almost guarantee they’ll work well into most ladies’ wardrobes, and they have classic appeal that’s not likely to go out of style any time soon.
Would you be interested in making a necklace out of lovely freshwater pearls? If so, there are many different techniques you could use to accomplish this goal — and many possible outcomes.
Did you realize that you could crochet your pearl necklace? Crochet might not be the first technique you think of when it comes to jewelry making, but these days crochet is a trendy technique for making many different sorts of projects — jewelry included.
Wire crochet is also an ideal technique for using with freshwater pearls. Their not-quite-perfectly-round-ness coordinates well with crochet stitches worked in wire, which can also have a charming but not-quite-perfectly-even quality.
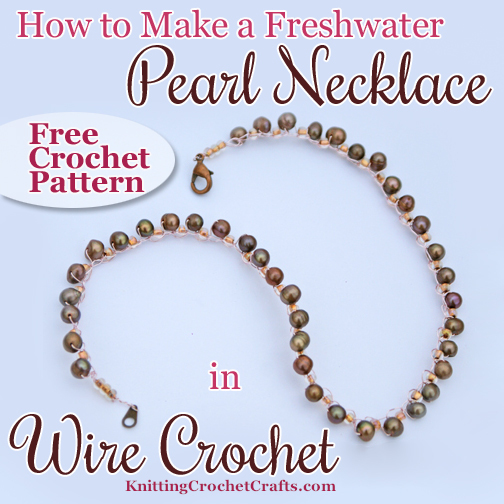
There are zillions of different ways you could crochet a necklace with these supplies. I decided to go with an ultra-simple, classic choker design that I thought would be easy to share online.
I was so enthralled with this idea that I decided to crochet the design several times, changing out the wire colors to see which one would turn out nicer. I love them all.
If this is an idea you’d like to explore further, I invite you to give it a try. Here’s how:
Step 1: Gather Your Supplies:
You’ll need all the following items to crochet this necklace:
- Several strands of freshwater pearl beads
- 6/0 Czech glass seed beads
- crochet hook in a size that you find comfortable for wire crochet. My preferred hook for this project was a size B / 2.25 mm in aluminum, but I found that it bent slightly as I crocheted. This wasn’t a big deal, as I have no particular attachment to the hook. I think it’s a good idea for you to choose a hook that you don’t have any particular attachment to, in case yours bends like mine did — or even breaks. In any case, you may have better results with a different size crochet hook, so feel free to make practice samples and experiment a bit to see which hook is most comfortable for you with this sort of project.
- Jewelry findings to use as a closure — perhaps a lobster claw clasp or similar closure.
- Wire cutters are optional. They’re helpful to have, and I do have a pair that I enjoy using for wire crochet and jewelry making — but I’ve also had success cutting the wire with a sturdy pair of scissors.
Update: I didn’t know about crimp beads at the time I originally designed this necklace. In hindsight, I should have used them in this project to protect the wearer of the necklace against accidentally getting poked by sharp ends of wire. Consider adding them to your supply list for this and all future wire crochet projects you make.
Step 2: It’s Bead Stringing Time:
Your next goal is to gently unwind enough wire, without bending or twisting it, to enable you to get your beads strung onto it. Begin by placing a freshwater pearl onto the wire, then a seed bead, then another freshwater pearl, then another seed bead, and so on. Continue alternating the beads until you’ve strung more than you think you’ll need.
After you’re finished stringing the beads, examine the work carefully to be sure you’ve strung them in the correct sequence. Once you start crocheting, it will be difficult, or perhaps impossible, to fix any bead stringing errors you have made.
Step 3: Crochet the Necklace:
Begin by making a slip knot on your hook using the wire. Leave a long tail of wire at the beginning, at least 4 inches long, preferably longer.
To crochet this necklace, you’re going to work modified chain stitches that each include beads. Here’s how to do it:
Grab the closest bead — it should be a freshwater pearl bead — and push it along the wire until it rests right next to your slip knot. Now complete your chain stitch: reach around the bead, grab the wire with your crochet hook, and pull a loop of wire through. If you did all this right, the bead will be trapped inside your stitch.
Grab the next bead, which should be a seed bead, and push it along the wire until it’s resting right up against your work. Then grab the wire with your crochet hook and pull a loop of wire through.
Work the rest of the beads the same way, continuing until your beaded chain is slightly shorter than the length you want your finished necklace to be — keeping in mind that you do still have to add a few more beads plus the closure. My sample necklace measures about 16 inches total, when counting the closure in the final measurement.
When your beaded chain is the right size, end off, leaving a long enough tail of wire for several more beads plus the closure. Feel free to make yours a different length.
Step 4: Finish the Necklace:
String 3 more seed beads onto the wire from each end.
Attach your closure to the necklace. I accomplished this by placing one part of the closure on one side of the necklace, and the other part on the other side; then twisting the wire onto itself and hiding the ends of wire inside the closest beads.
Step 5: Flaunt That Gorgeous Jewelry!
If you completed all the above steps, you hopefully have a lovely necklace in hand. It’s time to accessorize — or perhaps it’s time to giftwrap it, if you’re giving it as a gift.
Be sure to share pictures with us! We’d love to see how your necklaces turn out.
Thanks for checking out this crochet project. I appreciate your interest!
I invite you to return to this site often for more craft tutorials, project ideas and inspiration! You can make sure you keep this site on your radar by signing up for my newsletter and community at Substack. .
Basic subscriptions are free; I send out regular newsletters to let my subscribers know about new craft articles and tutorials as they are posted. I also share details about the craft projects I’m working on, and invite my readers to share their projects, too. So there is no need to feel like it’s just you, crafting all alone at home. I’d love to have you join us! You’re invited!!
By Amy Solovay
Please Visit My Ko-Fi Shop HERE to Find My Sample Sale, Destash Sale and Digital PDF Pattern Downloads for Sale.
Please Visit My Ravelry Store HERE to Find Digital PDF Pattern Downloads for Sale.
About the Author:

Amy Solovay is a real, live, human content creator and educator who holds an Associate of Arts degree in Textile Design from FIDM LA (The Fashion Institute of Design and Merchandising, Los Angeles) and a Bachelor of Arts degree in mathematics from Sweet Briar College. She is NOT a robot and does not use artificial intelligence (AI) to write book reviews or articles for this website.
Amy learned to crochet as a small child, and she still enjoys crocheting all these years later.

As an educator, Amy Solovay used to teach in-person college courses in trend forecasting, marketing and surface design at California Design College in Los Angeles. Nowadays she uses online platforms for sharing her knowledge about textiles, crafts, current color trends and current design trends.
Check Out More Jewelry Making Ideas, Instructions and Projects:
More Wire Crochet Projects to Try:
- All About Wire Crochet
- How to Wire Crochet With Beads — Free Tutorial
- Wire Lace Cuff Bracelet — Free Crochet Pattern
- Free Instructions for How to Make a Cotton Candy Necklace
- Free Instructions for How to Make a Rose Chip Bead Necklace in Wire Crochet
Find More Stylish Beadwork Ideas
- Check Out Our Picks for the Best Beadwork Books
- Beaded Gadget Cozy — Free Crochet Pattern
- Visit Our Main Directory of Beadwork Projects and Ideas
More Craft Pages You Might Enjoy:
- Knitting
- Knitting Supplies
- Lace Knitting
- Cable Knitting
- Knitting Techniques
- Knitting Yarn
- Quilting
- Sewing
- Sewing Appliques
- Birthday Crafts
- Paper Crafts
- Fine Art
Find More Craft Project Ideas HERE!
This page was last updated on 11-9-2025. Thanks for visiting!