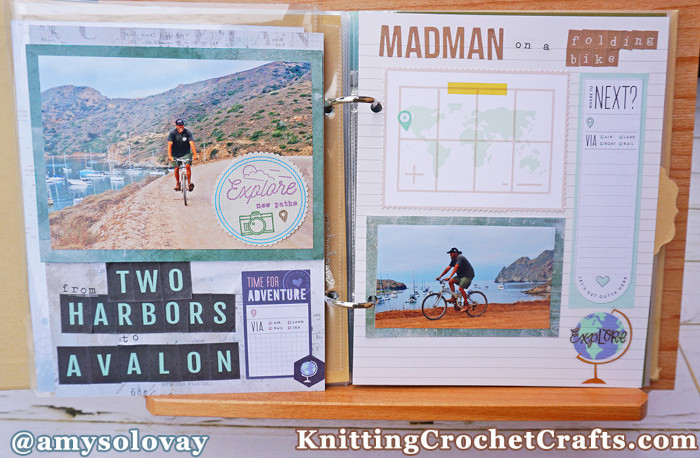
Biking at Catalina Island: Madman on a Folding Bike 6×8 Scrapbooking Layout by Amy Solovay
My husband, Mike, and I used to be liveaboard cruising sailors. Our claim to fame: We crossed the Atlantic Ocean and the Mediterranean Sea in a 34′ sailboat together — just him and me.
In our early days as liveaboards, our vessel was a 24′ vintage wooden sailboat called Typhoon. She was the perfect vessel for cruising the California coast. We spent about three years exploring California’s waters aboard Typhoon, and Catalina Island was one of our favorite destinations.
Long before Mike was a sailor, he was a mountain biker. Cycling is his sport of choice, and in particular, he enjoys mountain biking. Shortly before we moved aboard Typhoon, Mike told me he was selling his mountain bike and buying us folding bikes. I had a hard time comprehending that, because Mike without a mountain bike is like Thor with a shaved, bald head. But Mike made the decision to get folding bikes because there wasn’t any easy way to store full-sized mountain bikes aboard Typhoon.
There were bunches of times we sailed out to Catalina Island and found that real mountain bikes would have been super useful to have. We’d be anchored, with bow and stern anchors set, and we didn’t want to pull them up or give up our spot in the anchorage to go get mail or groceries or whatever. So Mike, being Mike, decided he’d ride his bike from wherever we were to wherever it was we needed him to go — never mind that the terrain in between Two Harbors and Avalon is gnarly.
If you were to ride a bike across Catalina Island, you’d want it to be a mountain bike, not a junky folding bike. But Mike didn’t let that stop him. He is the guy who rode a folding bike from Two Harbors to Avalon and back bunches of times. And frequently, he then rode back to our anchorage with a backpack full of groceries on his back. Once when he was in transit, he even got chased by an angry bison.
I usually stayed aboard the boat and crocheted while Mike went on those solo adventures. I don’t remember taking these photos of him, but I guess there must have been at least one time I went ashore with him AND the bike AND the camera. It might not seem like a big deal, but rowing anything ashore in those days was a pain in the neck. Looking back at these photos, I marvel that there was a day when we motivated to get both a bike and a camera ashore at the same time in our 5’ sailing dinghy. I am glad we did, because now I am working on scrapbooking our adventures.
Want to make your own scrapbooking layout similar to this one? If so, you’re invited to check out the following list of supplies, but these exact items aren’t strictly necessary. You could use similar supplies if you have them.
Craft Supplies Needed for Making This 6″x8″ Scrapbooking Layout:
- Patterned Papers: My background paper on the left-hand side of this double-page spread is from 49 and Market’s Serenity collection. I also used patterned paper from their Vintage Artistry Shore 6″x6″ paper collection.
On the right-hand side, the background paper is one of the Sn@p! pages that comes with the Sn@p! binders by Simple Stories. The map is from a Pinkfresh Studio patterned paper collection called “Office Hours;” this design has been discontinued, but there are lots of places you can obtain similar map papers or stamps. One you could take a look at is the Map patterned paper by Maggie Holmes, from the Round Trip collection. There are bunches of other possibilities. - Alphabet Letters for the Page Titles: There are multiple ways you could create your page titles for a layout like this one. I used letter stickers from 3 different places: the Simple Vintage Seas sticker book by Simple Stories; one of the Color Vibes sticker books, also from Simple Stories; and from a travel-themed sticker book by The Happy Planner / Me & My Big Ideas. It’s also possible to stamp your page titles, die cut them or do them digitally, so please do not feel obligated to buy any of these sticker books. If you’ve been crafting for awhile, I suggest looking through your craft supplies stash and using letter stickers, stamps or dies you already have on hand.
- Journaling Blocks: You can get journaling blocks from multiple sources — or, if you’re feeling ambitious, you could make your own journaling blocks. I used ready-made journaling stickers by Happy Planner.
Thanks so much for taking a look at my project. I appreciate your interest!