Basic Beginner’s Half Double Crochet Placemat Pattern: This Placemat Pattern Is Easy Enough for Beginners to Crochet
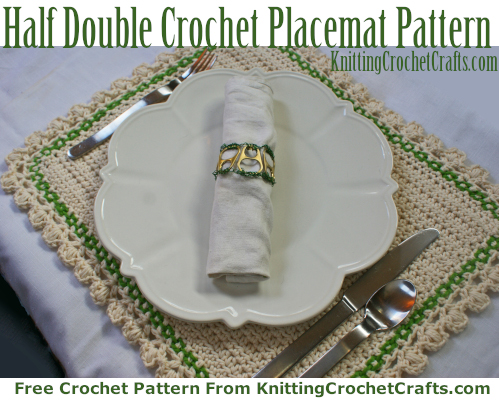
This basic crochet placemat is a versatile design that can be adapted to look right at home in any kitchen, dining room or picnic area. Pictured here, you see the placemat used as part of a table setting with a green theme, both in color and in the eco-friendly sense of the word “green.” I’ve crocheted the placemat using organic cotton yarn and finished it using a beautiful scalloped crochet lace edging.
To accessorize the placemat in this particular table setting, I’ve chosen a vintage cloth napkin and an upcycled pull tab napkin ring. The napkin ring pattern is also available on our website, so if you like this look, I invite you to make a set of these for your own table.
At first glance, if this look isn’t quite what you have in mind for your own table settings, please be aware that there are many different ways you can style this placemat. Here you can see several more options:
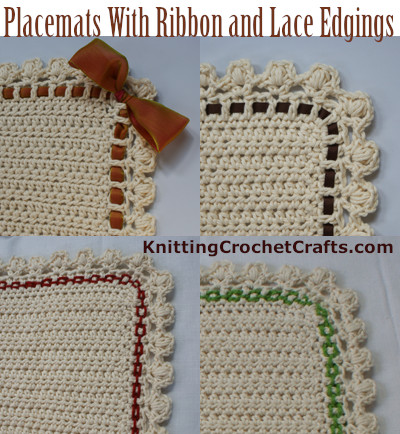
There are infinite other variations you could create beyond just those. If you take a look at the examples and then put your imagination to work, I’m betting you can come up with a look that’s suitable for your environment.
Choosing a different edging changes the character of the placemat completely. The same can be said of omitting the edging.
![]()
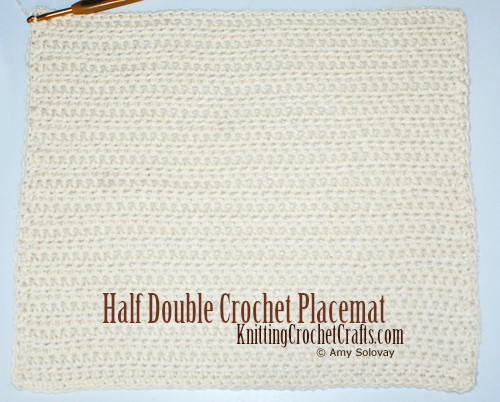
Crochet Skill Level: This basic placemat is easy enough for total beginners to crochet; if you haven’t yet learned the half double crochet stitch, this pattern offers you a fantastic opportunity to learn the stitch and practice it. If you have already learned how to half double crochet, this pattern will be really easy for you.
Supplies You’ll Need to Make a Half Double Crochet Placemat:
- Yarn: You’ll need worsted weight cotton yarn for this project. I used one ball of Knitpicks Simply Cotton worsted to crochet the sample placemat with only the basic single crochet edging. This yarn has about 164 yards per ball. I do recommend this yarn, as it is delightful to work with, but please feel free to substitute yarns if you like.
It’s possible that perhaps you might like to add a fancier edging in addition to the basic single crochet edging. If so, depending on the edging you choose, you are likely to need more than one ball of yarn to complete the project. Also, if you make your placemat larger than my project sample, you are likely to need at least one more ball of yarn in order to avoid running out. - Crochet Hook: Size H / 5.0 mm or size needed to obtain the correct gauge.
- Tapestry Needle: A tapestry needle is optional, but it is helpful for weaving in ends when you are finished crocheting your project.
Crochet Abbreviations List for This Pattern:
- beg = beginning
- ch = chain
- hdc = half double crochet
- rep = repeat
- rnd = round
- sc = single crochet
- sl st = slip stitch
- st = stitch
Finished Size: Before laundering or adding any edging, the main body of the placemat measures 14 inches wide by 12 inches tall. After adding the basic single crochet edging, the placemat measures about 14.5 inches by 12.5 inches.
If you use the suggested yarn for crocheting this placemat, please be aware that some shrinkage is likely to occur. This is always a possibility with cotton yarn. If you don’t know what to expect from the yarn you’re working with, you might wish to crochet a small swatch, measure it and then launder it to see how much it will shrink. This will help you to know what sort of shrinkage you’re likely to encounter the first time you launder the finished placemats.
If you add another edging in addition to the basic single crochet edging, the final dimensions will increase accordingly.
Gauge: Working in hdc, 3 sts = 1 inch. Please be sure to check your gauge; I recommend matching this gauge to ensure that your placemats will turn out to be the correct size.
Design Notes: Your turning chain always counts as the first st in the row.
My sample placemat is small; it’s about the right size for serving a sandwich on a TV tray, or a soup and salad type meal on a small, intimate table.
If you’d like to make a larger placemat, simply increase the number of chain stitches in your starting chain; for every inch you want to make it larger, just add 3 chains onto the starting chain.
How to Crochet the Placemat:
Crochet your starting chain – 43 sts if you want a small placemat, or more sts if you want a larger placemat. Be sure to chain loosely.
Row 1: hdc in 3rd ch from hook, and in ea chain st across the row.
ch 2, turn.
Rows 2 and Up: Work in hdc until the piece measures 12 inches or the dimension you want it to be. There are 30 rows total in my sample placemat, but keep in mind that you might need a different number of rows depending on your desired measurement and your individual way of crocheting.
Basic Single Crochet Edging:
Rnd 1: ch 1, then proceed working sc all the way around the placemat as follows:
- Work 30 evenly spaced sc sts down the side of the placemat. If you’re right-handed, this will be the left-hand side of the placemat; if you’re left-handed, it will probably be the right-hand side of the placemat.
- ch 2 to turn the corner.
- Work 42 sc sts across the lower edge of the placemat.
- ch 2 to turn the corner.
- Work 30 sc sts up the other side of the placemat.
- ch 2 to turn the corner.
- Work 42 sc sts across the upper edge of the placemat.
- ch 2 and join the work to the beg of the rnd with a sl st.
- If you don’t want to work an additional edging, end off now. If you want to add a fancier edging, do not end off. Work the additional edging and then proceed to the steps listed under “finishing” below.
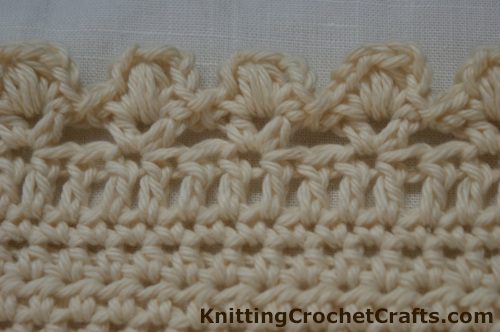
Here’s a picture of the first edging I tried using to finish off the half double crochet placemat. This edging is similar to the scalloped puff stitch edging that I used on this puff lace dishcloth. There’s one significant difference, and that is, in this version there’s an extra round of double crochet.
Scalloped Crochet Lace Edging Pattern for Placemat (Or any Square / Rectangular Project)
Skill Level: Easy
Crochet Abbreviations List for This Pattern:
- beg = beginning
- ch = chain
- ch-2 space = chain-2 space, meaning the space created when you crocheted 2 chain stitches in the row below
- dc = double crochet
- ea = each
- hdc = half double crochet
- hdc v st = half double crochet v stitch; see special stitches below for instructions
- sc = single crochet
- sl st = slip stitch
- st = stitch
Special Stitch: The Puff Stitch There are different ways to crochet a puff stitch. In this pattern, you’ll be using the following puff stitch instructions:
- Wrap the yarn over your crochet hook.
- Insert the hook into the next stitch to be worked.
- Wrap the yarn over your crochet hook again and pull up a loop. (3 loops on hook.)
- Do not complete the stitch. Instead, wrap the yarn over your crochet hook another time.
- Insert the hook into the same spot again.
- Wrap the yarn over your crochet hook again and pull up a loop. (5 loops on hook.)
- You still don’t want to complete the stitch yet. Instead, wrap the yarn over your hook another time.
- Insert the hook into the same spot again.
- Wrap the yarn over your crochet hook again and pull up a loop.
- Count the loops on your hook. If you have 7 of them, it’s finally time to complete the stitch. If you don’t have 7 loops total, something went wrong somewhere and it’s time to start over.
- To complete the stitch, wrap the yarn over your hook and carefully pull it through all 7 loops on your hook.
- Chain 1 to close the stitch.
Special Stitch: The Half Double Crochet V-Stitch (abbreviated “hdc v st”.) There are different ways to crochet a v-stitch. In this edging pattern, you’ll be using the following v-stitch instructions:
- hdc in next st to be worked.
- ch 1.
- hdc in same st to complete the v.
Design Notes: This edging is a multiple of 3 stitches, not counting the corners.
If you made any size adjustments to the placemat pattern, you may need to increase or decrease a bit on each side to ensure that you have a stitch count that’s divisible by 3. You can do this at any point before starting round 3.
In some of the pictures you’ll see in this series, I accidentally worked a modified version of the scalloped puff lace edging pattern, where round three turned out a bit different than it should have. Instead of following the pattern as written, I only repeated the series of instructions in between brackets, all the way around.
In theory, if you do this too, the math should still work out OK, although the corners on my mats did not turn out to be as nice as one would hope. I prefer the pattern as written. Having tried it both ways, I think the original version as written makes nicer corners than my accidental / modified version — although in the end of course you are welcome and encouraged to use whichever idea suits you better.
How to Crochet the Scalloped Lace Edging:
Rnd 1: If you already worked single crochet around the outer edge of your placemat as specified in the placemat pattern, then round 1 of your edging has already been completed. If you’re working a different project, round 1 will be a round of sc st all the way around the outer edge. When you get to a corner, ch 2, then resume working sc.
Rnd 2: Ch 3. dc all the way around. When you get to a corner: put 3 dc in ea ch-2 space in the corners. Then continue working dc. Sl st to join the work to the beg of the round.
Rnd 3: ch 3, skip next st, [hdc v st in next st, ch 1, skip next 2 sts.] Rep the sequence in brackets across the row. At the end of the side you are working, after your last hdc v st, work the corner as follows: ch 1. Locate the 2nd (the middle) dc st in the series of 3 dc sts you worked in the corner of the previous row. Skip any remaining stitches, and work 3 hdc sts in that middle dc st in the corner. ch 1, skip next 2 sts, then rep the sequence in brackets until you get to the next corner. Continue working in this manner all the way around. In the last corner, you only need to work 1 hdc st and then a ch st. Then sl st to join this to the beg of the round. You’ll want to work the sl st in the 2nd ch st you worked at the beg of the round. Think of those first 2 ch sts in the round as a hdc st, so when you work your last hdc and then ch, the sl st joins to a hdc to complete another hdc v st.
Rnd 4: In each v-stitch, work the following sequence: [sc, ch 2, puff stitch, chain 2, single crochet.] Then sl st in ea space between v-stitches.
Rnd 4 Corner Instructions: In the corners: sl st in next sp. In the row below, there are 3 hdc sts in ea corner. Sc in first hdc. In next hdc: sc, ch 2, puff stitch, ch 2, sc. Sc in next hdc. Sl st in next space.
Continue working in this manner all the way around.
End off.
Finishing:
Block if desired.
If you want to make a set of placemats, repeat these instructions as many times as necessary to complete the set.
Use and enjoy!
If you found this page helpful, I invite you to return to this site often for more crochet patterns, home decor projects, craft tutorials, project ideas and inspiration! You can make sure you keep this site on your radar by signing up for my newsletter and community at Substack. .
Basic subscriptions are free; I send out regular newsletters to let my subscribers know about new craft articles and tutorials as they are posted. I also share details about the craft projects I’m working on, and invite my readers to share their projects, too. So there is no need to feel like it’s just you, crafting all alone at home. I’d love to have you join us! You’re invited!!
By Amy Solovay
Please Visit My Ko-Fi Shop HERE to Find My Sample Sale, Destash Sale and Digital PDF Pattern Downloads for Sale.
Please Visit My Ravelry Store HERE to Find Digital PDF Pattern Downloads for Sale.
About the Author:

Amy Solovay is a real, live, human content creator and educator who holds a Bachelor of Arts degree in mathematics from Sweet Briar College; she has also earned a separate Associate of Arts degree in textile design from FIDM LA (The Fashion Institute of Design and Merchandising, Los Angeles). She is NOT a robot and does not use artificial intelligence (AI) to write book reviews or articles for this website.
Amy learned to crochet as a small child, and she still enjoys crocheting all these years later.

As an educator, Amy Solovay used to teach in-person college courses in trend forecasting, marketing and surface design at California Design College in Los Angeles.
Nowadays, she uses a variety of online platforms for sharing her knowledge with other crafters.
Find More Ideas for Setting a Lovely Table:
- Easy DIY Ribbon Napkin Rings
- 6 Ways to Make Napkin Rings
- Crochet Wire Napkin Rings — Free Pattern
- Beaded Christmas Napkin Rings (Free Crochet Pattern)
More Crochet Pages to Discover on Our Website
- Crochet Books
- Best Crochet Books for Beginners
- How to Crochet for Total Beginners
- Best Crochet Patterns for the Home
- Free Crochet Tutorials
- Learn Crochet Stitches
- Free Half Double Crochet Dishcloth Pattern for Beginners
- Easy Crochet Neck Warmer Pattern for Beginners
- Puff Lace Crochet Stitch With Half Double Crochet Vs
Find Our Main Directory of Craft Project Ideas HERE!
This page was last updated on 11-2-2024.