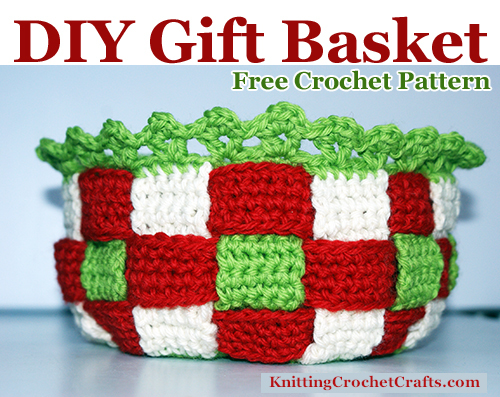
Crochet This Beautiful Gift Basket; Then Fill It With Candy, Gourmet Treats or Gifts
Many crafters enjoy designing and creating exactly the gifts we want to give — personalized gifts made with passion, insight, creativity and integrity.
This pattern was designed especially for those of you who might like to give gift baskets to any of the recipients on your gift list. The basket is an interesting project to crochet, and the result is a unique container that you can personalize in many ways.
See More About: Basket Patterns | Holidays and Special Occasions
I wish I had made my sample basket in a more versatile color combination — perhaps using brown or tan yarn. There are many possibilities for what you could do with it. You could gather small gourds and pumpkins into it to make a beautiful fall display for a table or shelf. It could become an everyday basket, or maybe a scrap basket that you could put in your crafting space to hold your yarn or fabric scraps.
As a gift basket, there are many ways you could use it:
- Fill it with yummy organic fruit: apples, pears, oranges, tangerines — an appropriate gift for pretty much anyone on your gift list.
- Fill it with home-spa goodies such as soaps, lotions and handmade washcloths — again, this is a great give-to-anyone idea. If your gift is for a guy, be sure to choose guy-friendly colors and scents for the goodies inside.
- Fill it with headbands and pretty hair accessories to give to a teenage girl.
- Fill it with cute amigurumi or small toys for any of the kids on your list.
- Fill it with yarn, fabric or craft supplies for a fellow crafter.
- I am sure you can think of plenty of other creative ideas that are customized specifically for the recipient you want to give a gift basket to.
Skill Level: Experienced. Most of the actual crochet work in this project isn’t difficult, but putting everything together is challenging. The finishing, especially, requires both patience and expertise. Therefore I recommend this project for experienced crafters.
This is definitely not a beginner-level crochet project, and it would not make a good first project. Otherwise, if you are are relatively new to crochet but you know your basic crochet stitches and you have extensive hands-on craft experience in other areas, I think you could succeed with this project if you’re determined to do so.
Craft Supply List:
Yarn: To crochet this basket as shown, you’ll need three colors of worsted weight yarn:
- Color A: The main color. In my basket, this color is green Cascade 220 wool.
- Color B: Accent color #1. In my basket, this color is an off-white. It is also Cascade 220
wool. - Color C: Accent color #2: In my basket, this color is red. I used Patons Classic Wool yarn for this.
It’s not necessary to use three different yarn colors; I think this basket would also be pretty if crocheted in one or two colors. If you want to make it a solid color, just ignore any mention of color changes in the pattern.
If you want to do two colors,I suggest making the bottom of the basket plus the warp pieces all one color, and making the weft pieces the other color.
Crochet Hook: I used a size I crochet hook to make the sample basket.
Other: In hindsight, I think perhaps a tapestry needle, safety pins / stitch holders, and straight pins or t-pins could be helpful for finishing this project — although I did not use any of the above when I made my sample basket.
Crochet Abbreviations Used in This Pattern:
- beg = beginning
- ch = chain
- dc = double crochet
- ea = each
- hdc = half double crochet
- hdc v-st – half double crochet v stitch. Work a half double crochet, then a chain stitch, then another half double crochet in the same stitch.
- rep = repeat
- sc = single crochet
- sl st = slip stitch
- st = stitch
- Brackets like these [ ] denote a set of instructions to be repeated. Repeat the sequence inside the brackets the specified number of times.
Design Notes:
For lack of better terminology to use, I’m going to use weaver’s terminology in this pattern to refer to the woven parts of the basket. I’m calling the vertical woven parts the “warp” and the horizontal woven parts the “weft.”
My sample basket is worked in 4 pieces: The warp pieces are attached to basket bottom, and there are three weft pieces that are each worked in the round as separate rings.
Try to crochet over your yarn ends and keep up with weaving in your loose ends as you work. If you don’t, you will have a nightmare of an end-weaving task to attend to at the end.
If you look closely at my work-in-progress photo, you might notice that my ends are shorter than the usual 6 inches I recommend leaving for end-weaving. I was a little stingier than usual with my ends because I was worried about running out of yarn, and also because I planned from the beginning to crochet over my ends rather than weaving them in later with a tapestry needle.
I used a little finishing trick to ease my mind over the security issues involved with short ends + crocheting overtop of them. As I worked, I used my hook to periodically weave the end through the uppermost loops at the top of several of the stitches I was about to work into, then I crocheted overtop of the woven-in ends.
Under ideal circumstances, I think it’s better to leave the usual 6 inches and weave in your ends in the usual way, but I think this alternative is also viable. I don’t expect this basket will need frequent laundering as a garment or blanket would. Also, I will have to hand wash this basket anyway to avoid felting, so it will receive gentle treatment and care.
If for some reason you expect your basket will be subjected to rough care and frequent laundering, you should not use feltable wool to crochet it; a superwash wool would be a better choice in that case. Also, you might want to consider leaving longer ends and weaving them in with a tapestry needle in the usual way.
Crochet Basket Instructions:
Basket Body and Warp Pieces:
Ch 6. sl st to form a ring.
Important Note: At the end of each round, sl st to join the end of the round to the beg, then ch 1 to get started on the next round.
Round 1: Work 16 dc in ring.
Round 2: [2 sc sts in next sc st, sc in next sc.] Rep the sequence in brackets all the way around for a total of 24 sc.
Round 3: [2 sc in next sc, 1 sc in ea of the next 2 sc.] Rep the sequence in brackets all the way around for a total of 32 sc.
Round 4: [2 sc in next sc, 1 sc in ea of the next 3 sc.] Rep the sequence in brackets all the way around for a total of 40 sc.
Round 5: [2 sc in next sc, 1 sc in ea of the next 4 sc.] Rep the sequence in brackets all the way around for a total of 48 sc.
Round 6: [2 sc in next sc, 1 sc in ea of the next 5 sc.] Rep the sequence in brackets all the way around for a total of 56 sc.
Round 7: [2 sc in next sc, 1 sc in ea of the next 6 sc.] Rep the sequence in brackets all the way around for a total of 64 sc.
Round 8: [2 sc in next sc, 1 sc in ea of the next 7 sc.] Rep the sequence in brackets all the way around for a total of 72 sc.
Round 9: [2 sc in next sc, 1 sc in ea of the next 8 sc.] Rep the sequence in brackets all the way around for a total of 80 sc.
Sl st to join the work to the beg of the round. Do not end off.
Basket Sides:
You will crochet each warp piece directly into the circle you just crocheted. You will work in rows and complete each piece separately, ending off after finishing each. If you’re making a basket in three colors as pictured, you will want to alternate the colors you use in each warp piece — colors A and B will alternate all the way around.
For the first warp piece, you can use yarn color A that is already attached. Just pick up your active loop and begin.
[Ch 1.
Work 12 rows of sc, with 1 ch st in between ea row for a turning ch.
End off. If you don’t plan to crochet overtop of your loose ends, you should weave this end in now.]
For the rest of the warp pieces, change colors and begin by making a slip knot on your hook. Then rep the sequence in between brackets with the new color. Work in this manner all the way around. You should have a total of 16 warp pieces when you are finished.
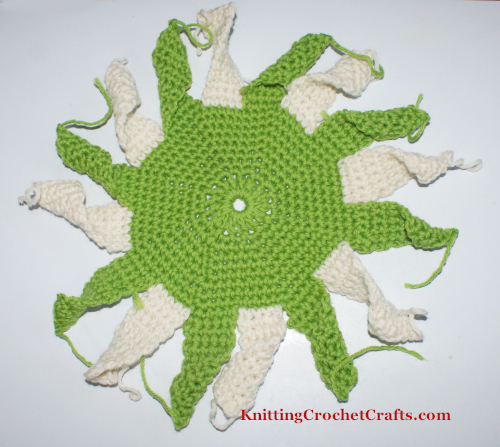
When you’ve completed this, you should have a piece that resembles my work-in-progress picture. It’s kind of like a circle with 16 spokes radiating outward.
Weft Pieces: Make 3 of These
ch 80. sl st to join, forming a ring. Be careful not to twist the chain. Work 4 rounds of sc st. Sl st to join ea round, then ch 1 between rounds.
Basket Assembly and Finishing:
If you want to block your basket, do so before proceeding further. I didn’t block the sample basket, although I think it would be an improvement if I had been able to. I share a tiny crafting space with several wool-loving cats. In the interest of keeping my projects out of harm’s way, I sometimes skip blocking things that ideally I would want to block otherwise.
Set the basket on your work surface with the outside (right side, the side that was facing you as you crocheted the basket center) facing down. Have your 3 weft pieces, your hook and a ball of yarn color A handy.
Decide whether you want color B or color C to be most visible on the outside sides of the basket. The other color will be more visible on the inside of the basket. On my basket, I wanted the white to be more visible on the outside, and the green to be more visible on the inside.
Grab a warp piece of the color that will be most visible on the outside and align one of your bands at the bottom of the basket, inside that warp piece. Take your second band and align it outside that warp piece, in the middle position. Take the third band and align it inside that warp piece at the top.
Grab your hook and ball of yarn color A. Leaving an appropriate amount of a yarn tail for end-weaving, make a slip knot on your hook and sc into the first sc stitch of that warp piece. If you’re right-handed, it will be the stitch that’s furthest right, and if you’re left-handed it will probably be the stitch that’s furthest left. Keeping your bands properly aligned, sc across the entire weft piece.
I didn’t do this, but you may wish to remove your crochet hook and put a safety pin or stitch holder into your active loop while aligning your weft bands with the next warp piece.
You might also wish to pin the pieces in place temporarily to keep them from moving around. I didn’t do this either, so it isn’t totally necessary, but you might find it helpful to do.
If
you’re right-handed, you want to grab the piece to the left of the one you just finished; if you’re left-handed, grab the one to the right of the one you just finished.
The bands will be aligned opposite the way they were for the first piece you aligned. This time you want the lower weft band to be aligned on the outside. The middle weft band will be aligned to the inside. The upper weft band will be aligned to the outside. Once they’re in place, crochet across the top of the warp piece, trying not to leave a gap between this piece and the last piece you worked.
Continue working this way, all the way around, aligning each warp and weft piece so that it forms a pattern with the others — alternating over, under, over, under, over, under, all the way around. Simultaneously, you’ll also be working a ring of sc st, using color A, all the way around the upper edge to hold everything together.
Increase by 1 sc st somewhere inconspicuous before you work your last sl st to join the end of the round to the beg. You need to do this in order to have the right number of sts available when you work the edging. When you’ve finished this process, you should have a total of 81 sc sts all together around the upper edge of the basket.
When you’ve finished, you might need to do a little tugging and manipulating to get the bands all evenly spaced and in the perfect position so they appear suitably basket-like.
Basket Edging:
Edging Round 1: ch 3; counts as 1 hdc and 1 ch st. This forms the first part of a hdc v-st. hdc in the same st to complete the hdc v-st. [ch 1, skip next 2 chs, hdc v-st in next st.] Rep the sequence in brackets all the way around. At the end of the round, work an additional ch then sl st to join the work to the 2nd ch in the round. Work 1 more sl st in the next hdc v-st. You should end up with a total of 27 hdc v-sts.
Edging Round 2: [In ea hdc v-st, work the following: sc, ch 1, hdc, ch 1, sc. Then sl st in ea space between hdc v-sts.] Rep the sequence in brackets all the way around. At the end of the round, work 1 extra sl st to secure the end of the round to the beg and end off.
Weave in all loose ends.
Fill the basket with goodies that you know the recipient will enjoy, and give it with love!
More Creative Handmade Gift Ideas
- Scarves Make Fantastic Gifts. Get Fantastic Knit and Crochet Patterns Here!
- Crocheted Jewelry Makes a Wonderful Gift.
- Blankets and Afghans Make Fantastic Gifts, Too.
- Knitted and Crocheted Accessories Can Make Lovely Gifts for Recipients You Know Well.
- Home Decor Items Can Also Be Amazing Gifts.
References:
This project is my own design, but inspiration for it came, in part, from multiple
sources.
When I was in pre-school, a creative teacher taught our class how to weave placemats out of paper. I was enthralled with this idea, and really never lost interest in it. The idea surfaces over and over again in my crafting in various places and at various times. While this basket is more sophisticated than the paper placemats I made as a child, the basic idea is the same: weave over, under, over, under, repeat.
I built on these ideas and learned more about weaving from a weaving class I took at the Fashion Institute of Design and Merchandising in Los Angeles, taught by Jackie Woo-Ross.
I was extremely inspired by an article about entrelac knitting published in the Winter ’91 -’92 issue of Vogue Knitting Magazine. One of my best friends in high school had a handknit entrelac sweater that I used to stare at for hours. This basket looks much like that sweater, only the basket is crocheted instead of knitted — and of course the compontents of this basket are actually woven, instead of mimicing the look of weaving, as entrelac knitting does.
Instead of designing this basket, I was originally planning to make Carol Ventura’s lovely tapestry basket as published in the book Simply Crochet by Robyn Chachula, published by Interweave Press, ISBN# 978-1-59668-298-6. I was unable to get the right gauge for the pattern and ran out of time for trying, so I ended up designing my own basket instead.
Get More Crochet Basket Patterns and Ideas:
There are bunches more beautiful basket patterns available online for you to use. Want to find more of them? If so, you’re invited to check out our main directory of basket patterns to knit and crochet.
Learn More About Crochet:
- Click here to find our picks for the best crochet books.
- Click here to find crochet stitch tutorials and instructions.
- Click here to learn more crochet techniques.
- Click HERE to Find Fabulous Yarn for Crochet and Knitting
- Click here to learn about crochet hooks.
- Click here to find my favorite crochet project bag.
Learn About Other Crafts: Knitting, Sewing, Quilting, Paper Crafts and More
- Click here to get updated on the latest craft supplies.
- Click here to learn about knitting.
- Click here to find our beginner’s guide to knitting needles.
- Click here to find outstanding craft project ideas.
Posted By: Amy Solovay
This page was last updated on 10-14-2025.