What Is Collage? Plus Free Step-By-Step Collage Art Instructions
Skill Level Requirements: Collage is suitable for everyone, even kids and total beginners to crafting.
Collage is easy. In fact, it’s one of the easiest art forms to master; it doesn’t require any special genius, or any special supplies (although both genius and special supplies are assets if you happen to have either. If you don’t, no worries, neither do most collage artists.)
Collage Is For Everyone: Kids, Pre-Teens, Teens and Adults
Collage is a kid-friendly art form. Anyone old enough to be trusted with glue and scissors can create a collage; in its simplest form, the instructions are only to glue one or more pieces of paper (or one or more items) to another.
(If you have some bored kids on your hands, check out this page on collage art for kids; and you might also find this page about kids’ crafts helpful, too.)
Yet collage is also an effective medium for adults to express their creativity.
Collage is simple, yet it can also be vast and complex. Entire books have been written about it, and I’m sure many more books will be written about it in the future.
Free Collage Art Instructions
On this page, I’ve compiled a list of collage art projects that you can make — along with free instructions you can use for making each project (if you want to.) You might prefer to just use these collages as inspiration, and to create your own designs instead of these. Either approach is totally fine!
Musings on the Supplies to Use for Collage
Before we get to the actual project list, I thought it might be a good idea to explain a few things to you about my methods for choosing and organizing supplies. For starters, I’ve created a list of more than 50 different materials to use in collage making. You probably already have plenty of fantastic ideas for things to use in your collages, but if you want a few more, this list will help.
In each of the project instructions below, I’ve given you specific instructions for how to make that particular collage. BUT if there’s one thing I really want you to learn from me on the topic of collage, it’s this: working on one collage at a time, in a linear fashion from start to finish, is really NOT the optimum way to do collage.
Yes, I know that probably sounds puzzling without any sort of further elaboration or explanation, so please let me elaborate.
A collage cannot and should not be compared to garments being mass-produced in an assembly line. Yet, I’ve noticed that there are actually similarities in these two processes — the creation of a collage, and the creation of a mass-produced garment.
What are the similarities? Well, both a collage and a garment are made out of other materials, and in each case, the materials are handled in a certain logical way. With the garment, the pieces are first cut out and then stitched together by machine. With a collage, the process can be similar; the pieces could first be cut out, and then glued (or perhaps stitched, or perhaps attached in some other manner.) The beauty of both collage and garment design is in the details; the materials you start with and the way that they are attached can make all the difference in the success or failure of either sort of item.
Additionally, a garment manufacturer does not go to the store and buy individual materials for each dress (s)he wants to make. No, (s)he purchases the fabrics and findings for many different styles of dresses, and many different dresses, all at once. Then these supplies are either used or organized for efficient future use.
In my experience, my collage-making is much more productive and successful if I approach my materials and supplies in the same way that the garment manufacturer does.
It’s obvious that most garment designers are designing their clothing out of textiles and fabric. There are certainly exceptions, but usually, fabric is the material of choice for clothing. Collage artists are able to select from a much wider variety of materials; every substance under the sun could conceivably be utilized in collage.
Let’s assume for a moment that we’re going to focus on collages made of paper. Even so, there are collage artists who create their work using a diverse range of papers. Some favor vintage photographs, vintage ephemera, and vintage papers. There are collage artists who make collages out of trendy magazines. There are even collage artists who make their collages completely out of trash.
In any case, the prolific collage artist will be better able to create art if (s)he begins by having a supply of these papers (or materials) on hand to work with — much like the garment manufacturer who begins by having a supply of fabric and notions on hand.
 Painted Paper for Using as the Background in a Collage
The Most Important Takeaway: In the collage instructions linked below, you’ll note that many of these projects begin with the instructions to “paint washes of color onto an X-inch square of paper.” While those are indeed accurate instructions for that specific collage pictured on the page, they really aren’t the best instructions overall for starting to approach the entire collage-making process.
In reality, what I have done to create each of these collages is this:
I’ve started with big piles of paper — some intact sheets, some scraps and bits left over from other projects. I apply interesting textures and effects and color washes and splatters and scribbles and inks to all of the papers. Usually, these are all-day sessions where I do not do anything other than making colored papers to use at a later time.

These small bits of spin art are ready for me to use in a collage. If you like this idea, and would like to try making some of these for yourself, you can learn how to do spin art using our free step-by-step instructions.
At other times, I might take a large batch of these colored papers and block print or rubber stamp them. These are usually shorter sessions, perhaps several hours at a time, but again, the only goal is to create imagery that can be used in my collages at a later time.
At other times, I might take a large batch of these colored papers and paint spin art onto them, or make them into paper flowers, or make other small embellishments such as borders or die-cuts.
I’ve found that it increases my efficiency and productivity greatly to deal with large batches of paper like this. Usually, in collage art, there’s a lot of down time for things like allowing wet paint to dry, and allowing glue to dry. If you make a collage from start to finish in linear fashion, you end up wasting tons of time sitting around waiting for things to dry; and if you’re the impatient type who might attempt to work with something prematurely, before drying time is complete, you risk ruining work and wasting even more time.
When I’m finished processing a pile of papers, I take the papers that I won’t be using right away, and I organize them by color in my paper organizers. This ensures that I will be able to find and use them efficiently later when I happen to need them.
This procedure works for me, because I typically like to collage with imagery that I create myself.
It isn’t necessary to do this; it’s perfectly acceptable to collage with imagery from other sources. (Of course, if you plan to sell your collages, you do have to be aware of the copyright issues and possible pitfalls you could run into when working with someone else’s imagery. This is one of the main reasons that I usually create my own imagery to work with from scratch.)
If you’re planning to make more than one collage in the future, I hope you’ll give some thought to organizing a process for yourself where you can group certain tasks that you do often, such as painting papers, die-cutting pieces, gluing layers together, or gathering trash or other materials to use in your collages. If you do this, you’ll find that quite a few of the instructions outlined in the following projects will become unnecessary. You won’t need to bother with the quite a few of the bits that say “set aside and let dry,” for example, and you’ll be able to skip the irrelevant bits and move ahead to the next task.
I hope you’ll enjoy these projects, and that you’ll find them inspiring and enlightening.

Bohemian Swirl Collage Instructions
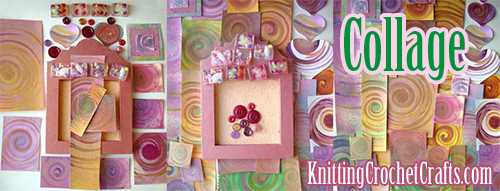
I already briefly mentioned using spin art as a design element in my collages. Here you can see an example of that; I’ve collaged several different spirals together to create this look.
Worth Noting: Spin art is an unpredictable process. Most of the time, the paintings turn out really well, even for someone without any “artistic talent.” The process isn’t foolproof, but it really is easy. That said, occasionally you get some duds — meaning some designs that just don’t turn out that well, for whatever reason. This project is a great way to use those up, and still end up with a project that looks fabulous. The secret: you just layer the not-so-fantastic spirals at the bottom of the collage, and use the ones that turned out beautifully as the top layer. Problem solved!
I’ve used the spirals along with a medallion motif that I stamped using a textile batik block from India. I’ve also included a ribbon for hanging the collage up.
Want more details about this collage? If so, please be sure to check out the instructions for this project.

Free Instructions for “Aladdin’s Magic Carpet Ride,” a Collage Featuring a Colorful Medallion Design
This work of art is definitely a collage, but it’s also a painting and a block print as well. You’re invited to check out the instructions page to learn more about this artwork.
By Amy Solovay
This page was last updated on 6-26-2023.