Placemat With Scalloped Crochet Lace Edging
This edging is intended to be used on this half double crochet placemat pattern. However, please feel free to use it on other projects if you like.
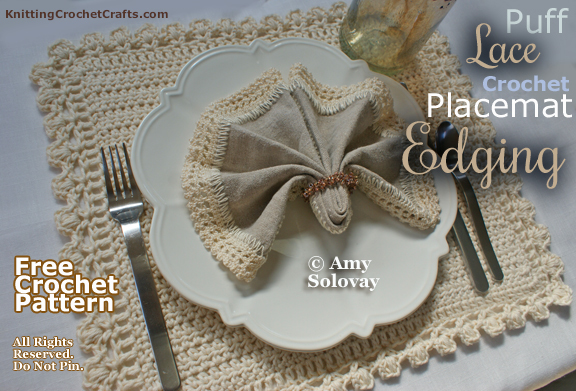
Above, you can see a picture of the first edging I tried using to finish off the half double crochet placemat. This edging is similar to the scalloped puff stitch edging that I used on this puff lace dishcloth. There’s one significant difference, and that is, in this version there’s an extra row of double crochet.
Scalloped Crochet Lace Edging Pattern for Placemat (Or any Square / Rectangular Project)
Skill Level: Easy
Crochet Abbreviations List for This Pattern:
- beg = beginning
- ch = chain
- ch-2 space = chain-2 space, meaning the space created when you crocheted 2 chain stitches in the row below
- dc = double crochet
- ea = each
- hdc = half double crochet
- hdc v st = half double crochet v stitch; see special stitches below for instructions
- sc = single crochet
- sl st = slip stitch
- st = stitch
Special Stitch: The Puff Stitch There are different ways to crochet a puff stitch. In this pattern, you’ll be using the following puff stitch instructions:
- Wrap the yarn over your crochet hook.
- Insert the hook into the next stitch to be worked.
- Wrap the yarn over your crochet hook again and pull up a loop. (3 loops on hook.)
- Do not complete the stitch. Instead, wrap the yarn over your crochet hook another time.
- Insert the hook into the same spot again.
- Wrap the yarn over your crochet hook again and pull up a loop. (5 loops on hook.)
- You still don’t want to complete the stitch yet. Instead, wrap the yarn over your hook another time.
- Insert the hook into the same spot again.
- Wrap the yarn over your crochet hook again and pull up a loop.
- Count the loops on your hook. If you have 7 of them, it’s finally time to complete the stitch. If you don’t have 7 loops total, something went wrong somewhere and it’s time to start over.
- To complete the stitch, wrap the yarn over your hook and carefully pull it through all 7 loops on your hook.
- Chain 1 to close the stitch.
Special Stitch: The Half Double Crochet V-Stitch (abbreviated “hdc v st”.) There are different ways to crochet a v-stitch. In this edging pattern, you’ll be using the following v-stitch instructions:
- hdc in next st to be worked.
- ch 1.
- hdc in same st to complete the v.
Design Notes: This edging is a multiple of 3 stitches, not counting the corners.
If you made any size adjustments to the placemat pattern, you may need to increase or decrease a bit on each side to ensure that you have a stitch count that’s divisible by 3. You can do this at any point before starting round 3.
In some of the pictures you’ll see in this series, I accidentally worked a modified version of the scalloped puff lace edging pattern, where round three turned out a bit different than it should have. Instead of following the pattern as written, I only repeated the series of instructions in between brackets, all the way around.
In theory, if you do this too, the math should still work out OK, although the corners on my mats did not turn out to be as nice as one would hope. I prefer the pattern as written. Having tried it both ways, I think the original version as written makes nicer corners than my accidental / modified version — although in the end of course you are welcome and encouraged to use whichever idea suits you better.
How to Work the Scalloped Crochet Lace Edging:
Round 1: If you already worked single crochet around the outer edge of your placemat as specified in the placemat pattern, then round 1 of your edging has already been completed. If you’re working a different project, round 1 will be a round of sc st all the way around the outer edge. When you get to a corner, ch 2, then resume working sc.
Round 2: Ch 3. dc all the way around. When you get to a corner: put 3 dc in ea ch-2 space in the corners. Then continue working dc. Sl st to join the work to the beg of the round.
Round 3: ch 3, skip next st, [hdc v st in next st, ch 1, skip next 2 sts.] Rep the sequence in brackets across the row. At the end of the side you are working, after your last hdc v st, work the corner as follows: ch 1. Locate the 2nd (the middle) dc st in the series of 3 dc sts you worked in the corner of the previous row. Skip any remaining stitches, and work 3 hdc sts in that middle dc st in the corner. ch 1, skip next 2 sts, then rep the sequence in brackets until you get to the next corner. Continue working in this manner all the way around. In the last corner, you only need to work 1 hdc st and then a ch st. Then sl st to join this to the beg of the round. You’ll want to work the sl st in the 2nd ch st you worked at the beg of the round. Think of those first 2 ch sts in the round as a hdc st, so when you work your last hdc and then ch, the sl st joins to a hdc to complete another hdc v st.
Round 4: In each v-stitch, work the following sequence: [sc, ch 2, puff stitch, chain 2, single crochet.] Then sl st in ea space between v-stitches.
Round 4 Corner Instructions: In the corners: sl st in next sp. In the row below, there are 3 hdc sts in ea corner. Sc in first hdc. In next hdc: sc, ch 2, puff stitch, ch 2, sc. Sc in next hdc. Sl st in next space.
Continue working in this manner all the way around.
End off.
Finishing:
Block if desired.
If you want to make a set of placemats, repeat these instructions as many times as necessary to complete the set.
You can use the placemat just like this if you like it, or you can add some additional embellishments to it if you want. Read on to discover some ideas for adding ribbon or yarn around the edges.
How to Embellish Your Crochet Lace Edgings With Ribbon or Yarn
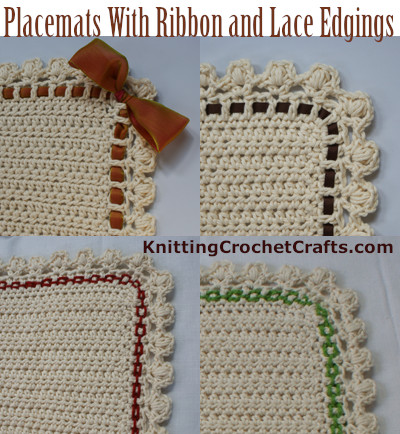
Upper Left Photo: This photo shows you an example of one possible way to add ribbon around the edges of your placemats. To achieve this look, I folded a length of wide fabric ribbon (measuring about 1 1/2 inches) in half, and wove it around the double crochet stitches — over one double crochet, under the next, over the next, under the next, etc.
This picture shows you a “mockup” that I did with a short piece of ribbon; right now I unfortunately don’t have enough ribbon in my stash to finish an entire placemat like this.
If I were to have had enough ribbon on hand, here’s what I would have liked to do: Cut 4 lengths of ribbon, one that’s long enough to weave into each side, with enough length left over to use for tying the ends into bows so that there would be a bow in each corner of the placemat.
That’s the look I was trying to emulate in the photo above, although I didn’t have enough ribbon to actually do it that way for the photo. If you do it the way I describe, it will look a little different and, I think, nicer than the photo shown.
Upper Right Picture: This photo shows you another possible way to add ribbon around the edges of your placemats. This is a narrower ribbon measuring 1/4 inch.
Again, I was working with a too-short piece of ribbon to finish the entire placemat, so the photo you see is just a mockup.
If you like the effect pictured, it’s possible to reproduce it.
You could weave the ribbon all the way around the outer edge of the placemat, without tying any bows at all. The photo shows an example of how that might look if that’s the way you finish your placemats.
To secure the ribbon, you could simply bring both ribbon ends to the back of the placemat and then stitch them together with a hand sewing needle and a bit of thread.
Another option I would have liked to try: Again, if I had had enough ribbon to work with, I would have liked to cut 4 lengths of ribbon, one for each side, and weave it into the double crochet stitches. Then I would have liked to tie bows in the corners to complete the look.
Lower Left Picture: In this version, I used a smooth worsted weight red cotton yarn instead of ribbon for weaving into the placemat edge. I used a tapestry needle and about 6 3/4 yards of yarn for this part of the project.
I threaded the tapestry needle with the yarn and then used it to weave the yarn around each double crochet stitch — over, under, over, under, all the way around, 3 different times.
If you finish your placemats this way, take care to stagger each round so that your yarn forms a sort of basket-weave effect.
Lower Right Picture: I repeated the same basic steps as pictured and described in the lower left photo, with the only major difference being the yarn used. In this version, I used Sprout yarn by Classic Elite in the color called “Galapagos green,” which is color #4335. Sprout is a lovely, textured organic cotton yarn that I think is delightful to work with.
Setting the Table With Your Crochet Projects
- Free Crochet Placemat Patterns
- Crochet Coasters — Free Patterns
More Kitchen Crafts
- Crochet Potholder Patterns
- Free Crochet Pot Scrubbie Pattern
- Pretty Afghan Stitch Potholders — Free Crochet Pattern
Crochet Resources
Posted By: Amy Solovay
This page was last updated on 11-1-2021.