See More About: Crochet Pouch Patterns | How to Save Money on Crochet and Knitting | How to Crochet Without Yarn
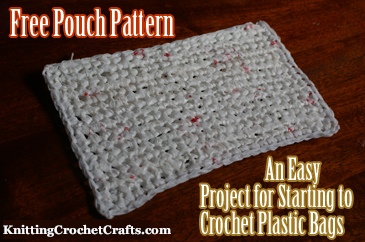
If you’re interested in learning how to crochet plastic bags, this free pouch pattern may be useful to you. It’s a fantastic starter pattern for learning how to crochet with “plarn”, otherwise known as “plastic yarn,” which is the term many crafters use for the cut up strips of plastic made from grocery bags.
This pouch has a lot going for it; it’s really an affordable project, and it’s pretty quick to make. I’ve made bunches of these pouches, and my husband keeps asking for more of them.
We have a couple of these pouches holding small cat toys like little rubber balls; if not for the pouches, we’d have cat toys all over the place, which drives Mike BONKERS. I think a pouch could also be useful for holding small kiddie toys like little PVC figurines, mini dolls or small cars.
The downside to this pouch is that, unless you decide to give it a lining, it has some limitations. Anything TOO small may fall through, so think small but not tiny when you decide what to store in here.
A couple of our other pouches are holding miscellaneous things like grocery coupons, random craft supplies, cords and gadgets. I have one filled with bottle caps, wine bottle corks and empty spools of thread that are waiting to be upcycled. These pouches also make good treat bags.
For people who wear makeup, I think this little zippered pouch could be seriously useful as a cosmetic bag. It’s ideal for holding small to medium-sized toiletries like nail polish and eye shadow. It also works well for holding feminine hygiene products. It’s not a great choice for holding slim products such as lip pencils, eye pencils or nail files. It is too small for holding full-sized shampoos or really large makeup kits.
I’m betting you could think of lots of other items to store in these useful little pouches. So if you need some new organizers, and you have more time than money, you’ll definitely want to grab this pattern!
Crochet Skill Level:
If you were to crochet this pattern with ordinary yarn, it would be a beginner-friendly project that could even be suitable as a person’s first crochet project. Working with plarn complicates things slightly; it takes more patience to work with plarn. For that reason, I’d label it “easy” rather than “beginner,” although I am sure a beginner could successfully complete this project given determination and patience.
Materials List:
Plarn — To crochet my sample pouch, I upcycled four white plastic grocery bags to make plastic yarn, otherwise known as “plarn”. Depending on several factors, such as the size of the bags, the way you cut your strips, and your unique way of crocheting, you might need a different number of bags.
To make your plarn, cut each bag into one long strip measuring roughly one half inch wide; start at the top of the bag and cut one long continuous piece, spiraling down and around the bag. Continue to cut until you run out of useable material, then stop and go on to the next bag until you have the amount of plarn you need.
Try to be as neat and precise as you can, but don’t stress about it if your cuts aren’t perfect. When I was cutting the strips for my sample bag, I wasn’t totally precise about it, so my strips do have areas sometimes measuring as much as three-quarters of an inch. So don’t worry if you don’t cut precisely either.
Crochet Hook — I used a size I / 5.5 mm crochet hook to crochet the sample pouch. Use whatever crochet hook feels most comfortable for you when working with your plarn.
Other Supplies You’ll Need:
- 7 inch zipper in a color that matches your plarn
- Sewing needle
- Thread to match your plarn
- Straight pins
Gauge — I worked to a gauge of about 3 stitches per inch. However, gauge isn’t critically important for this project (unless for some reason you need your pouch to be exactly the same size as mine); so don’t stress if your gauge is a little off. If it’s WAY off, you may wish to start over with a different hook.
Finished Pouch Size — My finished pouch measures about 8.25 inches wide by about 5 inches high.
Design Note: Whenever possible, crochet overtop of your plarn ends, then cut off and recycle any leftovers.
How to Crochet the Pouch:
Crochet two identical rectangle pieces measuring anywhere in the range from 7 to 7.5 inches wide; you can make them as high as you want them.
To make my sample pouch, I worked a starting chain of 24 stitches and then worked entirely in single crochet stitch. I worked 15 rows. You might need to crochet a different number of stitches and rows to end up with a pouch that’s a usable size.
Finishing the Pouch:
Unzip the zipper; pin and sew one side of the zipper to one crocheted rectangle piece, and the other side of the zipper to the other piece.
The zippered area forms the top of your pouch. At this point, you want to be sure that the entire top will be closed. Zip the zipper. If your zipper is shorter than the length of your pouch — in other words, if your pouch extends beyond the zipper a bit — then stitch the two rectangle pieces together at either side in any remaining area(s) along the top where the zipper is absent. Otherwise you could possibly end up with a little hole on either side at the top of your pouch.
The next step is to turn the two rectangle pieces into a pouch by joining them. Pin the pieces together if that will make it easier for you. Attach a new length of plarn to the upper left corner of the project with a slip knot. Working through both rectangle pieces, crochet an outside round of single crochet stitch around three sides; you don’t need to worry about the fourth side since it is already joined by the zipper. When you get to a corner, ch 2, turn the corner and keep going. When you’ve worked all the way around to the zipper, end off.
If you followed these instructions, you hopefully ended up with a simple, useful crocheted pouch made out of plarn.
Next, fill it with goodies! Enjoy!
Thanks for Visiting! Please Check Back Often to Find More Fun Crochet Projects.
I invite you to return to this site often for more craft tutorials, project ideas and inspiration! You can make sure you keep this site on your radar by signing up for my newsletter and community at Substack. .
Basic subscriptions are free; I send out regular newsletters to let my subscribers know about new craft articles and tutorials as they are posted. I also share details about the craft projects I’m working on, and invite my readers to share their projects, too. So there is no need to feel like it’s just you, crafting all alone at home. I’d love to have you join us! You’re invited!!
By Amy Solovay
Please Visit My Ko-Fi Shop HERE to Find My Sample Sale, Destash Sale and Digital PDF Pattern Downloads for Sale.
Please Visit My Ravelry Store HERE to Find Digital PDF Pattern Downloads for Sale.
About the Author:

Amy Solovay is a real, live, human content creator and educator who holds a Bachelor of Arts degree in mathematics from Sweet Briar College; she has also earned a separate Associate of Arts degree in textile design from FIDM LA (The Fashion Institute of Design and Merchandising, Los Angeles). She is NOT a robot and does not use artificial intelligence (AI) to write book reviews or articles for this website.
Amy learned to craft as a small child, and she still enjoys crafting techniques all these years later.

As an educator, Amy Solovay used to teach in-person college courses in trend forecasting, marketing and surface design at California Design College in Los Angeles. Nowadays she uses online platforms for sharing her knowledge about textiles, crafts, color trends and design trends.
Find More Patterns for Knit and Crochet Pouches and Bags
Click HERE to see my top picks for the best crochet accessory pattern books.
Learn More About Crochet Books:
Learn More About Crochet:
- Click Here to Learn How to Crochet; This Link Takes You to a Total Beginner’s Guide to Crochet.
- Click here to find crochet stitch tutorials and instructions.
- Click here to learn more crochet techniques.
- Click HERE to Find Fabulous Yarn for Crochet and Knitting
- Click here to learn about crochet hooks.
- Click here to find my favorite crochet project bag.
Learn About Other Needlework Techniques: Knitting, Sewing, Quilting, and More
- Click here to get updated on the latest craft supplies.
- Click here to learn about knitting.
- Click here to find our beginner’s guide to knitting needles.
- Click here to find outstanding craft project ideas.
Posted By: Amy Solovay
This page was last updated on 7-19-2025.
<