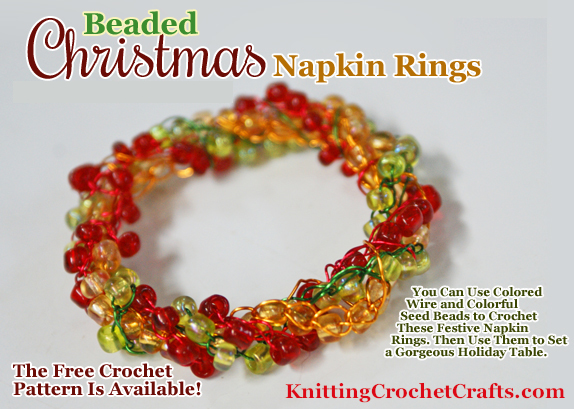
Learn How to Make Beaded Christmas Napkin Rings Like This Using Our Free Crochet Pattern and Step-By-Step Tutorial
You can use beads and wire to crochet a set of stunning beaded Christmas napkin rings.
If you want to set a festive holiday table this Christmas, these beaded Christmas napkin rings would make a lovely addition to the decorations. They’re absolutely drop-dead-gorgeous when paired with cloth napkins — and don’t even get me started on all the spectacular napkin folds you can use to make your table settings even prettier.
If napkin folds scare you, don’t worry — you can simply roll up your cloth napkins and stick one inside each napkin ring, and already that will be one zillion times nicer than your typical everyday-type table setting that includes paper towels.
Here you can see that I’ve put together some place setting ideas that incorporate several different crocheted pieces. In the photo below, I’ve used crocheted placemats paired with linen napkins that have crocheted edgings. This beaded crochet napkin ring is the finishing touch.
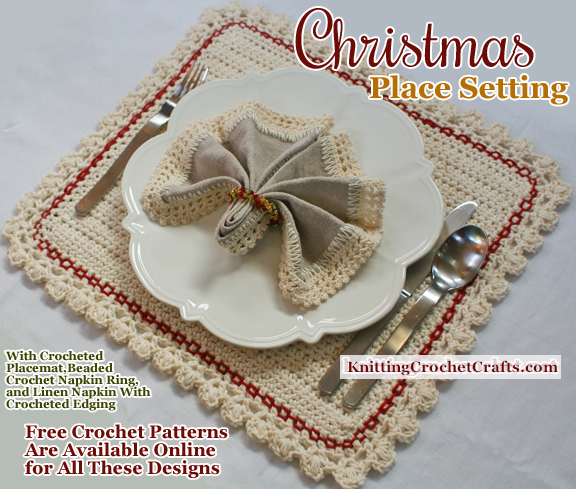
A Christmas Place Setting That Includes a Beaded Crochet Napkin Ring, Plus Crocheted Table Linens
Next, you can see the difference if you skip the fancy napkin fold, and the napkin with the fancy edging, and you just use a plain white cloth napkin, rolled up neatly and placed in your napkin ring. The effect is quite stunning and chic, don’t you think?

A Christmas Place Setting That Includes a Plain White Cloth Napkin Plus a Beaded Christmas Napkin Ring
So hopefully, that gets you thinking about some of the possibilities. Of course, the possibilities are endless, because your place setting doesn’t have to include placemats — you may prefer to use a table cloth and / or a table runner on your table instead. I happen to love crocheted placemats for any occasion, but I know they aren’t for everyone.
Now onto the free crochet pattern and instructions for the beaded Christmas napkin rings…
Materials and Supplies:
Beads — To make each napkin ring, you’ll need three different colors of seed beads. You can, of course, use any three colors you like — but if your intention is to make Christmas napkin rings, then of course, you’ll want to use Christmas-y colors.
I chose red, green and gold for my sample napkin rings. This might or might not be the right color scheme for you to use.
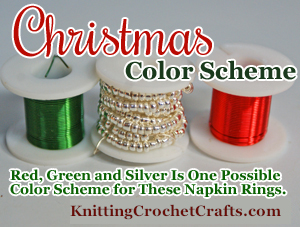
A Popular Christmas Color Scheme: You Could Use Red, Green and Silver Beads and Wire to Crochet These Napkin rings
The trick here is to choose colors that are going to be Christmas-friendly, yet still look fabulous with your home décor. So you could choose color schemes like
- Red, green and silver
- Burgundy, green and gold
- Burgundy, green and silver
- Navy blue, medium blue and silver (if you are going for a “snow” theme or a Hanukkah theme, this is a nice color scheme)
- Etc.
If you happen to have a printed table runner that you’ll be using as part of your table setting, your color choices are a bit easier; just choose 3 of the most prominent colors from the table runner, and match your beads to those.
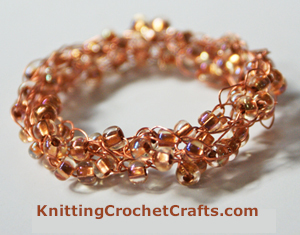
Copper Colored Bead Crochet Napkin Rings
Also keep in mind that you do not have to use Christmas colors specifically; you could also make beautiful napkin rings that would work well for the entire block of holidays, including Thanksgiving, Christmas and New Year’s. This is a sensible option — one that I highly recommend as a sanity-saver for crafters who tend to take on too many projects and get overwhelmed. Be sure to check out these lovely copper-colored napkin rings for a simpler, easier version of this design that is also versatile enough to use for pretty much any occasion you could think of.
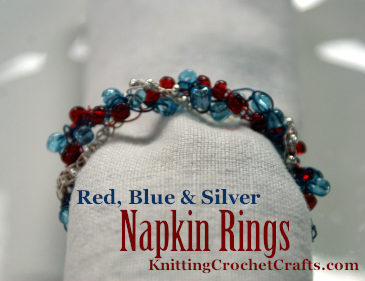
Red, Blue and Silver Beaded Napkin Rings With Rolled Cloth Napkin
Here’s one more option for a useful color variation: Red, blue and silver napkin rings. Red, white and blue is a popular color palette for kitchen decor — so if your kitchen is decorated in red and white or red, white and blue, this sort of color scheme could be a sensible choice for your napkin rings.
Once you know what colors you want, you then need to figure out how many beads to buy. This is the most frustrating part of the entire project, because it is impossible for me to give you precise instructions. I can give you some estimates and guidelines, but the truth is, this project is just plain going to involve a little bit of trial and error. This is because you crochet a little differently than I do; your napkins may be a different size than mine; you may want to use beads that are slightly different sizes than the ones I used; and because I have no idea how many napkin rings you want to make. There are many variables here, you know what I mean?
What I suggest doing: buy a few packages of beads and wire in colors that you like. Make up a few sample napkin rings in colors that you think will work. Choose whichever one you end up liking best; then use that as your basis for calculating how many beads you need to complete the entire set.
Numbers of Beads Used to Make the Sample Napkin Ring Pictured:
I used…
- 42 large red seed beads
- 38 large green seed beads
- 36 large gold seed beads
The seed beads I used in this project sample were el-cheapo glass beads that came from the dollar store. They were irregular in size, but on average they seemed comparable to the 6/0 size. I don’t recommend using significantly larger beads with this pattern, but feel free to experiment with smaller sizes if you like.
Please keep in mind that this number of beads only made one napkin ring, and that you’ll probably want to make more than one. So you’ll need to buy enough beads to make an entire set.
The size of your set is up to you; there are different possibilities for how to decide on the number to make. You could make one napkin ring for each chair at your dining room table. Or you could make a napkin ring for every plate in your dinnerware set. Or you could make one napkin ring for every family member, and perhaps a few additional rings if you want to be able use them while entertaining guests.
Wire — I used 26 gauge copper craft wire to make my sample project. This is a good size for bead crochet projects; it’s sturdy enough to hold glass beads, yet it’s pliable enough to crochet with. For best results, you’re probably going to need 3 different colors of wire: for each color of beads you’re using, you’ll need a corresponding, matching wire color.
Crochet Hook — I used a steel crochet hook measuring 1.80 mm to crochet the sample project. Steel crochet hooks are strong enough to use for wire crochet, making them an ideal choice for this project. However, wire crochet is a demanding technique that’s hard on both crochet hooks and human hands. I recommend being prepared for the possibility that your hook could break, so please choose your hook accordingly. This is not a good project for using with family heirloom hooks or any hooks that have particular value to you.
Tapestry Needle — I like using tapestry needles for hiding the ends of my wire, although there are other acceptable ways to accomplish the same task..
Gather your supplies and let’s get started!
How to Make the Beaded Crochet Napkin Rings
First, you want to string your beads onto your wire. I recommend stringing more than you think you’ll need, because you never know exactly how many you’ll need. After you begin crocheting, it’s not all that easy to add extra beads to the end of the work. It’s not totally impossible in this case, but it’s a pain in the neck.
Next, pull out a length of wire. Leave a comfortable amount, at least 5 or 6 inches, because later after you’ve finished the crocheting, you will need to have enough wire to work with when you want to hide the ends.
Next, you want to make a slip knot, which is the correct method to use for getting this project (and most crochet projects) started.
Important Note: Before you go any further, you should be aware of one important thing: it’s challenging to correct mistakes in wire crochet. Some crocheters claim that it’s impossible, although that hasn’t been my experience. I’ve been able to correct some of my past mistakes, but you CAN NOT take it for granted that you’ll ever be able to fix a particular mistake in wire crochet. Sometimes it’s possible and sometimes it isn’t.
So, keeping that in mind, here’s some important advice: ignore your mistakes and keep going.
You read that right. Just let go of your perfectionism and embrace the imperfect. With this particular project, you will never know the difference in the end anyway.
As you’re working in this technique, you’re likely to create some inevitable, oddly-spaced places in your beaded chains. This project is forgiving of odd spacing, and most of the time it won’t make a bit of difference in the finished project. So, please resist the urge to unravel the work and fix the oddities. Unless something is startlingly, awfully wrong, just leave it as it is and keep crocheting.
Once you’ve made your slip knot, the next step is to grab the first accessible bead and push it along the wire to get it right up close to your active loop (slip knot.) Then you’re going to grab the wire with your crochet hook and pull it through the loop on your hook, essentially working a chain stitch with a bead stuck inside of it.
Now just keep working beaded chains, just like the first one, until you have a length of beads crocheted using the wire. Push another bead up the length of wire, and grab the wire with your crochet hook. Pull it through to form the next stitch. Repeat over and over and over and over again until the piece is the length you want it to be.
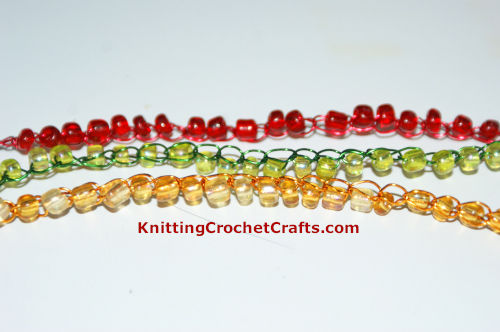
Your Goal: To Crochet 3 Different Beaded Chains Like These to Use for Making Each Beaded Christmas Napkin Ring in Your Set.
The picture above gives you a glimpse at what you’re trying to achieve. For each napkin ring, you’ll need 3 different beaded chains, one in each of the colors you’ve selected.
How Long Should Each Beaded Chain Be?
The finished size of your napkin ring depends entirely on the length of the piece you crochet here. My sample napkin ring is small, with an outside diameter of about 2 inches and a circumference of about 6.5 inches.
To achieve a finished napkin ring in that size, I crocheted a beaded piece that measured a bit more than 6.5 inches long.
That might or might not be the best length for you to make yours. If your napkins are really big or thick, you might want to make a larger ring.
Here’s my theory about this: if you have any doubts about whether your napkin ring will turn out to be too small, it’s better to enlarge it a little by crocheting a few more beads at the end of the piece. Most of the time, a too-big napkin ring won’t be unusable, but a too-small napkin ring will be useless.
What to Do If You Didn’t String Enough Beads, and You Run Out: If you somehow manage to run out of beads and your piece is too short, DO NOT END OFF YET. Try to guess at the amount of wire you’ll need to work with to finish up the project. Working from the OTHER END of the spool of wire, pull out this length of wire and perhaps a little bit more — just to be on the safe side. Cut this length to detach it from the spool.
Now string more beads onto the newly-cut end. When you’re finished, wrap the end around some sort of stopper like a paper clip or safety pin, to prevent the beads from falling off while you work.
Continue working until you (hopefully) have the length you want. I don’t guarantee that this method will work, since there is some guesswork involved, but at least there’s a chance you can make it work out.
When you’re satisfied that your piece is the correct length, you’re going to end it off. End off by simply cutting the wire, grabbing the wire with your crochet hook as pictured, and pulling the end through the active loop on your hook. When you cut the wire, remember to leave a length at the end of at least 5 or 6 inches so you have enough to work with when you need to weave in your ends later.
Work all 3 of your beaded chains.
Finishing the Napkin Ring
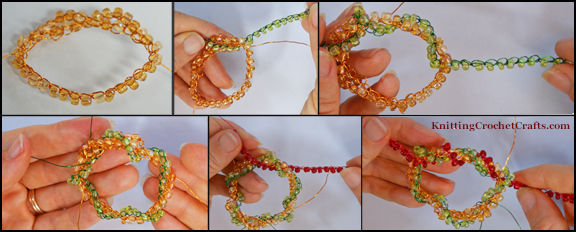
Work-In-Progress Pictures Showing How I Finished the Beaded Christmas Napkin Ring
To finish your napkin ring, simply twist and manipulate all 3 of your beaded chains together to form a tight, neat wreath-like ring. Then you can use the ends of wire to strengthen the bond between the 3 individual strands, weaving them together and hiding the ends of wire at the same time.
How to Weave in Your Ends When Crocheting With Wire:
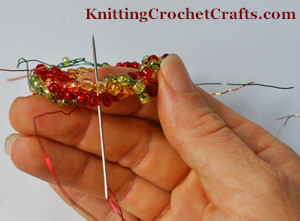
Weaving in the Ends on the Beaded Napkin Ring — Note That This Needle Is WAY Bigger Than What You Actually Need to Do This.
I deal with my loose ends by weaving them into the project in much the same way I do with projects I crochet in yarn and thread. There are a few minor differences, but the process is essentially the same.
I start by threading one of the loose ends onto a tapestry needle.
Then I use the needle to “sew” the end into the project, camouflaging it carefully as I go. In several places as I was finishing my project sample, I also strategically wrapped the end around all 3 strands of the finished napkin ring, just for a little extra insurance that the napkin ring will never come un-twisted in the future.
When the end is sufficiently camouflaged, cut it off and bend any extra down so that it is buried in the project.

The Finished Napkin Ring. Isn’t It Gorgeous?
Repeat with the other loose ends.
It’s finished! WOW, isn’t that napkin ring gorgeous?
Remember to make more matching napkin rings to complete the set…
More Christmas Patterns and Projects:
We invite you to load up on festive Christmas patterns for making bunches of amazing holiday projects and gifts. Check out some more great patterns at the following links:

Crochet Fabulous Christmas Projects With a New Pattern Magazine Called Have a Happy Crochet Christmas From Crochet World
- Christmas Crochet Blanket (free pattern)
- Striped Crochet Christmas Potholders (free pattern)
- Christmas Cupcake Potholders (free pattern)
- Jorid Linvik’s Big Book of Christmas Knits
- Big Book of Christmas Crochet Patterns: Make Blankets, DIY Gift Boxes, +++
- Have a Happy Crochet Christmas: Lovely Holiday Patterns for Blankets, Ornaments and More
- Find Our Picks for the Best Christmas Craft Books
- Christmas Patterns (Main Directory)
Check Out More Wire Crochet Christmas Projects
- Wire Crochet Christmas Wreath: Free Crochet Pattern
- Wire Crochet Lace Christmas Cuff Bracelet: Free Pattern
More Beautiful Beadwork Projects
The Beaded Edge 2: A Bead Crochet Pattern Book Published by Interweave
Do you love working with shimmery, shiny, beautiful beads? I sure do. If this is one of your passions too, I invite you to check out some more free beadwork patterns and projects.
- Check Out My New Favorite Crocheted Necklace!
- Beaded Snowflake — Free Crochet Pattern
- Beaded Gadget Cozy — Free Crochet Pattern
- The Beaded Edge: A Pattern Book of Beaded Trims and Edgings in Crochet
- Crochet Bead Necklace — Free Pattern
- See Our Picks for the Best Beadwork Books
- Check Out Our Main Directory of Lovely Bead Crochet Patterns and Tutorials
More Napkin Rings to Crochet
- Napkins and Napkin Rings — Main Directory
- Crochet Wire Napkin Rings
- Upcycled Crochet Napkin Rings
- 6 Ways to Make Napkin Rings — Free Instructions and Patterns
This page was last updated on 1-19-2022.