Learn How to Do Surface Crochet Using the Slip Stitch, Plus Find Free Patterns That Make Use of This Intriguing Crochet Technique
By Amy Solovay
See More About: Slip Stitch | Crochet Stitches | Crochet Techniques | Crochet Tutorials
Are you looking for ways to make your crochet projects extra special? Perhaps you’d like them to be more colorful or to look more detailed. Surface crochet is one of the secrets to accomplishing this. Surface crochet gives you extra options for enhancing your projects to add additional colors and details that are not easily possible otherwise.
Once you know how to do surface crochet, you can apply this versatile technique and use it for enhancing plain crochet, tapestry crochet, freeform crochet, and unlimited other types of crochet projects. If you knit, you can even use surface crochet as a means to embellish your knitting projects too.
What Is Surface Crochet?
Surface crochet is crochet that’s worked on the surface of the fabric — usually a previously crocheted fabric, but it can also be a knitted fabric or even a loosely-woven fabric. It is possible to work many different crochet stitches on the surface of a fabric; in this tutorial, I’m going to demonstrate surface crochet slip stitch.
I use surface crochet slip stitch frequently in the crochet patterns I design. Why? I invite you to consider the reasons this crochet technique is one of my favorites:
Make the Project More Colorful: Surface crochet slip stitches provide an easy way to add color to a project.
Let’s say you’ve finished working a color chart that has three colors. When you finish, you look at it and you decide that it would really benefit from having a fourth color.
Of course, you could re-chart your design, adding the fourth color. Then you’d have to re-crochet the whole thing (dealing with four different balls of yarn in the process.)
Surface crochet provides you with an alternative. Instead of redoing the whole thing, you could just enhance your completed piece using surface crochet slip stitches in the fourth color.
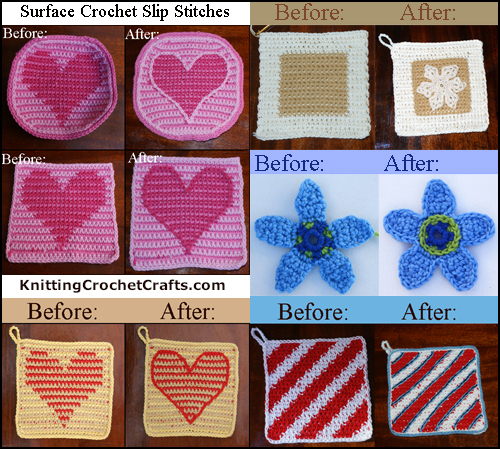
Add Outlines, Drop Shadows and Details: If you’ve ever played around with designing digital art, you’re no doubt aware that it’s nice to be able to add strokes, outlines and drop shadows at the click of the mouse. It isn’t so easy to accomplish the same tasks when you are designing patterns in crochet, but surface crochet slip stitches do allow you to fake these effects somewhat.
In the pictures above, you can see several different examples of this. The “Before” pictures show how each of these designs looks before outlines have been added. The “After” pictures show the projects with outlines. In some cases, the difference is subtle; in many cases, the difference is significant and dramatic.
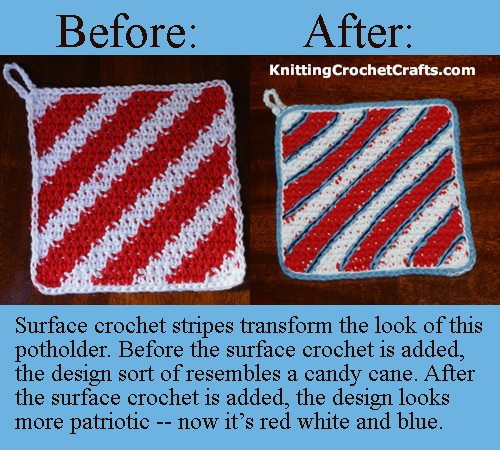
Tapestry Crochet: Surface crochet is handy for cleaning up messy areas in tapestry crochet. Sometimes, when working tapestry crochet patterns, you end up with jagged lines in places where the colors touch each other. This isn’t the crocheter’s fault; it’s just the reality of the technique. Certain tapestry crochet designs can really benefit from having an outline added in surface crochet slip stitches.
The red, white and blue potholder pictured above is a fantastic example of this. On the left, you see the red and white potholder before any surface crochet was added. Notice how jagged the lines are. On the right hand side, you see how the potholder looks after some surface crochet slip stitches have been added. This tutorial takes you through the process of transforming the potholder, using surface crochet to do it.
If you’d like to try this, you can click here to get the free potholder pattern.
Build Additional Layers Onto a Flat Project, or Give Yourself Another Space to Crochet Into: Let’s say you want to add flower petals to a flat flower, or animal ears to a crocheted hat. In either case, you could work surface crochet slip stitches in the spot you want the petals or the ears. The surface crochet stitches could be the foundation that you crochet into when you get started on the addition.
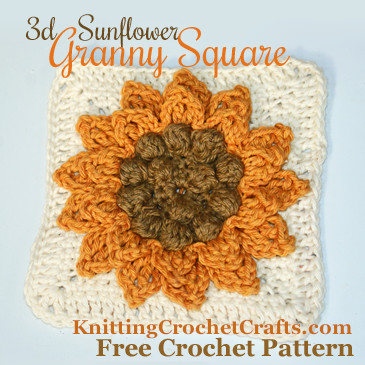
See an Example: In this 3d sunflower granny square, the granny square itself is crocheted flat. Then I used surface crochet slip stitches to build a couple of additional layers on top of the square, forming the flower petals.
Freeform Crochet: If you enjoy freeform crochet, you’ll find that surface crochet techniques greatly enhance your ability to create interesting work.
I hope the following examples will spark your imagination so you can appreciate all the possibilities this marvelous technique offers you in your own crochet work. There are free crochet patterns available for all the example projects you see pictured above.
Check Out the Free Crochet Patterns for the Surface Crochet Slip Stitch Projects Pictured Above:
- Striped heart afghan square pattern
- Striped heart potholder pattern
- Snowflake potholder
- Flower applique pattern
- Candy cane diagonal striped potholder
How to Do Surface Crochet Slip Stitch: Free Tutorial
Sample Project for This Tutorial: Crocheted Potholders
Pictured here: a couple of crocheted potholders; these potholders look somewhat different, but both were made using the same crochet pattern. The main difference between these two designs is that the potholder on the left does not have any surface crochet details added.
For this project, I decided I wanted to outline each stripe with two layers of surface crochet slip stitches. The result is shown in the right hand photo. The lower layer of slip stitches is crocheted with worsted weight kitchen cotton yarn in a light blue color; this layer was crocheted first. The upper layer of surface crochet is crocheted in dark blue embroidery floss afterward.
This technique takes practice to master. When you first try it, it’s going to seem awkward; at least, that was my experience. I’d been crocheting for many years by the time I learned how to do this, and even considering my considerable experience with crochet, I had a tough time with it at first.
The awkwardness comes in, for one thing, because it’s difficult to keep track of what’s happening on both the front and back of the fabric at once. Don’t let that discourage you; like anything else with crochet, once you get the hang of it, it’s a piece of cake. It just takes practice to get there.
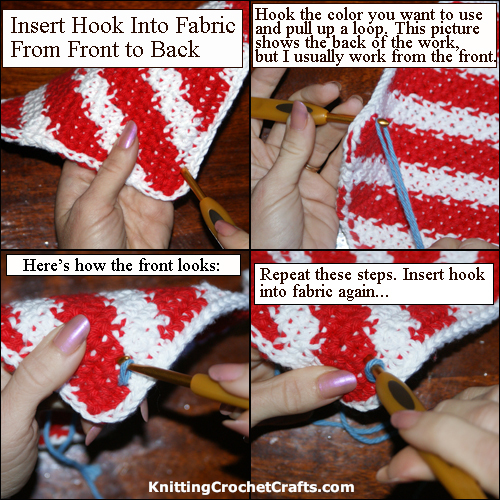
Here’s how to work the surface crochet slip stitches as shown.
Top left photo: Find the spot where you’d like to begin outlining, and insert your crochet hook in that spot from front to back.
Top right photo: Hook your yarn and pull up a loop. When I do this, I have the front of the project facing me. So you can see what’s going on, this photo is taken from an odd angle that I wouldn’t actually use when crocheting. I usually do turn the work over and look at the back every so often to make sure nothing strange is happening back there.
Lower left photo: This picture shows how the work looks after you’ve pulled up a loop.
Lower right photo: Insert your hook into the fabric again.
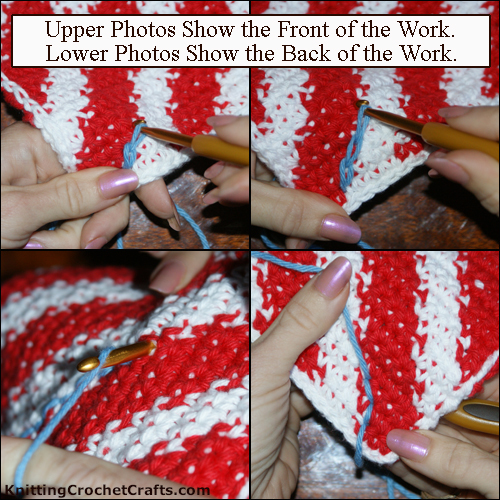
When you pull up the next loop, make sure to pull it through the potholder itself and also through the previous loop on your hook.
This process is a bit like making a chain stitch, only you’re working the stitch onto the potholder instead of working it into thin air.
That’s basically all there is to it; you repeat those steps — insert your hook, pull up a loop — as many times as it takes you to finish your stripe, outline your motif, or otherwise achieve the effect you want.
These photos show a few more stitches being added. The upper pictures show how the front of the project works; the lower photos show the back of the work. Again, the lower photos were taken at an unnatural angle; I thought it was important to show you how the back of the work looks, but we couldn’t get the pictures if I held the work naturally while crocheting.
Learn How to Work a Second Layer of Surface Crochet Slip Stitches.
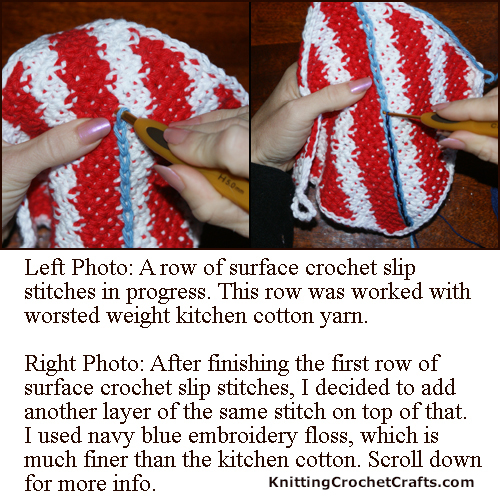
Left Photo: a row of surface crochet slip stitches in progress. Like the potholder itself, these slip stitches are worked in kitchen cotton yarn.
Right Photo: After finishing the first row of surface crochet slip stitches, I decided to add another layer of the same stitches overtop of it. I used embroidery floss, which is much finer than the kitchen cotton, to do this.
The second layer of stitches creates an interesting effect; it’s like a fine outline on top of the thicker line. The dark color adds a nice bit of contrast and emphasis to the design.
Here’s how the finished potholder looks:
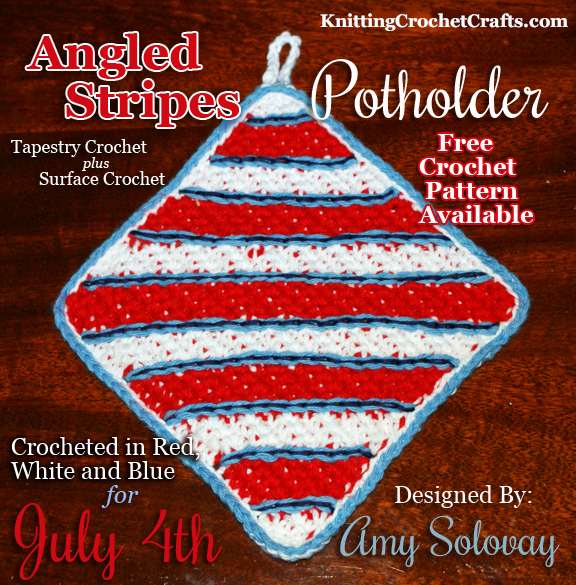
I’m adding this to my list of patriotic craft ideas for Fourth of July. If you don’t care for red, white and blue, please feel free to recolor the design any way you like. If you’d like to make this a Valentine’s Day craft project, switch the blues to pinks. If you’d like to make this a Christmas pattern, switch the blues to greens. You could also just stick with the red and white stripes if you prefer; the red and white stripes resemble a candy cane. There are many interesting possibilities.
So there you have it: That’s how you do surface crochet slip stitch.
If you want to do other surface crochet stitches, you can easily do so by simply working surface crochet slip stitch into the spots where you want other stitches; then you can work into the surface crochet slip stitches you made and build your layers on top of the fabric from there.
I hope you find this technique as fun, useful and engaging as I do; I use surface crochet slip stitches frequently when I am designing crochet patterns and also when I am messing around with freeform crochet.
Happy crafting!
By Amy Solovay
About the Author: Amy Solovay is a crochet pattern designer, craft blogger and educator who learned to crochet as a young child. She holds a degree in textile design and spent about a decade working in the textile industry. She taught apparel marketing, trend forecasting and textile design courses to aspiring fashion industry professionals at California Design College. For five years, she worked as the Crochet Expert at TheSpruceCrafts.com, a web property owned by Dotdash Meredith, which is America’s largest publisher. Nowadays, she helps crafters improve their skills at this website and others.
Page last updated on 3-12-2024. Thanks for visiting!
Find More Crochet Stitch Tutorials
- Crochet Shell Stitch Tutorials and Patterns
- Picot Stitch Tutorials and Patterns
- Afghan Stitch Tutorial
- Free Tunisian Knit Stitch Tutorial
- Free Single Crochet Stitch Tutorial
- Free Double Crochet Stitch Tutorial
- Free Half Double Crochet Tutorial
- Free Treble Crochet Tutorial
Learn More Useful Crochet Techniques
- Filet Crochet
- Tunisian Crochet
- Woven Crochet
- Bruges Crochet
- Fabric Crochet
- Wire Crochet