Learn How to Crochet Striped Heart Potholders Using the Tapestry Crochet Technique
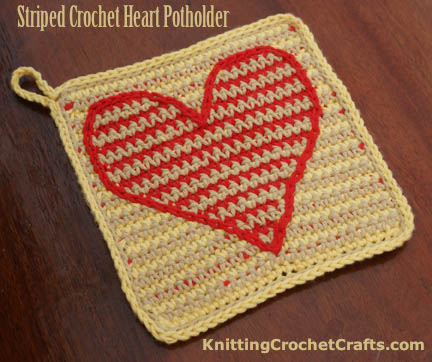
Striped crochet heart potholders could be a fun addition to any style of kitchen decor. You’ll work these potholders in rows of tapestry crochet, using a free charted design with striped heart motif. Read on to find the free crochet pattern and free chart for crocheting the potholders.
This design is unique because, even though it is worked in rows instead of rounds, all the mid-row color changes take place on the back of the work.
These striped heart potholders are ideal for use on Valentine’s Day or other romantic occasions — but it doesn’t have to be a holiday for you to enjoy them. They’re also fantastic for everyday use.
Similar Crochet Patterns: Heart patterns | Potholder Patterns | Kitchen Crafts | Valentine’s Day Crafts | Holiday Crafts
Materials You’ll Need for Crocheting These Potholders:
Yarn:
For each potholder, you’ll need three different colors of worsted weight wool or cotton yarn. The sample was worked in Peaches & Creme cotton yarn in the following colors:
- Yellow (Color A — Corresponds to lightest color on the striped heart chart)
- Camel (Color B — corresponds to medium color on the chart)
- Red (Color C — corresponds to darkest color on the chart)
Feel free to substitute any similar cotton or wool yarn if you prefer.
Crochet Hook
H / 8 / 5.0 mm crochet hook, or size needed to obtain gauge.
For Weaving in Ends: Tapestry needle
Crochet Abbreviations Used in This Pattern:
- ch = chain
- sc = single crochet
- sl st = slip stitch
- st(s) = stitch(es)
Dimensions of the Finished Potholder
Each of these potholders measures approximately 7 inches square, not including the hanging loop. The hanging loop measures about 1.5 inches.
Gauge and Row Gauge:
7.5 stitches and 7.5 rows = 2 inches.
Gauge isn’t too critical for success with this project; you’ll be able to use your potholder even if it turns out a few inches larger or smaller than my sample potholder. However, it is still a good idea to check your gauge; if your gauge is drastically different, you’ll want to switch crochet hooks.
Pattern Notes:
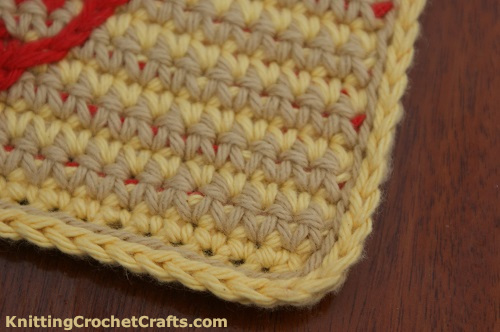
Color Changes: While working the charted heart design, you will have one active color and two inactive colors. Crochet overtop of both inactive colors; hold them horizontally, so that they are parallel to the last row you worked. When you form your next stitch, the inactive colors will be hiding inside of the stitch.
Crocheting Over Your Ends: One other technique you’ll find helpful: be sure to crochet overtop of your yarn ends after you change colors. If you don’t do this, you will end up with too many ends to weave in (unless of course weaving in ends is your favorite thing to do, in which case, have at it.)
Using these techniques together, you’ll produce a stiff, thick fabric that is well-suited for potholders.
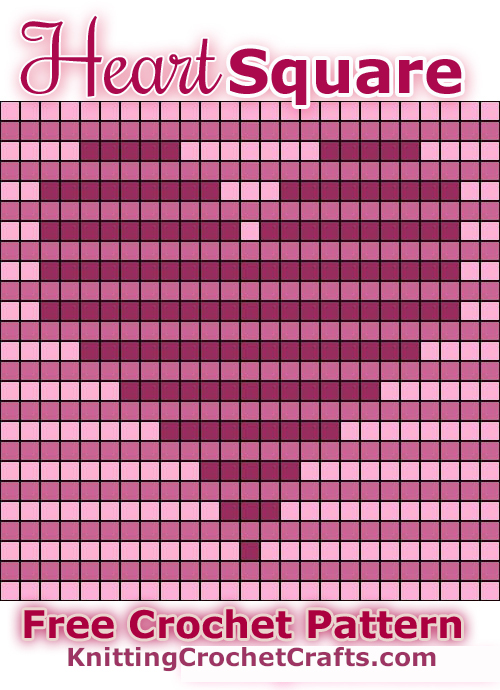
Striped Heart Chart:
How to Crochet the Potholders:
Using color A, ch 26. sc in 2nd ch from hook.
Begin working the striped heart chart. To keep a consistent look throughout the project, you may wish to work overtop of color B and color C starting with row 1. Work in sc, turning your work at the end of every row; use a turning chain of 1 stitch.
Starting with row 2, work through both loops of the stitches in the previous row.
When you’ve completed the chart, do not end off; change colors to color B.
How to Crochet the Edging Around the Potholder:
Edging Round 1: Using color B, work evenly spaced sl sts all the way around the potholder. At the end of the round, change colors to color A.
Edging Round 2: Work through back loops only of the sl sts in the previous rounds. Work 1 sl st in each sl st, all the way around the potholder. When you get to the upper left hand corner, ch 12 to form the hanging loop for the potholder. Then join the work to the body of the potholder with another sl st.
When you have worked a sl st in each of the sl sts from the previous round, cut the yarn, leaving a tail of yarn at least 6 inches long for weaving in. Then, remove your hook, and insert it from back to front through the next sl st. Grab the active loop and pull it through the stitch so that it will be on the back of the work. Then end off.
Weave in the ends carefully using a tapestry needle. Your work will be visible on the back of the potholder, so be as neat as you can.
Heart Outline in Surface Crochet (Optional)
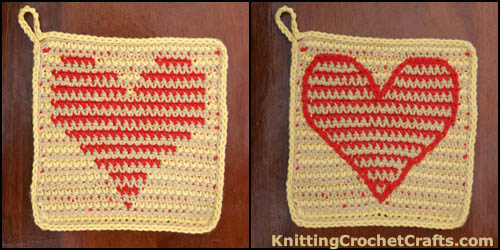
To make the heart design stand out more, you may wish to work an outline around it in surface crochet. You can use any color you like. I used color C (red) for the outline in the sample potholder.
To do this, I worked surface crochet slip stitches on the surface of the potholder, all the way around the heart.
There you have it: A finished striped crochet heart potholder. If you want to make a pair of potholders, simply repeat the process to make a second potholder identical to the first.
Enjoy!
More Free Patterns for Potholders
- Crochet Potholder Patterns — This list features mostly free crochet potholder patterns, plus a few suggestions for pattern books that are worth paying for.
- Free Crochet Pattern for Pretty Afghan Stitch Potholders — Who says potholders have to be dull? Use the afghan stitch to crochet these delightfully pretty potholders for your kitchen.
- Free Crochet Cupcake Potholders Pattern — These make delightful Christmas gifts, but they are useful all year around. Make a pair for yourself, too!
More Free Patterns for Kitchen Accessories
- Kitchen Dishcloth Patterns
- Coaster Patterns
- Placemat Patterns
Crochet Techniques
Learn More About Crochet:
- Click Here to Learn How to Crochet; This Link Takes You to a Total Beginner’s Guide to Crochet.
- Click here to find crochet stitch tutorials and instructions.
- Click here to learn more crochet techniques.
- Click HERE to Find Fabulous Yarn for Crochet and Knitting
- Click here to learn about crochet hooks.
- Click here to find my favorite crochet project bag.
Learn About Other Crafts: Knitting, Sewing, Quilting, Paper Crafts and More
- Click here to get updated on the latest craft supplies.
- Click here to learn about knitting.
- Click here to find our beginner’s guide to knitting needles.
- Click here to find outstanding craft project ideas.
Posted By: Amy Solovay
Page last updated on 7-9-2021. Thanks for visiting!