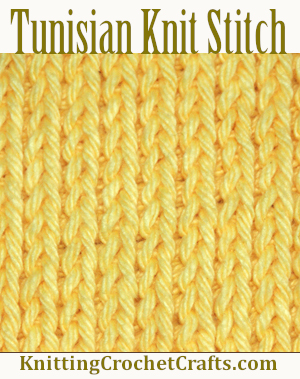
Learn How to Do Tunisian Knit Stitch With This Free, Step-By-Step Photo Tutorial.
Want to learn how to do a crochet stitch that looks just like knitting? Check out this Tunisian knit stitch crochet tutorial, and then practice your new skills using FREE Tunisian knit stitch patterns.
One of the questions crafters ask me most frequently: How do I make my crochet look like knitting?
The answer: Yes, there is. There are actually multiple ways to do this. One possibility is to use the Tunisian knit stitch, which I will demonstrate for you momentarily. The other is to use the Shallow Single Crochet stitch. The best resource I’m currently aware of on learning the shallow single crochet stitch is a book called Fair Isle Mittens.
Both of these stitches look highly similar to the stockinette stitch in knitting.
One important caveat: There is no real substitute for knitted stockinette stitch; if stockinette stitch is what you want, it’s better to just spend the time knitting that stitch than it is trying to mess around with crocheting lookalikes. Neither of these lookalike crochet stitches behaves quite like the stockinette stitch, which tends to be thin, flat and gloriously stretchy.
The Tunisian knit stitch lies reasonably flat on the front of the work, but on the back, it is heavily textured. It does not have the slim, sleek profile that knitted stockinette stitch has. Nevertheless, it is a wonderful stitch with many interesting uses.
The shallow single crochet stitch doesn’t behave quite like the knitted stockinette stitch, either. The shallow single crochet has a lot less flexibility and stretch; it is fairly thick and stiff. But it, too, is a fantastic stitch with zillions of possible uses. I hope you’ll give both of these stitches a try and see what you think of them.
So let’s take a look at how to do Tunisian knit stitch, step by step:
How to Hold a Tunisian Crochet Hook
Your first priority is to learn how to hold a Tunisian crochet hook. Perhaps you already know how to do the afghan stitch or another Tunisian crochet stitch; if so, you’ve no doubt already figured out how to hold your Tunisian crochet hook. If you haven’t yet learned this important skill, take a look at the following photo:
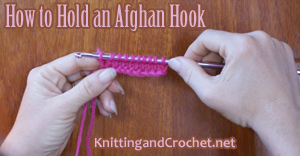
You hold the hook with an overhand grip that’s similar to the way you hold a knife when you use it to cut with; only instead of holding your hook tightly, you want to use a looser, more flexible type of grip.
Begin by Making a Starting Chain
To get started, crochet a foundation chain of any length greater than 2 stitches.
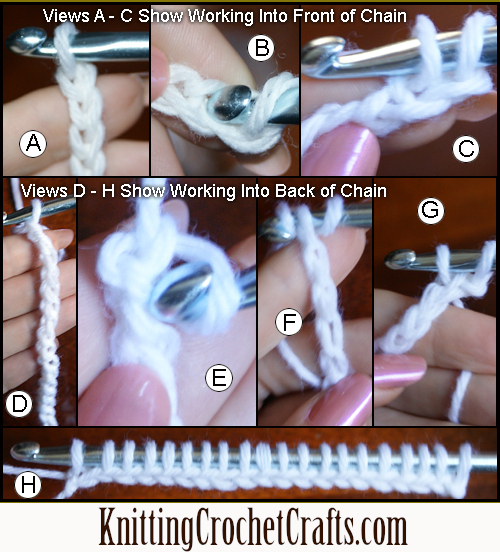
To begin the Tunisian knit stitch, you could work into either the front side or the back side of your starting chain. I usually prefer to work into the back of the starting chain; that way, there will be two loops free to work into across the lower edge in case I want to later add an edging or embellishments to my work. If you take a look at the lower edge of the work in view H, you’ll see what I mean by “two loops free”.
Views A, B and C show you how the work looks if you crochet into the front loops of the foundation chain.
Views D, E, F, G and H give you an idea of how the work looks if you crochet into the back bumps of the stitches in the foundation chain.
To get started, insert your crochet hook into the second chain from your hook. View B shows my crochet hook pointing to the spot where I’d insert my hook if I were going to work into the front of the chain stitch. View E shows my crochet hook pointing to the spot I’d insert my hook when working into the back of the chain stitch. View F shows my crochet hook inserted into the chain stitch.
Next, pull up a loop. (Views C and G.) You’re going to leave this loop on your crochet hook for now.
Insert your hook into the next chain stitch and pull up another loop. Repeat that step, inserting your hook into the next chain and pulling up another loop. Keep pulling up loops until you have one loop on your hook corresponding to each chain stitch in your starting chain.
When you’re finished with this, your work will somewhat resemble view H in the photo collage.
Don’t turn your work; keep the front of the work facing you.
I’ve seen different terminology applied to this beginning row. It is sometimes called the “base row,” and is sometimes referred to as the “foundation row.” There may be other names for it in addition to these.
Rows like this where you are drawing up loops can also be called the “forward” or the “forward pass.”
Tunisian Knit Stitch Return — Reverse — Return Pass
The next part has several different possible names. Some people call it the “return” or the “return pass.” Some people call it the “reverse;” this is the name given to it in The Harmony Guide to Crochet Stitches compiled by James Walters and Sylvia Cosh.
When following other designers’ patterns constructed using this stitch, you’ll find that some people call this “row 2” of the work, while others envision it as being the second half of row 1.
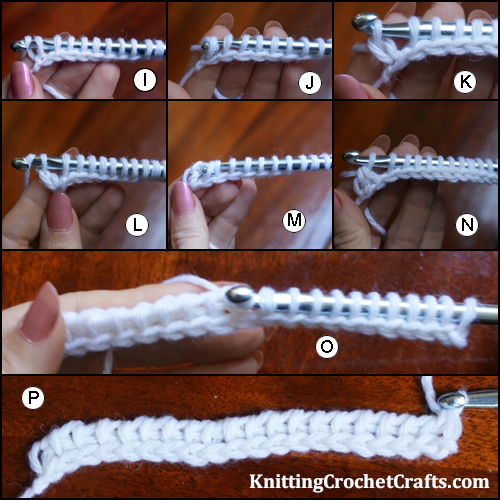
To complete the return pass / reverse for the Tunisian knit stitch, work a chain stitch by looping the yarn over your hook and pulling it through the last loop on your hook (Views I, J and K.)
*Yarn over (View L) and pull it through through two loops (Views M and N.)
Repeat from * all the way across the row until only one loop remains on your hook. (Views O and P) The remaining loop on the hook will count as the first stitch in the next row.
Again, the terminology for this aspect of the technique is not standardized. Some people call this “working off the loops;” you might read instructions telling you to “work off the loops by twos.” Others refer to this as “binding off” or “casting off,” which is perhaps how a knitter might express it; there are definite similarities here to the process of binding off in knitting. There are probably more ways than these to refer to this process; those terms are just a few that immediately come to mind.
If you were going to crochet rows of the afghan stitch, the next step would be to work stitches into the vertical bars all the way across the next row. You’re not going to do that here, but the vertical bars create an important frame of reference.
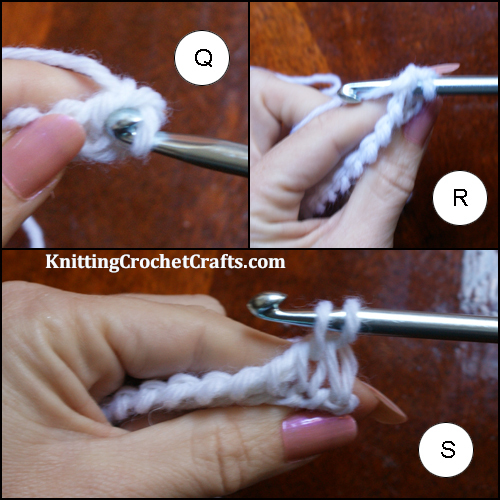
There’s a vertical bar below your active loop, but you can’t really do anything with that one, so just ignore it and use the next closest vertical bar as your reference point. Using your crochet hook, you’re going to pierce the fabric completely through from front to back, as shown in view R, and the spot to do it is directly to the right of the vertical bar. (View Q.)
After you’ve pushed your hook through the fabric, yarn over and pull up a loop. If your hook went in at the correct spot, the result will look something like view S.
Continue pulling up loops in this manner all the way across the row.
Working More Rows of Tunisian Knit Stitch
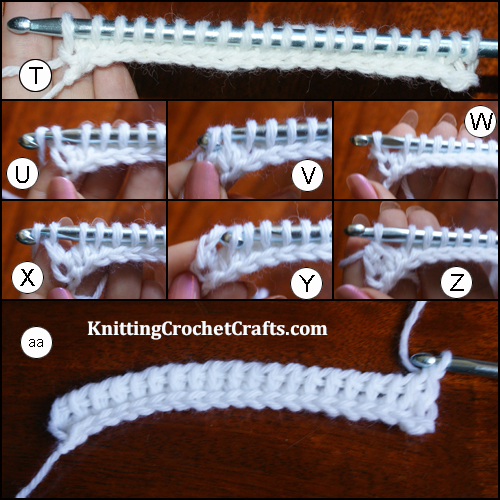
Next you’ll repeat the steps for completing the return pass / reverse; it’s exactly the same here as it was the first time you did it.
To add more rows of the Tunisian knit stitch, just keep repeating the steps you already learned; after you work the reverse, the work will look something like view aa; then you proceed with drawing up another row of loops and working them off by twos.
Check Out Free Crochet Patterns for Practicing Your Tunisian Knit Stitch:
Ready to try a project using the Tunisian knit stitch?
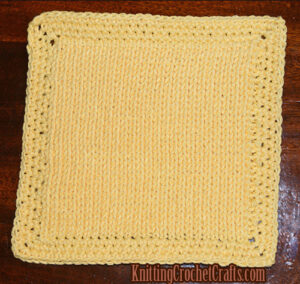
This Tunisian Knit Stitch Dishcloth Pattern is a free crochet pattern that utilizes the Tunisian knit stitch plus the single crochet stitch. The result is a dishcloth that’s crocheted but looks knitted.
The dishcloth is a good first project for people who have never tried this stitch before — because it is basically just a rectangular piece of the knit stitch fabric, with an edging added. It’s an easy project.
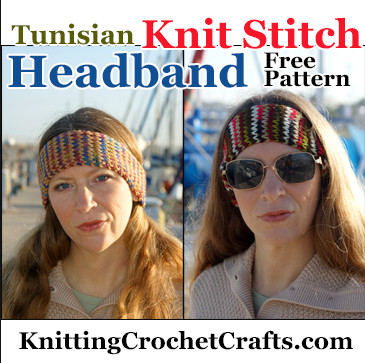
This Tunisian Knit Stitch Headband is a stylish project that you can use as an ear warmer, or you could also use it for keeping your hair tidy and off your face.
Learn How to Do Tunisian Knit Stitch Colorwork in the Fair Isle Tunisian Crochet Book:
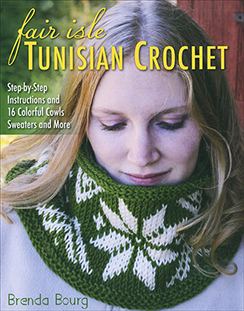
Author Brenda Bourg has devoted an entire, ground-breaking crochet book to the topic of exploring the Tunisian knit stitch and interesting ways you can use it. If you’d like to learn how to crochet blankets, sweaters, headbands, fingerless gloves, boot cuffs and other projects that look just like Fair Isle knitting projects, you’re going to love this colorful book. It’s both a crochet pattern book and a crochet instruction manual featuring step-by-step stitch tutorials and detailed information about how to succeed with colorwork projects in Tunisian crochet.
Find More of My Picks for the Best Tunisian Crochet Books:
I’ve posted recommendations for my favorite Tunisian crochet pattern books, many of which include patterns that incorporate the Tunisian knit stitch. I invite you to check ’em out.
Thanks so much for visiting!
Posted By: Amy Solovay
This page was last updated on 6-23-2023.