Free Crochet Pattern and Instructions
Project Inspiration
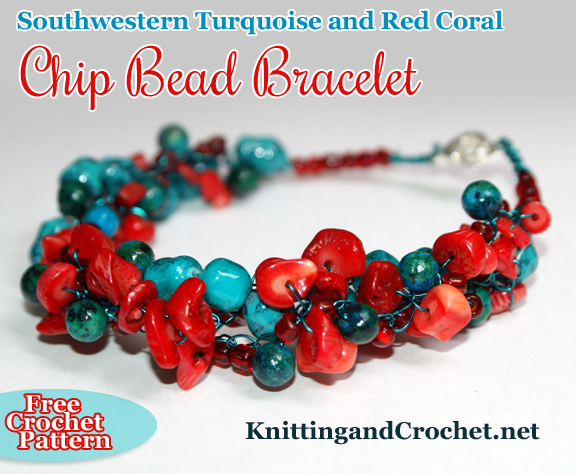
This bracelet was inspired by the American Southwest, with its vibrant color palette and gorgeous turquoise stones.
Depending on your style, you could make this bracelet in the same colors to wear with jeans, a turquoise concha belt and cowboy boots for a Southwestern look; or you could make your bracelet in a different color scheme which complements your own wardrobe perfectly. Or make it for a friend in her favorite colors.
Materials Needed for Making the Bracelet:
The list below gives you a detailed summary of the craft supplies that I used to create the sample bracelet. You may wish to make substitutions, in fact, I recommend doing so in the case of the largest beads — which in hindsight I think are a little too big.
- 26 gauge wire; in the sample bracelet, I used dark green permanently colored copper wire.
- Red coral stone bead chips
- I used large glass beads that resemble turquoise, but in hindsight I suggest using smaller beads instead of these.
- Round jasper beads
- Red glass 6/0 seed beads
- A crochet hook; I used a size B aluminum hook, but feel free to use whatever size feels comfortable to you for wire crochet.
- A clasp or closure for the bracelet; I used a lobster claw clasp, but you may have a different closure in mind for yours — which is fine too.
- A sturdy clipboard (optional) to help you do the braiding when it is time to finish your bracelet.
- Optional but Highly Recommended: Crimp beads and crimp pliers or flat-nosed pliers; I didn’t use these to make this bracelet (because I didn’t know about them at the time I designed this project) but, in hindsight, I can see that they would give you a better way to finish the project than the way I’ve suggested doing it.
Special Stitch: The Beaded Chain Stitch
To crochet the beaded chain stitch, first string your beads onto your spool of wire. You’ll want to string ALL the beads you need for that strand only onto the wire. It’s a good idea to string a few extra, just in case. It won’t be a big deal if you end up not using them, but it will be a real headache if you run out of beads before each strand is the length you want it to be.
To work the beaded chain stitch, begin by making a slip knot with the wire, leaving at least a 6 inch tail of wire to use later for finishing the bracelet.
Then grab the closest bead and slide it up the wire, holding it close to your slip knot. Reach around the bead with your crochet hook and grab the wire; then pull it through to complete the chain stitch. The bead will be trapped inside the stitch, so it’s a beaded chain stitch.
To make the next one, slide the next bead up the wire and hold it close to the work; then reach around the bead with your crochet hook, grab the wire with your hook and pull it through. That’s another complete beaded chain stitch.
Continue working in this way until the strand is the length you want it to be. At that point, cut the wire, leaving at least 6 inches of wire to work with for finishing off your bracelet. Grab the end of the wire with your crochet hook and pull it through your active loop to finish.
How to Make the Bracelet:
Gather your materials and supplies.
To make this bracelet, you will use wire and beads to create 3 different strands of beadwork. Then you will braid the three strands together. To finish, you’ll string an additional 6 seed beads at each end, then add a closure such as a lobster claw clasp.
Bead Strand #1 — In my sample bracelet, I used green wire and red coral stone bead chips to crochet the first bead strand using the beaded chain stitch.
Bead Strand #2 — The bead stringing pattern for this strand is as follows: two 6/0 red seed beads followed by one round jasper stone bead. Repeat. At the end of the strand, add an additional 2 red 6/0 seed beads. After you’ve strung the beads onto the wire, use the beaded chain stitch to crochet the entire strand.
Bead Strand #3 — In my sample bracelet, I strung the large faux turquoise glass beads onto wire without crocheting them. You may wish to approach your bracelet differently than I did; see notes below for additional insights.
Finishing the Bracelet:
After you have made all three of your bead strands, it’s time to braid them together. To accomplish this, you can either have a friend hold the ends for you while you braid, or you can clip the ends onto a clipboard and hold the clipboard in your lap.
First, braid the three six-inch ends of wire together. Then gently braid the 3 bead strands together, taking your time and manipulating the beads and wire gently to achieve the nicest possible appearance you can get.
At the end, braid the other 3 six-inch wire ends together.
String 6 more seed beads overtop of one braided end piece, and secure part of the lobster claw clasp to that end. Twist the end of wire onto itself to secure it, then cut off or hide the excess ends of wire.
Repeat on the other side with the other part of the closure.
A Story About This Bracelet
I designed this bracelet right before setting sail on the longest trip I’ve ever attempted: sailing across the Atlantic Ocean and the Mediterranean Sea. I had planned to post the bracelet pattern online before I left, but I ran out of time and never got around to it.
The trip across the ocean was stormy and dangerous, and we encountered many periods fraught with strong winds and big waves. It was an uncomfortable trip — not only for me and Mike, but for this bracelet as well.
When I arrived in the Mediterranean, I discovered that the bracelet was broken. The strand of beads that was strung without crochet work was the part that broke; it snapped in two.
Why am I telling you this? Well, mainly just so you’re aware that pieces like this are more delicate than you might think they would be. This design is apparently particularly vulnerable. I did bring several similar pieces along for the trip, and out of all of them (which were all stored in the same jewelry box) this is the only one that broke.
If you plan to take your wire jewelry on a trip, be sure to pack it carefully. Treat it gently, and avoid subjecting it to excessively rough abuse (like my bracelet endured in its journey across the Atlantic.)
It’s possible that the design of this bracelet may have had something to do with the piece’s fragility. In hindsight, I think my bracelet would have traveled better if I had used smaller beads, and if I had crocheted all three bead strands instead of stringing one strand of beads without crochet. This is only a hypothesis, but I’ve formulated the opinion based on all the other pieces that made the journey safely.
With that in mind, I invite you to use this pattern as a jumping-off point, and try making some substitutions that will improve on this design. I also hope you’ll enjoy both the creative process, and your finished bracelet. Happy crafting!
Over to You:
Which craft projects are you interested in working on next? Let’s talk about it in the comments.
If you found this page helpful, I invite you to return to this site often for more craft tutorials, project ideas and inspiration! You can make sure you keep this site on your radar by signing up for my newsletter and community at Substack. .
Basic subscriptions are free; I send out regular newsletters to let my subscribers know about new craft articles and tutorials as they are posted. I also share details about the craft projects I’m working on, and invite my readers to share their projects, too. So there is no need to feel like it’s just you, crafting all alone at home. I’d love to have you join us! You’re invited!!
By Amy Solovay
Please Visit My Ko-Fi Shop HERE to Find My Sample Sale, Destash Sale and Digital PDF Pattern Downloads for Sale.
Please Visit My Ravelry Store HERE to Find Digital PDF Pattern Downloads for Sale.
About the Author:

Amy Solovay is a real, live, human content creator and educator who holds a Bachelor of Arts degree in mathematics from Sweet Briar College; she has also earned a separate Associate of Arts degree in textile design from FIDM LA (The Fashion Institute of Design and Merchandising, Los Angeles). She is NOT a robot and does not use artificial intelligence (AI) to write book reviews or articles for this website.
Amy learned to crochet as a small child, and she still enjoys crocheting all these years later.

As an educator, Amy Solovay used to teach in-person college courses in trend forecasting, marketing and surface design at California Design College in Los Angeles.
If you’re interested in reading Amy’s personal blog, she invites you to visit her official website, AmySolovay.com.
Find More Wire Crochet Bracelets
- Red Coral Chip Bead Bracelet in Wire Crochet
- Rose Cat Eye Chip Bead Bracelet
- Wire Lace Cuff Bracelet
- Tunisian Crochet Wire Bangle Bracelet
- Cotton Candy Necklace in Wire Crochet
- Freshwater Pearl Necklace Pattern
- Rose Chip Bead Necklace in Wire Crochet
See Also:
More Craft Pages You Might Enjoy:
- Craft Supplies
- Knitting
- Knitting Supplies
- Lace Knitting
- Cable Knitting
- Knitting Techniques
- Knitting Yarn
- Quilting
- Jewelry Making
- Best Tools for Jewelry Making
- Beadwork
- Sewing
- Sewing Appliques
- Kitchen Crafts
- Paper Crafts
- Ribbon Crafts
Find More Craft Project Ideas HERE!
This page was last updated on 11-9-2025.