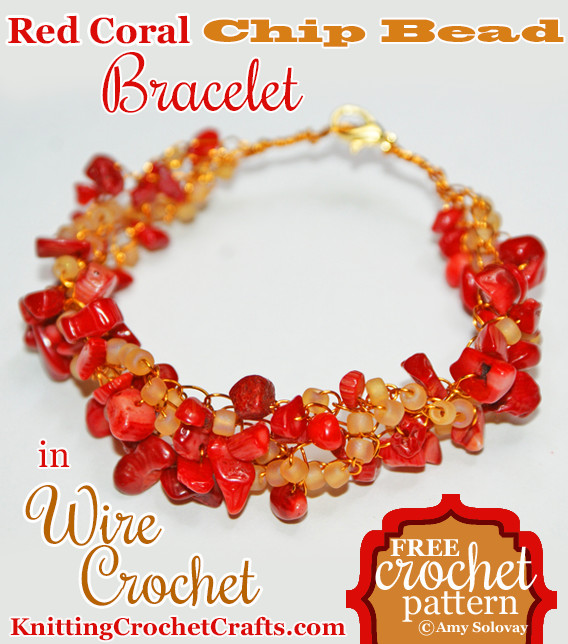
Got stone bead chips in your craft supply stash? Need a chic, stylish idea for using them in a jewelry-making project? If so, I invite you to be inspired by this red coral chip bead bracelet in wire crochet. You could make a bracelet just like this one if the project appeals to you — or you could use it as inspiration for creating a similar design if you prefer.
While the bracelet might appear complex at first glance, it’s actually one of the easiest wire crochet projects you’ll encounter. I don’t think of wire crochet as being an easy crochet technique, exactly; but as far as wire crochet projects go, this one isn’t too complicated.
You’re basically going to make three different beaded chains, like these:
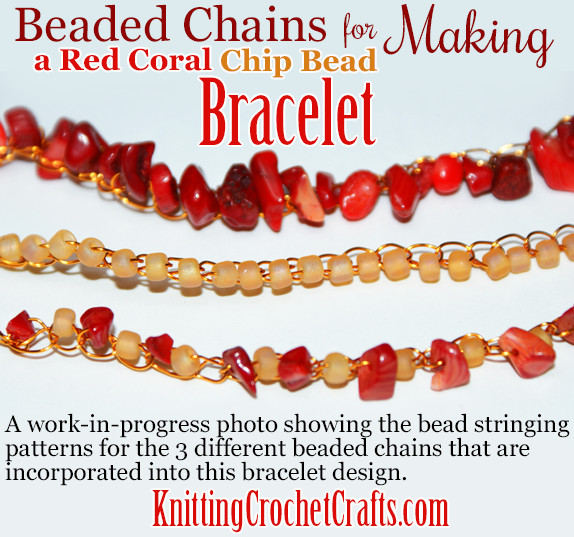
Then you braid all three of the chains together to create the bracelet design.
Materials List:
You’ll need the following materials to make a bracelet like this one. Feel free to substitute materials if you like; if you want to use different beads or different colors, your bracelet will turn out to be a unique, one-of-a-kind creation.
- Beads: The sample bracelet features two different types of beads:
- Red coral chips by Bliss Beads
- 6/0 glass beads in a color that looks like a frosted, opalescent butter yellow.
Bead chips are available in many different colors and materials; you can obtain interesting stone chips in color combinations that are simply stunning. I do love the red coral chips pictured, but would also love to try this design again using other types of bead chips. Feel free to experiment.
Wire: I recommend 26 gauge wire for this project. I used colored copper wire by Darice. This wire was purchased in a multi-pack so I don’t know the exact color name; it’s a color that looks like a deep, orange-y gold. You’ll also need wire cutters for cutting the wire.
Jewelry Findings: You’ll need a closure for your bracelet. The sample bracelet features a goldtone lobster claw clasp. If you can find a closure that’s an exact color match for your wire, that would be ideal, but if not just use the closest match you can find.
Crochet Hook: Size B / 2.25 mm aluminum hook or your preferred size hook for wire crochet. Be sure to choose a sturdy hook, and one you don’t care too much about; I make this suggestion because it’s possible that your hook could bend or break while you work this project.
Finished Bracelet Size:
You can make this bracelet to fit any size wrist.
Measure your wrist, or the wrist of the person who will wear the finished bracelet. Add an inch or two to this measurement to allow for some “ease.” If you’re using large, chunky beads, go for two inches; if you’re using small beads, an inch is probably sufficient. You can add more ease than that if you’d like a loose-fitting bracelet, or less ease if you want a tighter-fitting bracelet. The number you decide on here is going to be the length you make each beaded strand.
Bracelet Instructions:
You are going to crochet 3 separate beaded strands, then braid them together to form the bracelet.
Make one strand at a time. Begin by stringing your beads onto your wire in the order you want them to appear in the finished bracelet. Leave a length of wire unworked at the beginning — at least 4+ inches long. (Do not count this length in your finished measurement.) Make a slip knot. [Slide a bead right up close to your crochet hook. Reach around the bead with your hook and grab the wire; pull a loop through to make a chain stitch with a bead caught inside.] Repeat the sequence noted in brackets until your strand is the length you decided you want to make. Leave another 4+ inches of wire at the end. Cut the wire and pull the end through your active loop. Set the piece aside while you make the other 2 strands.
For my sample bracelet, I made one strand using just the red coral chips; I made another strand using just the seed beads; and then I made another strand alternating the red coral chips with the seed beads, every other bead. For all three strands, the crochet instructions are the same; it’s only the stringing and type of bead used that’s different.
Align the strands so that you are holding them with the starting slip knots all in the same place. You should have 3 ends of wire poking out; braid these together as tightly and neatly as you can. Then shift the bracelet so that you can comfortably braid all three strands together. You’ll want to braid slowly and manipulate the strands as you braid, so that the beads all sit nicely and look good where you put them. When you are finished braiding, braid the other 3 ends of wire together, again making the braid as tight and neat as you can.
Attach your closure at the ends and cut off any excess wire. The bracelet is now ready to be worn, or given as a gift. Enjoy!
Find More Crochet Jewelry Patterns
- Tunisian Crochet Wire Bangle Bracelet Pattern
- Freshwater Pearl Necklace in Wire Crochet — Free Pattern and Instructions
- Crochet Necklace Patterns
- Crochet Bracelet Patterns
Find Free Wire Crochet Instructions
- Learn How to Crochet With Wire and Beads — Free Tutorial
More Spectacular Bead Crochet Patterns
More Crochet Techniques
Crochet Loom Blooms by Haafner Linssen, published by Interweave. The paperback edition of this book comes with a starter loom, and it includes patterns for 30 flowers plus 5 finished projects. This page was last updated on 7-25-2023.