Are you wondering how to crochet a baby hat — or looking for a crochet baby hat pattern that’s easy enough for total beginners? There are many possible approaches you could take, but this ribbed crochet baby beanie pattern will introduce you to one of the easiest possibilities. This is actually a great crochet project for anyone, from beginners to advanced crochet enthusiasts.
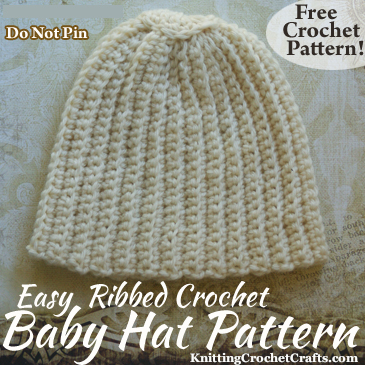
This cute fall and winter-friendly ribbed baby beanie will help to keep a little one’s head warm. Not only that, it’s super stylish and fun, too. It’s a great unisex design that works equally well for baby boys or baby girls. The off-white color shown here is a great choice either way, and it works well if you are crocheting for a baby who hasn’t yet made his or her grand entrance into the world. It’s also a great color choice for charity crochet projects since you don’t always know whether a baby boy or girl will be the recipient of the baby hat you’re making.
As far as crocheted baby hats go, this is one of the simplest designs you could make. For a beginner, this project is a great way to get acquainted with single crochet stitch worked into the back loops — which is a little different than ordinary single crochet stitch, but it’s just as easy. This fascinating stitch is the secret to creating the eye-catching, stretchy ribbing that makes this little baby hat so appealing.
For crocheters who are past beginner status, this is an easy, relaxing, meditative crochet project that works up quickly. It’s a wonderful pattern to have in your crochet pattern stash, considering you’re likely at times to receive last-minute baby shower invitations from family members, friends, colleagues or neighbors. For an experienced crocheter this hat only takes a few hours to whip up, and it makes a fantastic baby shower gift.
Supplies Needed to Crochet This Baby Hat:
- Crochet Hook — You’ll need a size H / 5.0 mm crochet hook, or any crochet hook that gives you the right gauge for this pattern.
- Yarn — Use medium weight (worsted weight) yarn. For best results, I recommend using a smooth, basic wool yarn in a light or bright color. I made my project sample using Knitpicks Bare Swish merino wool, a yarn I highly recommend for baby projects. I made a baby sweater and hat set out of this yarn for my best friend’s baby shower, and her little one wore the sweater almost daily during her first fall and winter. It took a surprising amount of abuse while only showing minor signs of wear and tear. I had enough yarn left over from that project to make this hat for her, and I’m planning to order more of the yarn to make more projects for her this winter.
- Tapestry Needle — You’ll need a blunt needle with a large eye, such as a tapestry needle or darning needle, to stitch the final details and weave in the ends when you are finished crocheting this project.
- T-Pins — Pins are optional, but if you happen to have them, they’ll be a great help to you when it comes time to finish the hat.
- Embellishments — There are lots of fun ways you could embellish this hat; for example, you could stitch on a crocheted flower or an embroidered patch. I’m still working on making the flower I want to pin to a pretty hat I made; if all goes according to plan, I’ll be sharing that pattern shortly, but in the meanwhile you can click here to find crochet flower patterns.
Abbreviations Used in This Pattern:
- beg = beginning
- ch = chain
- chs = chains
- dc = double crochet
- ea = each
- rep = repeat
- sc = single crochet
- sl st = slip stitch
- st = stitch
- sts = stitches
- () = parentheses — repeat the series of instructions inside the parentheses as directed.
Skill Level: Beginner
Fitting, Gauge and Finished Baby Hat Size:
One of the things that makes this hat such a beginner-friendly crochet project: it’s really easy to customize the fit to make it perfect for the intended wearer.
If you want to make this hat for a baby you know, measure the baby’s head circumference to customize the fit. If you’re making this as a charity crochet project, or as a gift for a baby who has not been born yet, you may wish to use the standard head circumference measurement of 16 inches. Each child is unique, but this will fit the average baby at approximately 6 months of age.
The one-year-old recipient of this hat has a head circumference of approximately 17 inches, so you could use that as a reference point if you want to make the hat fit a baby of about a year old — however, if you’re making the hat for a baby who has already been born, it’s ideal to get the child’s actual head measurement to get the fit correct.
Finished Size: The pictured baby hat measures about 6.25 inches long from the top of the circle down to the lower edge. It measures about 14 inches in circumference at its widest point.
Before finishing, my rectangle piece measured about 6 inches wide by about 14 inches when laid flat, and about 17 inches when stretched.
Gauge: After you crochet the first 4-6 inches of the pattern, measure the width of the piece. Ideally, it should measure 6 inches wide.
If your piece is narrower than 6 inches, it means your baby hat will turn out shorter than my project sample. This could possibly be OK for a preemie or a very young newborn baby, but it would probably be too short for a six month or year-old baby. In that case, you may wish to start over using a larger crochet hook.
If your piece is significantly wider than 6 inches, it means your baby hat will turn out longer than my project sample. That could possibly be just fine if you’re crocheting for a year-old baby and you want extra length available to fold up above the baby’s eyebrows; however, it is not ideal if you’re crocheting for a younger baby and / or you want the baby to be able to wear the hat without folding it up. In that case, you may wish to start over using a smaller crochet hook.
Important Note: Use Negative Ease When You Crochet This Baby Hat. What is “negative ease”, you might ask? “Ease” is a term used to refer to the amount of extra space you leave when you crochet anything wearable. For example, if you want to crochet a sweater for a baby with a chest measurement of 17 inches, you might actually make the sweater 20 inches around so there’s extra space to accommodate the shirt s/he’ll be wearing underneath, and so the sweater doesn’t feel too tight. That extra 3 inches of space is the “ease”.
With that in mind, “negative ease” means that you won’t leave any additional space; in fact, you want the hat circumference to be less than the baby’s head circumference. This is because you’ll be using a really stretchy stitch to crochet the hat, and you want the hat to actually stay put on the baby’s head.
To figure out how long to make your piece, don’t go by the flat measurement; instead, gently stretch the piece and then measure it. When the stretched measurement is about equal to the baby’s head circumference, that’s when you want to stop crocheting and proceed to finishing your hat.
How to Crochet the Baby Hat:
Crochet a Rectangle Shape:
Ch 27
Row 1: sc in back bump of ea ch st across the row starting with the 2nd ch from hook. You’ll end up with a total of 26 sts in the row. ch 1, turn.
Row 2: sc in back loop of ea sc st in the previous row. ch 1, turn.
Rows 3 and up: Rep row 2.
Continue working in back loop st until the piece measures a length that’s about equal to the baby’s head circumference when it’s gently stretched. Do not end off yet.
When you’ve determined that the hat is the right size for the baby’s head, the next step is to create a tube by joining the top of the rectangle piece to the bottom. I used slip stitch to accomplish this, but you could use whichever joining method you prefer; whip stitch would also be a suitable way to sew the side seam. If you decide to use whip stitch, you’ll have to end off before you proceed further, and leave a longer yarn tail than specified.
If you decided to use slip stitch, here’s what to do next: Pin the top and the bottom of the rectangle together; then work your slip stitches through one loop at the bottom of the rectangle and another loop at the top of the rectangle so you catch both ends together. Work sl st all the way across the row.
End off, leaving an extra long tail of yarn for finishing the hat. When I made my sample baby hat, I left a length of about 24 inches, which turned out to be too long. Try leaving somewhere around 15-18 inches.
Crochet a Small Circle:
Pull out a length of yarn around 8 – 10 inches long; then make your starting slip knot for the circle.
Round 1: ch 4. The last 3 chs count as 1 dc. Work 11 dc sts in fourth ch from hook for a total of 12 dc sts. Work a sl st in the top of the fourth ch in the round to join the end of the round to the beg.
Round 2: ch 1, sc in same ch as the last joining sl st, (work 2 sc in next dc, work 1 sc in next dc.) Rep the sequence in parentheses all the way around. Work a sl st to join the end of the round to the beg.
End off, leaving another 8-10 inches of yarn available for finishing.
How to Finish the Baby Hat:
To finish the baby hat, your next step is to return to the tubular piece you created and thread your tapestry needle with the long tail of yarn you left for finishing. You’re going to want to sew basting stitches all the way around the top edge of the hat to use for gathering the top of the tube and pulling it closed. To accomplish this, you’ll want to put 1-2 stitches in each row of the hat, then gather it, pull tightly, and work some more stitches to permanently close the top of the hat. Then turn the hat inside out and weave the loose end into the inside of the hat.
Next, you’ll want to stitch the little crocheted circle over the gathers on the outside (the right side) of the hat. To accomplish this, thread your tapestry needle with one of the loose ends on your circle shape; then stitch it to the hat until it stays in place over the gathers, and weave your loose end into the inside of the hat. Then thread the tapestry needle with the other long tail of yarn and use that for additional stitching; then weave that loose end into the inside of the hat as well.
The end result is a cute, warm baby hat fit for a tiny prince or princess! I hope s/he’ll enjoy it.
More Crocheted Hats:
More Crocheted Baby Patterns:
Learn More About Crochet:
- Click Here to Learn How to Crochet; This Link Takes You to a Total Beginner’s Guide to Crochet.
- Click here to find crochet stitch tutorials and instructions.
- Click here to learn more crochet techniques.
- Click HERE to Find Fabulous Yarn for Crochet and Knitting
- Click here to learn about crochet hooks.
- Click here to find my favorite crochet project bag.
Learn About Other Crafts: Knitting, Sewing, Quilting, Paper Crafts and More
- Click here to get updated on the latest craft supplies.
- Click here to learn about knitting.
- Click here to find our beginner’s guide to knitting needles.
- Click here to find outstanding craft project ideas.
Posted By: Amy Solovay
Page last updated on 6-24-2021. Thanks for visiting!
Amy