Learn How to Crochet a Plarn Dish Scrubber With This Free Pattern
See More About: Kitchen Crafts | Crochet Scrubbie Patterns | Crochet With Plastic Bags | Upcycled and Recycled Crafts
This scrubbie is an environmentally-friendly crochet project, and it’s frugal too. Rather than buying scrubbers at the store, you can make them yourself, and in the process you’ll be able to save a little cash; this project is made using mostly free materials, as well as materials that many people would otherwise toss in the trash.
The scrubbie is crocheted using “plarn,” AKA “plastic yarn,” and its scrubbing power comes from a scratchy textured produce bag.
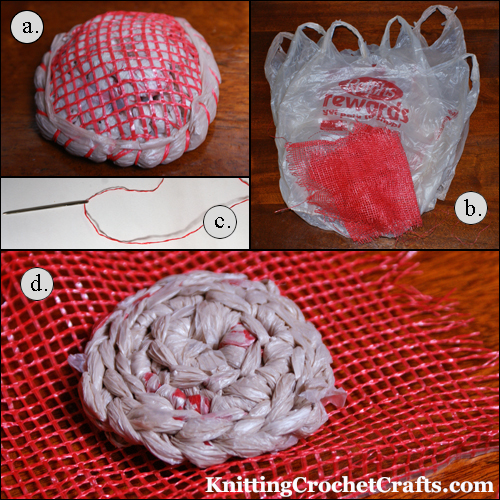
See photo (a.) above for a picture of how the completed scrubber looks.
I’ve tested my scrubber, and I found that it works well. I also recommend that you take a look at my pot scrubber pattern, which I like better than this scrubbie; it’s a bit more flexible and it’s also a little more abrasive.
I recommend this style of scrubber for use on everyday dishes — not so much the “fine china” — and for use on not-too-dirty pots and pans. If your pots have excessive amounts of burned-on goo stuck all over them, skip this scrubber and go for a scouring pad instead. For the fine china, I think it would be better for you to use a lovely crocheted dishcloth.
Skill Level: Intermediate
The stitches used in this pattern are all easy ones, but I’ve labeled this pattern as “intermediate” because plarn is a bit more challenging to crochet with than ordinary yarn is.
Supplies You’ll Need for Crocheting a Scrubbie:
Plastic Bags to Make Into Plarn (Also Known as “Plastic Yarn”):
To succeed with this project, it’s ideal to use two different types of plastic bags:
- For the crocheted part of the scrubbie, you can use ordinary grocery shopping bags. I needed 2 of them to make the sample scrubbie you see pictured on this page — but I’d recommend having at least three grocery bags on hand in case you use a bit more than I did, or in case you mess up and need a little extra material to work with.
- For the “scrubber” part of the scrubbie, you’ll need a small bit from a plastic mesh bag. It’s ideal to use material from one of those abrasive mesh bags that produce comes packaged in when you buy it at the grocery store or farmer’s market. We recently bought a 25 lb bag of oranges at the farmer’s market; now that the oranges are gone I thought this project would be a great way to re-purpose their bag. You can also get similar bags in the produce section at the grocery store; look for bags of onions, avocados, lemons, limes, etc.
See photo (b.) above to get a better idea of the materials I used.
Do not, under any circumstances, use trash bags to crochet this project; some trash bags contain pesticides, and you absolutely do not want pesticides to come into contact with your dishes. It’s better to use bags that are safe for coming into contact with food and groceries.
Crochet Hook:
K / 10 1/2 / 6.50 mm crochet hook
Other:
Tapestry needle for stitching one part of the scrubbie to the other; you’ll also need some sort of thread-like material. Instead of using actual thread, I pulled out a bit of the orange bag and threaded it through the needle. (See photo c above.) It worked fine for me, but if that doesn’t work for you, ordinary sewing thread should do the job.
Gauge:
Gauge is not particularly important for this project. If your scrubbie turns out too small, start over using a larger crochet hook; either that, or add an extra round or two. If it somehow turns out too big to be useful – I doubt that’s even possible? – start over using a smaller crochet hook.
Finished Size:
The scrubber measures approximately 3 inches in diameter.
Abbreviations Used in This Crochet Scrubbie Pattern:
- ch = chain
- sc = single crochet
- sl st = slip stitch
- st = stitch
Scrubbie Instructions:
Cut a plastic grocery bag into one long, continuous strip measuring approximately 3 inches wide by however long it turns out. If you run out of “plarn” at any point before round 3, cut up a second grocery bag in the same way, join it, and keep crocheting.
The crochet pattern below gives you a scrubbie that is gently concave; I created it this way because I think it’s easier to hold onto, and scrub with, than a flat circle would be. However, if you’d like yours to lie perfectly flat, you can use the first 2-3 rounds of just about any crochet circle pattern as a substitute.
Using the grocery bag, ch 5; sl st to form a ring.
Round 1: 8 sc in ring. Sl st to join to beginning of the round. Ch 1.
Round 2: Working in back loops only, work 2 sc in each sc all the way around. You’ll end up with 16 sc total. Sl st to join to the beginning of the round.
Round 3: Sl st in back loops of each sc st in the previous round, all the way around the piece. If you run out of “plarn,” you can just end off at that point. Otherwise, end off when you’ve finished working a sl st in each sc st around.
Weave in / cut off your loose ends.
Transforming the Crocheted Piece Into a Scrubbie
At this point, you have a crocheted circle. It could be used as a scrubber, but the scrubbing power wouldn’t be too impressive. It’s the next step that makes this more of an effective scrubber.
Next, use the crocheted circle as a template for cutting around the produce bag. Photo d shows the general idea, although in the end I decided to pick up both pieces and hold them together while cutting.
Stitch the cut-out circle-shaped piece of produce bag onto the crocheted plastic circle shape.
Cut off the handle of another grocery bag, making sure you have a piece that is larger than the circumference of your crocheted circle piece. You’re going to use this piece to camouflage the rough edges of the produce bag. See photo (a.) above for an example of how this is going to look when it is finished. Thread your needle again and manipulate the piece you cut out from the grocery bag handle so that part of it is on the top and part of it is on the bottom, with it wrapping around. Stitch around it as you go. When you’ve stitched all the way around, be sure to go a bit past your starting point to be sure that it’s reinforced. Then hide the end inside the piece and cut your “thread.”
Your scrubbie is now ready to use. While I’m not sure you’ll enjoy it – does anyone really enjoy doing dishes? – I hope you’ll at least enjoy the cost savings! Here’s hoping you never have to buy scrubbers again.
Related Resources:
- Fabulous Crochet Books for Home Decor
- How to Crochet for Beginners
- Crochet Stitches
- Crochet Techniques.
- The Best Yarn for Crochet and Knitting
- All About Crochet Hooks.
Learn About Other Crafts: Knitting, Sewing, Quilting, Paper Crafts and More
- Click here to get updated on the latest craft supplies.
- Click here to learn about knitting.
- Click here to find our beginner’s guide to knitting needles.
- Click here to find outstanding craft project ideas.
Posted By: Amy Solovay
Page last updated on 6-26-2021. Thanks for visiting!