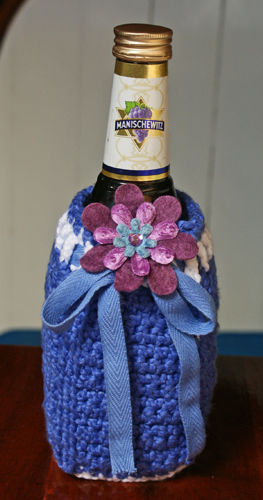
It can be hard to find a square wine bottle cover to fit bottles of Manischewitz or similar spirits. If you want one of these, it might be easier to crochet your own than it would be to find a commercially available square wine bottle cover. You’re in luck, because you’ve just landed on a page with a free crochet pattern you can use for making one of these.
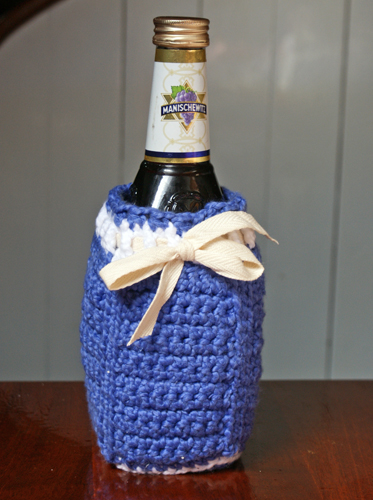
If you’re planning to bring a bottle of Manischewitz with you to a Passover Seder, or you want to give this wine as a gift to a friend, a wine bottle cover might be a welcome addition.
I’ve thought of several different ways to embellish the bottle cover; there’s a version with a menorah:
A Square Wine Bottle Cover Embellished With a Menorah
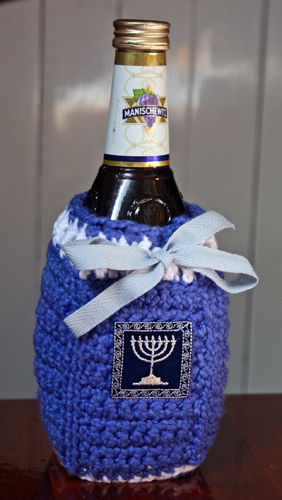
There are also several other versions that are suitable for all-occasion use.
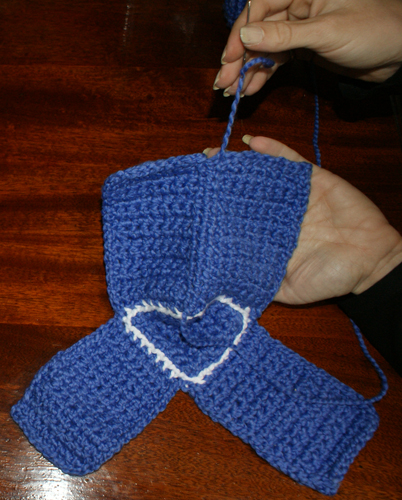
This wine bottle cozy is constructed in much the same way as a cardboard box with sides that fold up. Basically, you’ll crochet a flat piece shaped like a wide plus-sign. ( + ) Check out these photos:
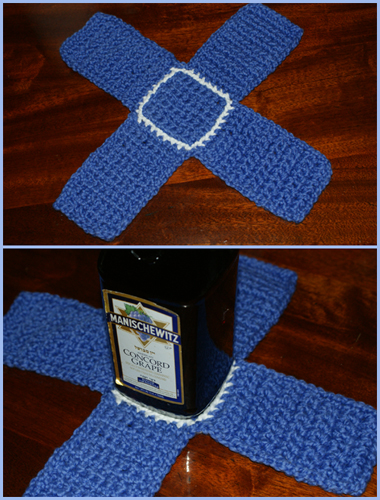
The center will be a square, and the square will have extensions emanating out from each side. The extensions will then be folded up and whipstitched together to form the square shape of the bottle cover.
Supplies You’ll Need to Make This Project:
Yarn in Two Colors: I used a textured organic cotton yarn called “Sprout” by Classic Elite. This is a chunky, machine-washable yarn that is now discontinued. One skein of the main color is more than enough for this project; I used about 2 oz. of yarn total. You’ll only need a small amount of the accent color.
Crochet Hook: I used a size J / 6.0 mm crochet hook. Adjust as necessary to get the required gauge.
Embellishments: Each version requires different embellishments. For all versions, you’ll need at least two feet of ribbon. You can also add faux flowers, buttons, embroidered patches or any other type of embellishment you like.
You’ll also need a tapestry needle for weaving in ends and stitching the sides of the box together.
Finished Size
My bottle cover was intended to fit a 750 ml bottle of Manischewitz kosher wine, which measures 11 inches around the bottle. The “square” portion of this bottle is in the neighborhood of 5 inches tall, and the entire bottle is about 10.5 inches tall. I tried my bottle cover on a few other similarly-designed bottles (a Jim Beam whiskey bottle, a Jose Cuervo tequila bottle, and a fancy vintage glass bottle) and found that it fits all of them. With the Cuervo bottle, I’d have liked to crochet a few more rows to make it taller, but otherwise it fit fine.
This cotton yarn (Classic Elite “Sprout” from the “Verde” collection) is somewhat stretchy, so it’s a challenge to give you precise measurements. The sizes given here are approximate. My sample bottle cover measures approximately 5.5 inches high; each side measures about 3 inches. The bottom measures about 3 inches square.
Gauge: You can use the bottom square of the wine bottle cover to check your gauge. It should measure approximately 3 inches square. If it turns out any larger than this, start over and try again with a smaller hook. If it turns out smaller than about 2 3/4 inches, choose a larger hook.
Crochet Abbreviations Used in This Pattern:
- ch = chain
- dc = double crochet
- sc2tog = single crochet two stitches together, AKA decrease
- sc = single crochet
- sl st = slip stitch
- st = stitch
Design Note
If you crochet tightly, whenever possible, crochet overtop of your loose ends. If you crochet loosely, it might be better for you to weave in your ends instead. Either way, be sure to take care of your loose ends as you go. It’s a good idea to secure your loose ends before sewing up the sides; once you whipstitch the sides of the wine bottle cozy, it’ll be more challenging for you to weave them in.
Project Instructions
Crochet a Square for the Bottom of the Bottle Cover:
With main color, ch 9. Sc in 2nd ch from hook and in each st across the row; ch 1, turn. Work 7 more rows of sc st for a total of 8 rows with 8 sc sts per row; work 1 turning chain in between each row. Before working the last step of the last stitch, change colors to the accent color; do not end off.
Using your accent color, work 1 round of sl sts all the way around the square. Cut the accent color and fasten off.
Crochet the Sides of the Wine Bottle Cover
Pick up the main color. Work into back loops only of the last round of slip stitches. You are going to work one side at a time until each side is complete. Work 8 sc sts across the row; ch 1, turn. Continue working rows of sc st until the side of the bottle cover is as tall as you need it to be to cover your bottle. I worked 14 rows of sc; you might need to work a different amount of rows, depending on your bottle and your individual way of crocheting.
Make 3 more sides the same as the first.
After you’ve crocheted the fourth side, do not end off. Work a round of sl sts all the way around the outer edge of the plus sign shaped piece you have. You want to put 1 sl st in each st across the upper edges, and 1 sl st in each edge of each row. Count carefully; this round of sl sts will make it easier for you when it comes time to whipstitch the edges together, and if you don’t do this part correctly, it will make it more challenging for you to sew up the sides.
Creating the Square Shape
Thread your tapestry needle with yarn and whipstitch the sides together, working through the back loops only. See pictures if you need help understanding how to do this part. When you’re finished this part, you’ll have created the square part of the wine bottle cover.
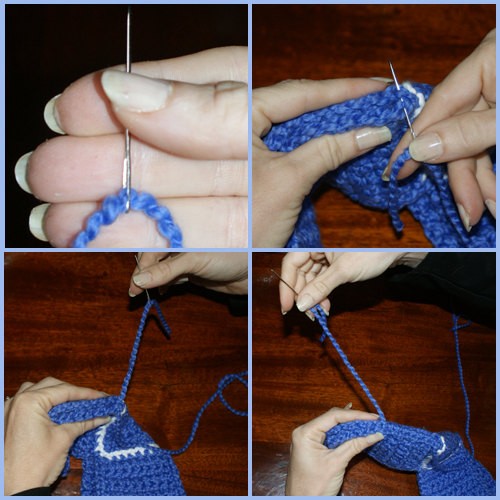
Crocheting the Top of the Wine Bottle Cover
Attach the accent color to the upper edge of the wine bottle cover and ch 3 (counts as 1 dc.) dc all the way around the upper edge of the wine bottle cover. I crocheted 37 sts total, putting some of the sts in the seams. This number of stitches is not set in stone; it might make sense for you to add or subtract a few stitches here, depending on how you crochet. In the last step of the last st, change colors back to the main color.
Decrease Row: In this row, you are going to work decreases (sc2together) all the way around the row. For me, this resulted in a bottle cover that fits snugly over the top of the square part of the bottle, which is what you want; it should fit snugly without being too tight to fit through the opening. It’s possible that, depending on how you crochet, such an extreme amount of decreases might result in the top being too tight. You’ll want to have your bottle handy to test this; if it turns out too tight to fit over your bottle, you’ll want to do fewer decreases, perhaps working (sc2tog, then sc,) all the way around. When you’re satisfied that the top is snug but not too tight, end off.
Weave in any remaining loose ends.
Embellishing the Wine Bottle Cover
Pick a side that will become the front (they should all be identical, so it doesn’t matter which side you choose.) Starting at the center front, weave ribbon through the dc sts worked in the accent color – under one dc st, over the next dc st, under the next, etc, all the way around. Add other embellishments if desired.
You can now place the wine bottle inside its cover; enjoy!
Related Resources
If you found this page helpful, I invite you to return to this site often for more craft tutorials, project ideas and inspiration! You can make sure you keep this site on your radar by signing up for my newsletter and community at Substack. .
Basic subscriptions are free; I send out regular newsletters to let my subscribers know about new craft articles and tutorials as they are posted. I also share details about the craft projects I’m working on, and invite my readers to share their projects, too. So there is no need to feel like it’s just you, crafting all alone at home. I’d love to have you join us! You’re invited!!
By Amy Solovay
Please Visit My Ko-Fi Shop HERE to Find My Sample Sale, Destash Sale and Digital PDF Pattern Downloads for Sale.
Please Visit My Ravelry Store HERE to Find Digital PDF Pattern Downloads for Sale.
About the Author:
Amy Solovay is a real, live, human content creator and educator who holds a Bachelor of Arts degree in mathematics from Sweet Briar College; she has also earned a separate Associate of Arts degree in textile design from FIDM LA (The Fashion Institute of Design and Merchandising, Los Angeles). She is NOT a robot and does not use artificial intelligence (AI) to write book reviews or articles for this website.
Amy learned to craft as a small child, and she still enjoys crafting techniques all these years later.
As an educator, Amy Solovay used to teach in-person college courses in trend forecasting, marketing and surface design at California Design College in Los Angeles. Nowadays she uses online platforms for sharing her knowledge about textiles, crafts, current color trends and current design trends.
This page was last updated on 12-2-2024.
