Want to learn how to crochet a box shape? If so, grab this free crochet pattern — and get project ideas for using your crocheted box in other craft projects.
Project Photo: Crochet Box Shape
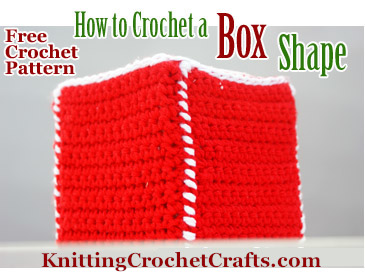
Crochet Box Shape: Free Crochet Pattern for Covering Blocks of Craft Foam
This crocheted cover will really come in handy when you’d like to disguise a block of craft foam in a soft, unbreakable box-like container. You can also use it for covering assorted other boxes or square objects.
Crochet-covered craft foam has a wide variety of potential uses. I’ve used mine to create a couple of fun candy dispensers. Here’s a picture of one of them:
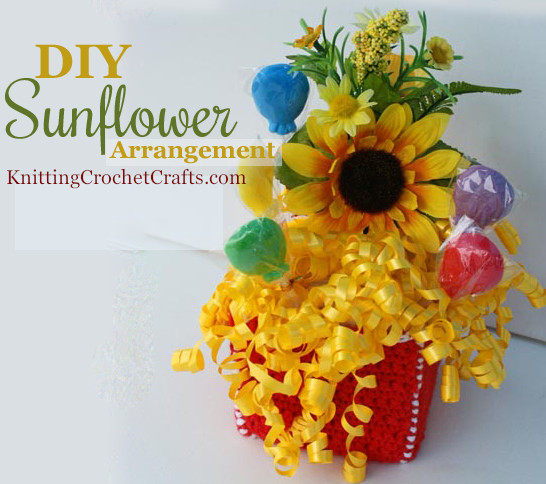
In addition to these ideas, you could use the box shape for making silk or dried flower arrangements and many other crafts. I am sure you can think of some amazing ways to put this pattern to good use!
This Design in a Nutshell:
Basically, the idea here is to crochet a flat piece shaped like a wide plus-sign. ( + )
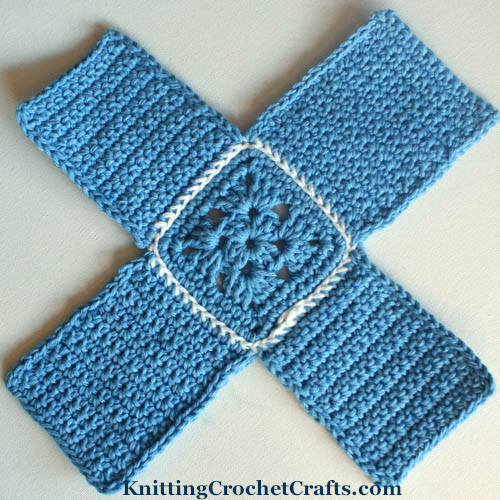
The center will be a square, and the square will have extensions emanating out from each side. The extensions will then be folded up and stitched together to form the box.
If your box needs to be closed, you’d then crochet another square exactly like the center to add to the top. You don’t need to do that if you want to crochet the sunflower arrangement shown above, but you might need to do it if you need a cube-shaped box that’s completely covered in crochet.
I’m going to show you a very simple way of making this type of design. It’s rather plain, and could easily be improved on. Once you get the basic idea, feel free to dress it up with beads, fancier stitches, different color patterns, embroidery, appliques, or 3-dimensional embellishments.
Craft Supplies Needed for Crocheting a Box Shape:
-
- Yarn, crochet thread or fiber in two colors. The second color can be scrap yarn, because you only need a small amount of it.
-
- A crochet hook of appropriate size to use with your chosen fiber.
- A tapestry needle for weaving in ends and stitching the sides of the box together.
I worked my project samples using worsted weight yarn colors that have now been discontinued. If you don’t know which yarn is best for making the project you have in mind, I recommend using Cascade 220 wool yarn to crochet your box shape. I make this recommendation because the yarn has an incredible color palette; you’re likely to find exactly the color you need — and also because the yarn is soft, smooth, resilient, high quality and easy to crochet with.
I crocheted my sample boxes using a size H / 8 – 5.0 mm crochet hook. Feel free to experiment with other hooks, fibers and yarn / thread sizes.
Gauge:
You can work this project at any gauge.
Finished Size:
Finished size will vary, depending on materials used and other factors.
My sample box measures approximately 4 inches high and 4 inches in diameter when it is stretched to its max with the foam block inside it. When laid flat, it is slightly smaller.
Crochet Abbreviations:
- ch = chain
- dc = double crochet
- sc = single crochet
- sl st = slip stitch
- st = stitch
How to Crochet the Box Shape:
Start by making a square. Pretty much any square will do. I’ll share instructions for the one I used, but there’s nothing extraordinary about this square. You can use any square you like.
With main color, ch 5. Join with a sl st to form a ring.
Round 1: Ch 3 – this counts as the first dc. Work 2 more dc in ring, (ch 2, 3 dc) repeat sequence in parentheses 3 times. Ch 2, sl st to join to beginning of round.
Work several slip stitches so your next round can start in a ch-2 space.
Round 2: Ch 3 – this counts as the first dc st. 2 dc, ch 2, 3 dc in same space, (ch 2, 3 dc in next space, ch 2, 3 dc in same space) repeat sequence in parentheses 3 times. Ch 2, sl st to join to beginning of round.
Work several slip stitches until you get to the corner of the next ch-2 space.
Round 3: Work 1 sc into corner space, work 1 sc into each of the next 3 dc sts, work 1 or 2 sc in the ch-2 space, (see note below) work 1 sc into each of the next 3 dc sts, work 1 sc into ch-2 corner space, ch 2 to form corner. Repeat this entire sequence three more times for the remaining three sides of the square. Then ch 2 for corner and join with a sl st to the beginning of the round.
Note: In the sample, I only worked 1 sc st into the center ch-2 spaces. I did it that way because I wanted my square to fit snugly over my block, and that was the easiest way of making the whole square the right size for my particular project. If you plan to make a big square, the proportions will turn out better if you work 2 sc in the ch-2 spaces.
Round 4: Sc in each sc; when you get to the corners, work 1 sc in each ch-2 corner space, ch 2, work another sc in same corner space, then continue working sc. At the end of the round, join with a sl st.
At this point, my sample square was the right size, so I stopped here. If you need a bigger square, repeat row 4 as many times as you need to.
Next Round: Using the accent color, work 1 sl st in each stitch, all the way around.
Begin the Sides of the Box Shape:
The sides are all worked in straight rows of sc. For the first row, for each sc st you’re going to work through three loops total: work through one loop of the sl st from your previous round, plus the two loops below it from the round before that. See photo:

This will create a sturdy base that is also decorative. Work all the way across one side of your square, then ch 1, turn, and work back across.
Continue working rows of sc until the side of your box is the desired height. Be sure to jot down the number of rows you worked, because you will need to make 3 more sides identical to that one.
Don’t cut the yarn. Work back down the side of the piece you just made, crocheting one slip stitch per row. Later, these slip stitches will be used as guides for whipstitching the box sides together. Work slip stitches on the other edge too. Be sure to work an identical number of slip stitches on all your edges.
Make three more box sides just like that one.
Weave in all the loose ends.
Sewing the Box Sides Together:
Using a tapestry needle and your accent color, whip stitch the sides of each piece together, working through both loops of the slip stitches you crocheted.
Using your accent color, crochet one additional row of slip stip stitches all the way around the upper edge of the box.
If you’re using craft foam in your project, insert it inside the box, arranging it so that the corners of the crocheted piece match up with the corners of the foam.
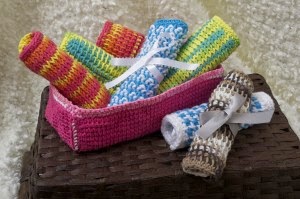
Now you can use it in the project of your choice. If you’re not sure what to do with this box, I have some craft project ideas for you:
-
- Snowman Lollipop Dispenser (photo and instructions for this are coming soon)
I am sure you can think of more great ideas for using this pattern. I have a few more ideas for using it too, but I haven’t had a chance to try them yet. If they turn out well, I will post them in the future. Would you like to be notified when I post new (free!) projects and patterns? It’s easy! I send out email newsletters filled with links to the free crochet patterns, crochet tutorials, and craft project ideas I’ve published. You are invited to sign up so that you never miss out when new patterns are posted.
Thanks for your interest. I hope you will enjoy the free patterns.
Other Patterns for Crocheting Boxes
Maybe this crochet box pattern is exactly what you needed — and maybe it isn’t quite right for the project you have in mind. If this box isn’t what you want, take a look at some other options.
In Sharon Silvermans’ book called Tunisian Crochet for Baby, you’ll find a pattern for making a box designed to hold washcloths in a baby’s nursery.
Crochet nursery box holding washcloths you can make for baby. These Projects Are All Included in Tunisian Crochet for Baby by Sharon Silverman This is actually my least favorite pattern in the book; I really love some of the others, though. The baby blanket patterns in the book are adorable.
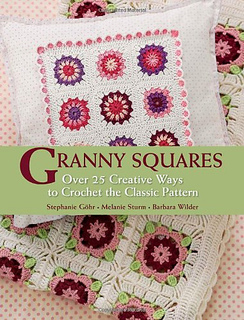
Granny Squares: Over 25 Creative Ways to Crochet the Classic Pattern by Stephanie Gohr, Melanie Sturm and Barbara Wilder, Published by Trafalgar Square Books
Another option for a Crochet Box Pattern: Stephanie Göhr, Melanie Sturm and Barbara Wilder have designed a box-shaped crochet project called “Breadbasket with Delicate Blooms”. If you’d ever want to crochet a box for any purpose, these instructions are definitely worth having in your pattern stash. The bread basket is one creative way to use them, but I’m sure you’ll think of plenty of additional ideas. You can find that project in a book called Granny Squares: Over 25 Ways to Crochet the Classic Pattern. This book is published by Trafalgar Square Books. I LOVE this book! I have bunches of granny square books, but this one is my second go-to favorite of all time — for starters, because it has symbol crochet charts, and also because it has truly gorgeous grannies — nicer than the grannies found in most other pattern books.(My first go-to favorite granny square pattern book is Sandra Eng’s Crochet Kaleidoscope, which has much more than just granny square patterns. It also has patterns for making finished projects plus other types of crochet motifs.
So there you have it: My pattern for how to crochet a box shape, plus a couple of other suggestions for crocheting boxes in case my pattern doesn’t work for your intended purpose. I hope you found this page to be helpful, practical and informative.
More Crochet Resources
- How to Crochet: Free Tutorials and Patterns for Beginners
- Crochet Stitches
- Crochet Instructions
- Tunisian Crochet Stitches
Lovely Knitting and Crochet Patterns
More Craft Pages You Might Enjoy:
- Craft Supplies
- Knitting
- Knitting Supplies
- Lace Knitting
- Cable Knitting
- Knitting Techniques
- Knitting Yarn
- Quilting
- Jewelry Making
- Best Tools for Jewelry Making
- Beadwork
- Sewing
- Sewing Appliques
- Button Crafts
- Kitchen Crafts
- Paper Crafts
- Fine Art
Find More Craft Project Ideas HERE!
Posted By: Amy Solovay
This page was last updated on 4-16-2026.