Similar Crochet Patterns: Crochet Scarf Patterns | Accessory Patterns | Easy Crochet Patterns | Crochet Patterns for Beginners
Crochet Project Overview:
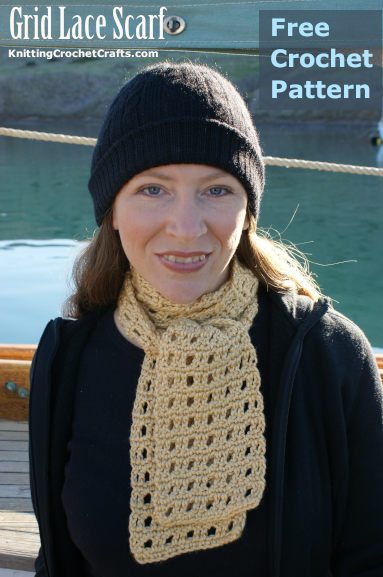
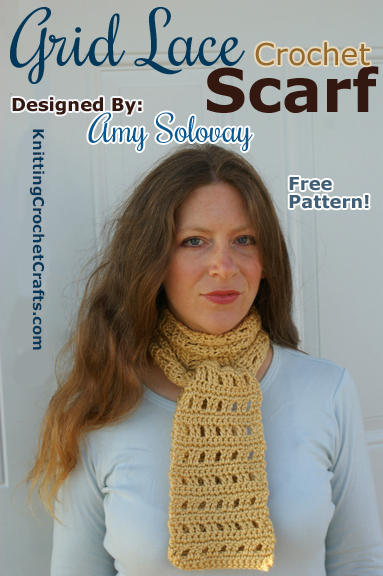
This scarf combines several basic stitches to create a lacy grid pattern that’s pretty but simple to crochet; in fact, it’s easy enough for beginners who have mastered the chain stitch, single crochet, and double crochet.
Be aware that the stitches on this scarf lean slightly to one side. If you look closely at my photos, you’ll be able to see this. That’s just the nature of this stitch pattern.
I had the idea of trying a second version of this design that won’t lean like this one does. That one turned out well; it’s a bit heavier and slightly less lacy, but it doesn’t lean so much.
I also decided to try a third version of this design worked in two colors. I crocheted my project sample in red and green, so I call it the Grid Lace Christmas Scarf. However, you could crochet it in other colors — perhaps orange and black for Halloween, or red and pink for Valentine’s Day, for example.
I like all three versions, so I’m posting the patterns for all of them.
Crochet Skill Level: Beginner
Materials:
- Medium Weight Yarn: I crocheted the sample scarf using about 3 ounces / 86 grams of Caron’s Simply Soft yarn in the “Autumn Maize” color. Feel free to substitute any similar yarn if you like.
- Crochet Hook: I crocheted my sample scarf using a size I crochet hook. You can use this size hook if it enables you to comfortably achieve the correct gauge; otherwise you’ll want to change hooks and use whichever hook works better for you.
- Tapestry Needle: You’ll need a tapestry needle for weaving in ends when you are finished crocheting the scarf.
Crochet Abbreviations for This Pattern:
- ch = chain
- ch-1 sp = chain-1 space, the space formed when you crocheted a chain stitch in the previous row
- dc = double crochet
- ea = each
- rep = repeat
- sc = single crochet
- st = stitch
Finished Size: The scarf measures about 4.5 inches wide, and you can make yours as long as you want it to be. The sample scarf shown measures about 48 inches.
Gauge:
Stitch Gauge: To check your stitch gauge, crochet 10 – 12 rows of the pattern and then measure the width of the scarf. Compare that measurement against my measurement of 4.5 inches. If your scarf is turning out the same width as mine, you’ve achieved the correct gauge; yay! keep crocheting. If not, you will need to decide whether you should adjust your hook size and start over.
There are two compelling reasons you might want to start over. One: if the scarf is turning out to be a width that isn’t wearable (for example, if it is laughably skinny, or unacceptably wide.) As long as you like the width, you don’t need to feel compelled to start over because of that, even if the width is a little different than mine.
Two: if your scarf looks like it’s going to be significantly wider than mine, it means that you will use more yarn than I did when I crocheted my sample. In that case, it is possible that you could run out of yarn if you only purchased the amount of yarn specified in the pattern. If your scarf is turning out wider than my samples, you might want to consider beginning again with a smaller crochet hook.
Row Gauge: For this particular pattern, row gauge is not important, because the length of the scarf is determined by the number of rows you crochet. You can crochet as many rows as you like to achieve your desired scarf length; you do not need to bother with trying to match my row gauge.
How to Crochet the Scarf:
Ch 18.
Row 1: sc in 2nd ch from hook and in ea st across the row.
Row 2: Ch 3, turn. skip the first st because your ch 3 will count as the first dc in this row and throughout the rest of the pattern. dc in next sc. [ch 1, skip next sc, work 1 dc in ea of the next 2 sc.] Rep the sequence in brackets across the row.
Row 3: Ch 1, turn. Work this entire row in sc as follows: sc in 1st dc, sc in next dc, [sc in next ch-1 sp, sc in ea of the next 2 dc.] Rep sequence in brackets across the row.
Row 4: Rep row 2.
Row 5: Rep row 3.
Continue repeating these two rows, alternating them, until your scarf is the length you want it to be.
Finishing the Scarf
End off, leaving enough yarn for you to weave in your ends. Thread your tapestry needle with this end of yarn and weave it into the scarf. Do the same for the other loose end(s). If you crocheted your scarf using wool or any fiber that responds well to blocking, you’ll want to block it to accentuate the beauty of the lace pattern. Not all yarns respond well to blocking.
Photo caption: Left: the easy crochet grid lace scarf. Notice how it biases (leans to one direction) slightly. Right: a swatch of a slight variation of this stitch.
Easy Crochet Grid Lace Scarf Compared With a Swatch of a Similar Crochet Stitch
Grid Lace Scarf Version 2 — Non-Leaning Version
Project Overview:
This is the second version of my easy grid lace scarf pattern. This scarf does not lean to one side, but it is a bit heavier and less lacy than the first version I designed.
Crochet Skill Level: Beginner
Materials:
- Medium Weight Yarn: I crocheted the sample scarf using about 3 ounces / 86 grams of Caron’s Simply Soft yarn in the “Autumn Maize” color. Feel free to substitute any similar yarn if you like.
- Crochet Hook: I crocheted my sample scarf using a size I crochet hook. You can use this size hook if it enables you to comfortably achieve the correct gauge; otherwise you’ll want to change hooks and use whichever hook works better for you.
- Tapestry Needle: You’ll need a tapestry needle for weaving in ends when you are finished crocheting the scarf.
Crochet Abbreviations for This Pattern:
- ch = chain
- ch-1 sp = chain-1 space, the space formed when you crocheted a chain stitch in the previous row
- dc = double crochet
- ea = each
- rep = repeat
- sc = single crochet
- st = stitch
Finished Size: The scarf measures about 4.5 inches wide, and you can make yours as long as you want it to be. The sample scarf shown measures about 48 inches.
Gauge:
Stitch Gauge: To check your stitch gauge, crochet 10 – 12 rows of the pattern and then measure the width of the scarf. Compare that measurement against my measurement of 4.5 inches. If your scarf is turning out the same width as mine, you’ve achieved the correct gauge; yay! keep crocheting. If not, you will need to decide whether you should adjust your hook size and start over.
There are two compelling reasons you might want to start over. One: if the scarf is turning out to be a width that isn’t wearable (for example, if it is laughably skinny, or unacceptably wide.) As long as you like the width, you don’t need to feel compelled to start over because of that, even if the width is a little different than mine.
Two: if your scarf looks like it’s going to be significantly wider than mine, it means that you will use more yarn than I did when I crocheted my sample. In that case, it is possible that you could run out of yarn if you only purchased the amount of yarn specified in the pattern. If your scarf is turning out wider than my samples, you might want to consider beginning again with a smaller crochet hook.
Row Gauge: For this particular pattern, row gauge is not important, because the length of the scarf is determined by the number of rows you crochet. You can crochet as many rows as you like to achieve your desired scarf length; you do not need to bother with trying to match my row gauge.
How to Crochet the Scarf:
Ch 18.
Row 1: sc in 2nd ch from hook and in ea st across the row.
Row 2: ch 1, turn. sc in ea sc st across the row.
Row 3: Ch 3, turn. skip the first st because your ch 3 will count as the first dc in this row and throughout the rest of the pattern. dc in next sc. [ch 1, skip next sc, work 1 dc in ea of the next 2 sc.] Rep the sequence in brackets across the row.
Row 4: Ch 1, turn. Work this entire row in sc as follows: sc in 1st dc, sc in next dc, [sc in next ch-1 sp, sc in ea of the next 2 dc.] Rep sequence in brackets across the row.
Rep rows 2, 3 and 4 over and over until your scarf is the length you want it to be.
Finishing the Scarf
End off, leaving enough yarn for you to weave in your ends. Thread your tapestry needle with this end of yarn and weave it into the scarf. Do the same for the other loose end(s). If you crocheted your scarf using wool or any fiber that responds well to blocking, you’ll want to block it to accentuate the beauty of the lace pattern. Not all yarns respond well to blocking.
Find More Fabulous Crochet Scarf Patterns:
- Click here to find my suggestions for the best crochet scarf pattern books.
- Crochet Cowl Patterns by Sharon Hernes Silverman
- Shell Stitch Crochet Scarf: Free Pattern
- Holiday Scarf Patterns to Crochet
Learn More About Crochet:
- Click here to find our main directory of all the best crochet books.
- Click here to find crochet stitch tutorials and instructions.
- Click here to learn more crochet techniques.
- Click HERE to Find Fabulous Yarn for Crochet and Knitting
- Click here to learn about crochet hooks.
- Click here to find my favorite crochet project bag.
Learn About Other Crafts: Knitting, Sewing, Quilting, Paper Crafts and More
- Click here to get updated on the latest craft supplies.
- Click here to learn about knitting.
- Check Out My Suggestions for the Best Knitting Books HERE.
- Best Sock Knitting Books
- Vivian Hoxbro’s Knitting Handbook Review: 8 Schools of Modular Knitting
- Click here to find our beginner’s guide to knitting needles.
- Click here to find outstanding craft project ideas.
Posted By: Amy Solovay
Page last updated on 7-22-2023. Thanks for visiting!