Have you crocheted or knitted a blanket that needs a border? Want to learn how to crochet borders for blankets? These free instructions will teach you how to approach it — plus we’ll link you to bunches of free blanket border patterns you might enjoy using to finish off all your crocheted blankets, throws, afghans, and bedspreads.
It’s easy to crochet a blanket borders; all you need is a little crochet know-how and this page of free patterns for blanket borders. Alternatively, once you understand how to create a border around a blanket, you can even design your own blanket edges if you like.
These instructions are written with the assumption that you already know the basics of crochet, and that you’re starting with a crocheted blanket that is finished except for the border. If you need help learning how to crochet, please visit the following pages:
If you’re starting with a knitted blanket, the instructions are basically the same, but you might need to experiment a bit to find a hook size that will give you an even tension when paired with your knit stitches. If you don’t have a clue which hook size to use, you can look on your yarn label for suggestions. Otherwise you can start by trying a hook that is around the same size in millimeters as your knitting needles, and adjust up or down as necessary.
If you’re starting out with a quilt, a fleece blanket or a fabric blanket, it’s a little more complicated than the directions given here because you’d likely have to crochet directly into the fabric instead of crocheting into other crocheted (or knitted) stitches. However, it is still possible to accomplish this. See this page of towel and linen edgings for more information on how to crochet directly into fabric. The instructions given on this page can be adapted to use with a fabric blanket once you understand how to crochet into fabric.
An Overview of How to Crochet Blanket Borders:
In a nutshell, here’s how to crochet a border for a blanket.
Choose the pattern, yarn(s) and color(s) you would like to use for your border. Usually, you’ll want to use the same type of fiber for both blanket and edging; for the border, you may wish to use either the same color or a contrasting color.
If you crocheted your blanket in rows, position the blanket so that it is facing up; that is to say, you want the last row or round of stitches you worked to be on top.
If your blanket consists of a bunch of granny squares, the blanket can be facing in any direction. Before you begin the border, make sure all the crocheted squares are joined together the way you want them to appear in the finished blanket.
Attach yarn in the upper corner you would like to work from. I’m right-handed and I usually begin working in the upper right hand corner of my blanket. If you’re left-handed, it will likely be more comfortable for you to start working in the upper left corner.
I like to attach my yarn by using the same general technique that I use for working color changes. Alternately, you could attach the yarn using a slip knot.
From there, you’d begin crocheting your edging pattern. Ususally, you will want to work across the top row first. Then you will need to turn the corner; the instructions for how to do so will be revealed in your pattern. When working in single crochet stitch, I often use 2 chain stitches to turn the corner; sometimes I’ll put 3 single crochet stitches in each corner. There are many other possibilities for turning corners, but generally, unless you are working a ruffled border, the main thing to keep in mind is that you want the work to lie flat.
After you’ve turned the corner, you’ll work an evenly spaced number of stitches down the side of the blanket. This is a little trickier than crocheting into the top of the blanket, because there is no clearly defined spot to place your stitches. Just go for it; you’ll get a feel for how to do it after you practice a bit. Try to keep your stitches as close to the edge of the work, and as even as possible.
There are a couple of pitfalls to be aware of. One is that you’ll need to make sure to put the same number of stitches on both sides of the blanket. So, it’s important to pay attention and count your stitches at this point; you can write the number down so you don’t forget how many to work. If you end up with different numbers of stitches, your blanket will turn out looking lop-sided.
Another pitfall: your tension down the sides is likely to be different than your tension working across the tops of the rows. If you work too many stitches down the sides, you might end up with a “ruffled” effect. If you work too few, you might end up with a blanket that pulls in a bit around the edges. If a flat afghan border is what you are aiming for, be sure to pay attention to what the work is doing; if it seems like it isn’t lying flat or it is buckling and distorting, you may wish to pull out what you’ve done and try again.
When you’re satisfied with your stitches down the side of the blanket, it’s time to turn the next corner. Just repeat the steps you took to turn the first corner.
After that, you’ll be working back into the free loop (or loops) of each chain stitch in your foundation chain. You’ll want to be sure you have the same number of stitches you worked when you first crocheted across the top of your blanket.
Then you turn the next corner and work back up the other side of the afghan. Remember to put the same number of stitches that you worked on the opposite side.
When you are finished working all the way around the blanket, you may wish to work a slip stitch to join the end of the round to the beginning. You might also wish to place a stitch marker in a spot that will help you remember where the round ended.
From there, you’ll move on to the next round of your border pattern, if there is a second round. (There are some one-round edging patterns available, so you might not always need a second round.) The second round is easier because at this point you’ll be crocheting into the tops of the stitches you worked in the first round.
Free Crochet Border Patterns for Blankets and Afghans
Ready to choose a border pattern to use on your crocheted or knitted blanket? Try one of these:
Long Single Crochet Stitch, Also Known As “Spike Stitch”
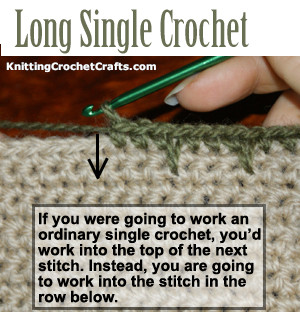
There are many intriguing ways to use crocheted spike stitches. One of my favorites: you can use them to make interesting blanket borders. They’re especially nice on afghans for guys. For this type of border, I recommend using a color that contrasts with the body of the blanket.
Easy Single Crochet Blanket Border
If you’re looking for an edging that’s visually clean and simple, and also very easy to crochet, this might just be the right pattern for you. It’s one I use often for finishing off afghans where I’ve used intricate charted patterns or colorwork; I like pairing complex afghan designs with simple edgings, and vice versa.
Easy Double Crochet Shell Stitch Border
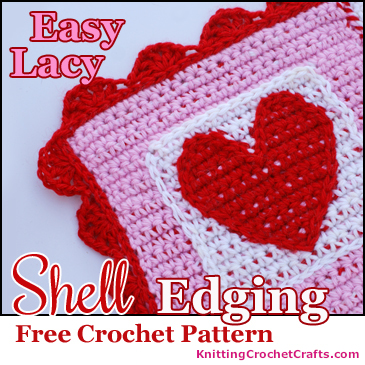
This edging is really quick and easy. It is comprised of shell stitches built using double crochet, resulting in a narrow edging that’s simple yet attractive.
Click or Tap HERE to Find More Crochet Blanket Border Patterns.
How to Make Borders With Fringe
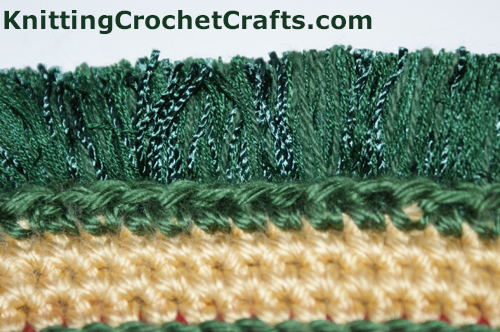
Want to add fringe to your blanket? It’s really easy to do. This page will teach you how to attach fringe to all your crochet projects — including blankets, afghans, throws, bedspreads and others.
So there you have it: That’s how to crochet a border for a blanket, afghan, throw, or bedspread. I hope these instructions are helpful to you. If you have any questions, please feel free to leave a comment. I will do my best to help if I am able.
We really appreciate your interest in our free patterns and tutorials. Want to find more of them? If so, we invite you to stay and browse awhile. Here are some related resources you might also enjoy.
More Free Crochet Patterns for Trims and Edgings
- The Beaded Edge: A Pattern Book of Beaded Trims and Edgings in Crochet
- Vertical Trim Patterns
- Filet Crochet Heart Trim
Crocheting Blankets and Afghans
- Crochet Blanket Patterns
- Crochet Baby Afghans in 24 Hours!
- Free Crochet Christmas Tree Afghan Pattern
All About Crochet
This page was last updated on 5-5-2023.