The smooth, solid glass seed beads coordinate well but also add a bit more contrast to the design.
If you enjoy crocheting with wire and beads, or if you’d like to give that technique a try for the first time, you’re invited to consider adding this Wire Crochet Necklace With Jasper Stone Beads to your project queue.
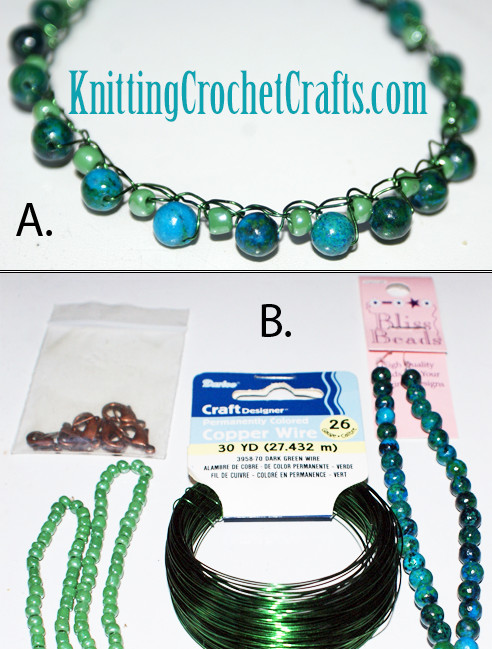
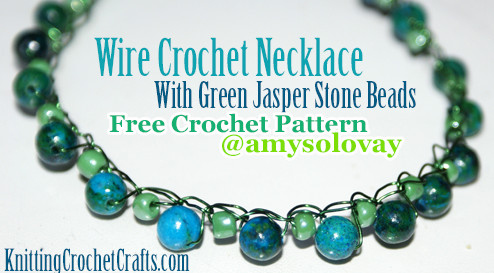
This necklace is a simple design crocheted using wire and round jasper stone beads. You can use smaller glass beads for accents. You can see the finished necklace and the supplies used to make it in the picture above.
Materials:
- Round Green Jasper Stone Beads: The sample project incorporates Australian jasper stone beads measuring approximately 6 mm each on average. You can use beads like these if you like, or substitute any that are roughly the same size and shape.
- Glass Seed Beads: 6/0 seed beads; the ones in the sample necklace are made by Blue Moon Beads, but you can use any similar seed beads for this
- Craft Wire: I recommend 26-gauge craft wire for this project. I originally used dark green colored copper wire by Darice to make this project. Unfortunately, Darice is now defunct. However, any 26-gauge craft wire should work fine for crocheting a necklace like this one.
- Crochet Hook: I used a size B / 2.25 mm crochet hook to make my sample necklace. You can use this size hook if you like, but do not feel obligated if there’s a hook you find more comfortable for crocheting with wire. Be sure to use a sturdy metal hook, because this technique is hard on hooks; a flimsy one is almost guaranteed to break on you. Also, please avoid using a hook that has significant sentimental (or monetary) value. In case you have a problem, it’s better to have it with a hook you don’t mind losing.
- Jewelry Findings: I used lobster claw-style clasp closures, and recommend using those or a similar type of closure.
- Update 8-10-2023 I didn’t know about crimp beads when I originally made this project, so I didn’t use them. In hindsight, it would be an improvement to incorporate crimp beads into this project. I highly recommend doing so.
Feel free to substitute materials and / or colors to achieve results you’ll be happy with.
Necklace Size:
My sample necklace measures about 16 inches all together from tip to tip, including the closure.
Gauge: Rather than trying to match my gauge, I suggest using a ruler or tape measure and checking your progress periodically. When your necklace is the size you want it to be, you can simply stop crocheting, and then follow the finishing instructions below to end it off.

Necklace Instructions:
Pull out a length of wire, making sure that the wire flows freely so that you will be able to pull out even more when needed. String all your beads onto your wire in the order you want them to appear in the necklace. I alternated jasper stone beads and seed beads, starting with a seed bead and ending with another seed bead.
Double check your work before proceeding. It’s easy to mess up even the most mundane stringing patterns (like this one.) If you did make a mistake in your stringing, the best time to find it is before you start crocheting; after you begin, it’s difficult to correct mistakes.
Leaving at least 4 inches free at the beginning of the piece, make a slip knot in the wire. [Slide a bead up close to your crochet hook. Reach around the bead with your hook and grab the wire; pull it through to create a chain stitch with a bead sandwiched inside of it.] Repeat the instructions specified inside the brackets until your necklace is the length you want it to be. Do not feel obligated to work all the beads if your necklace reaches the desired length before you run out of beads to work with.
Hopefully you will have enough beads to work with, but if for some reason you run out, you can pull out another length of wire, cut it (leaving enough room to finish the piece) and string additional beads from the other side of the work.
Finishing Instructions:
Update: The following finishing instructions do not incorporate crimp beads because I didn’t know about crimp beads at the time I designed this necklace. I think it would be an improvement to use crimp beads if you are inclined to figure out how to incorporate them into your necklace design.
When you are finished crocheting, cut the wire, leaving enough to work with in finishing — at least 4 inches or so. Gently pull the end of the wire through your active loop and give it a slight, careful tug to end the work off.
String 3 additional seed beads onto the end of the piece; then add one side of your lobster claw clasp. I did mine by stringing the clasp onto the wire, then folding the wire down onto itself and wrapping it around itself many, many times. Then I inserted the end of the wire back down into the three seed beads and cut it so that the end would be buried inside those beads.
Repeat on the other side to attach the other part of the clasp.
The necklace is now ready to wear, or to give as a gift. Enjoy!

Other Free Crochet Necklace Patterns
- Fabric Crochet Necklaces –Pattern With Free Step-By-Step Tutorial
- Beaded Crochet Necklace With Dichroic Glass Pendant
- Check Out Our Main Directory of Free Crochet Necklace Patterns
More DIY Jewelry Making Resources

- Wire for Crafts
- Jewelry Making: Learn How to Make Jewelry With (Mostly) Free Instructions
- Jewelry Tools for Beginners to Jewelry Making
Other Stylish, Trendy Wire Crochet Project Ideas
Posted By: Amy Solovay
This page was last updated on 8-10-2023.