Learn How to Do Fabric Crochet With This Easy Necklace Pattern

This is an easy project, and it’s a quick one, too — at least, it’s quick as far as fabric crochet projects go. This simple, low-commitment project is a great way to jump in and see whether fabric crochet is for you or not. This project will give you a good feel for the technique without a large investment of time or money on your part.
Gather the Craft Supplies You Will Need for This Project
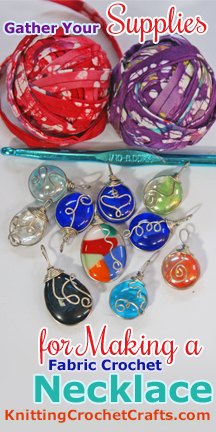
You’ll need a large-sized crochet hook (J / 6.0 mm at the smallest, but a larger hook will probably be more comfortable for you,) a rag ball that measures at least 122 inches long, and some beads or doodads to use for transforming your rag ball into a necklace.
I think wire-wrapping is beautiful, and I have bunches of handmade glass pendants that incorporate this fascinating technique. The hardware on my pendants is large enough to accommodate fabric strips, making them ideal for this project. There are many other types of pendants you could use — or other materials that you could use.
As far as pendants go, there are plenty of choices available for sale online, as well as in craft stores and jewelry stores. You could also crochet your own pendants using wire or bead crochet.
I’m planning on designing some wire crochet pendants that I could use for making similar necklaces. It would be interesting to see if the two techniques, wire crochet and fabric crochet, could be combined in this way. I don’t see any reason why they couldn’t be, and it’s an idea I’ll look forward to trying.
If you decide to use beads, you’ll be limited to using beads that have holes that are large enough to accommodate your fabric crochet strips. There are wooden beads that meet this criteria, and you could also make or buy polymer clay beads with large holes.
I’ve created bunches of different necklaces using this pattern and tutorial. When I set out to make jewelry using this technique, I gather up a variety of different materials in bunches of different colors — more than I know I’ll need. That way, I can play with various color choices before committing to the final design.
The trick here is to give yourself enough material to work with that you have plenty of choices — without giving yourself so much material that you have too many choices and thus get overwhelmed with too many possibilities.
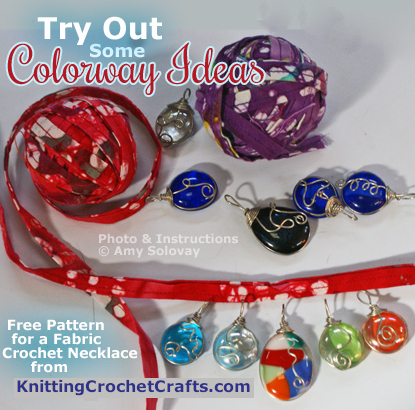
Pictured at right, you can see the supplies I decided to start with for this particular jewelry-making session. I have a red batik rag ball, a purple batik rag ball, and an assortment of colored glass pendants with wire-wrapping. I think this is a good amount of material to start with; it’s enough to offer some choice but not be too overwhelming. The necklaces I’ve made so far each incorporate 3-5 pendants. However, if you’re working with beads instead of pendants, you may want to use more beads, and different spacing.
Evaluate Various Color Combinations
When you start with an abundance of materials, the design process becomes fun and engaging. It’s as simple as laying different color combinations out in front of you and figuring out which one you like best.
Here are a couple of examples of colorways that I considered, but ended up not using.
I like the red batik fabric with this colorful lineup of pendants, but in the end I decided that it would be better to incorporate the deeper blue pendants into the design.

I also considered using the purple batik fabric with the cool-colored green and blue pendants. However, I decided that this sort of colorway would be better with either a green fabric (which I didn’t already have made up into rag balls) or some purple pendants (which I also didn’t have on hand.)
So in the end, a red colorway was the one I decided to go with.
This decision-making process is entirely one of personal preference. It’s helpful to have an understanding of color theory, but at the same time, there aren’t any concrete rules that govern this process. You just choose colors that you like, and colors that you think will look good together. If you happen to choose wrong, and you don’t like the end result, no worries; it’s simple to unravel your piece, and omit the design elements that weren’t working, substituting different materials in their place.
Here’s an idea for the most practical way to make your design decisions: begin with supplies that will match a top you already own. Then make all your choices based on which placement would work best with the top you have in mind. When you’re finished, you’ll be much likelier to wear your finished piece, because you already have an idea for one great way to integrate it into your wardrobe. You may find later that it will also match other outfits in your wardrobe as well.
How to Make the Necklace
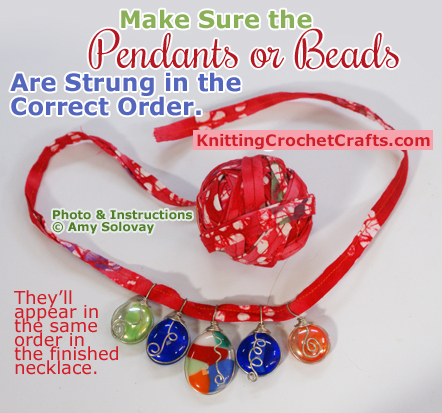
Next, you want to string your pendants or beads onto your fabric strip, placing them in the exact order that you want them to appear in the finished necklace. Double-check the placement before you begin crocheting.
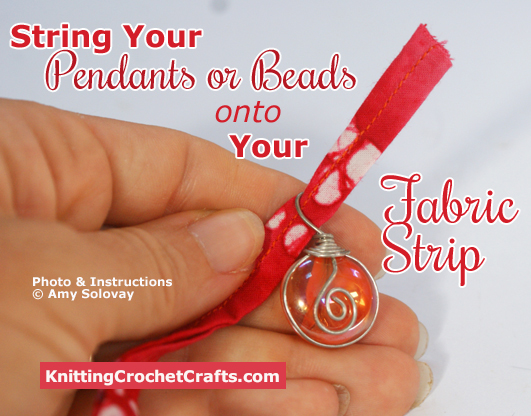
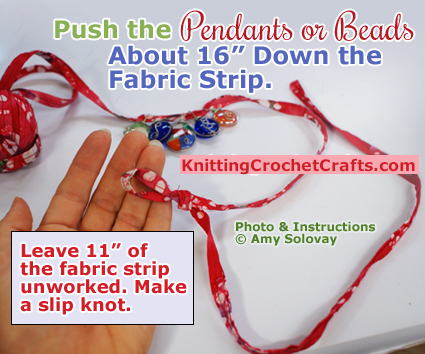
You’ll need to leave a length of your fabric strip unworked at each end of the piece; this will become the ties you use for your necklace’s closure. If you want to create a more elaborate closure, that would also be possible; you could incorporate hardware into the design, and use these lengths of fabric as the basis for securing it. I like to leave at least eleven inches unworked for this purpose.
If you’re using pendants and you want a a finished design that’s similar to the necklaces pictured in the photos above, you’ll want to scoot the pendants down the length of your fabric strip about sixteen inches, so they’ll be out of your way when you begin crocheting.
Important note: my picture shows my work BEFORE I figured out exactly what the right measurements should be. It shows the general idea of what to do without being exactly the right scale. Point being: you’ll get better results from pulling out your ruler / tape measure and measuring, than you will from just following the picture.
If you’re working with beads, you may wish to try different spacing than I used.
The next step: begin crocheting.
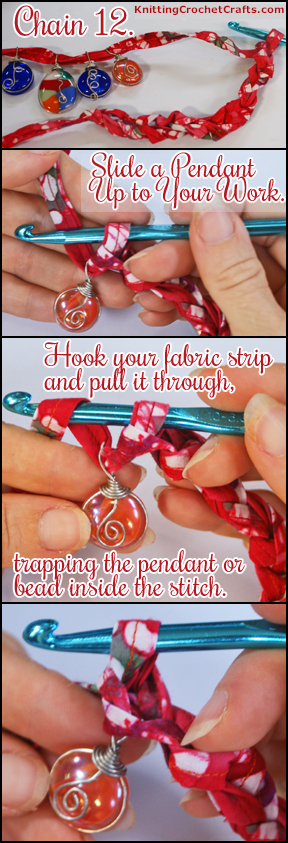
This simple design utilizes only chain stitches, with pendants being incorporated into the chains at certain intervals.
You need not feel compelled to follow the same exact pattern than I did, but feel free to do so if you would like.
For this necklace, I followed the following pattern:
- I crocheted 12 chain stitches.
- Then I placed a small pendant inside the next chain stitch.
- Then I worked another two chain stitches.
- Then I incorporated another small pendant inside the next chain.
- Then I worked another two chain stitches.
- Then I incorporated the large focal pendant into the next chain.
- Then I worked another two chain stitches.
- Then I incorporated another small pendant inside the next chain.
- Then I worked another two chain stitches.
- Then I incorporated another small pendant inside the next chain.
- I crocheted another 12 chain stitches.
- Then I ended off, leaving another 11 inches unworked afterwards to form a tie for closing.
The pictures at right show you in detail the process of incorporating a pendant into a chain stitch.
This project gave you a little bit of insight into the fabric crochet technique. You got a good feel for one possible way of processing fabric strips. You got a glimpse at what it’s like to actually crochet with fabric, although there’s a lot more you can do with it beyond just the chain stitch.
Want to learn more? Here are some additional resources you might find helpful.
Fabric Crochet Resources
Fabric Crochet — Learn all about fabric crochet. Get free instructions. Find free patterns. Learn about the history of this fascinating technique.
How to Make a Rag Ball — Rag balls are the materials you’ll use to make your fabric crochet projects. Most of the time, you’ll have to make ’em yourself — so if you’ve never tried it, hop on over and check out these free instructions for how to do it.
Crochet Rag Rug Pattern — If you enjoy the fabric crochet technique enough to want to try a much larger project, this rag rug is a fantastic project to get started on.
Fabric Crochet Tote Bag Pattern — Free crochet pattern for a sturdy fabric crochet tote.
More Jewelry-Making Projects and Instructions
Posted By: Amy Solovay
This page was last updated on 6-25-2021.