How to Make a Slimline Wedding Card
There Are Zillions of Possible Ways You Could Make a Slimline Wedding Card. In This Post, I Offer Free Step-By-Step Instructions for Making a Slimline Wedding Card Using Emily Moore’s Card Sentiment Dies, Plus Patterned Papers From Graphic 45’s PS I Love You Collection.
Hello, crafters!
Today I’m sharing a project I created as part of a guest design gig I worked on for my super talented friend, Emily Moore.
Emily’s brand new collection of paper craft supplies is amazing! Emily’s product line consists of a versatile grouping of dies, papers and stamps. If you’d like to try all of the above, you’ll want to take a look at her Card Maker’s Essential Bundle, which enables you to easily receive all Emily’s most popular items.
As part of my commitment to be a guest designer at Emily’s website, I made three new wedding cards using her dies. Today, I’m sharing step-by-step instructions for the slimline wedding card pictured below, but I hope you’ll check out the others, too (I’ve posted a photo of the other card designs at the end of this post plus shared web links to where you can find these craft project ideas).
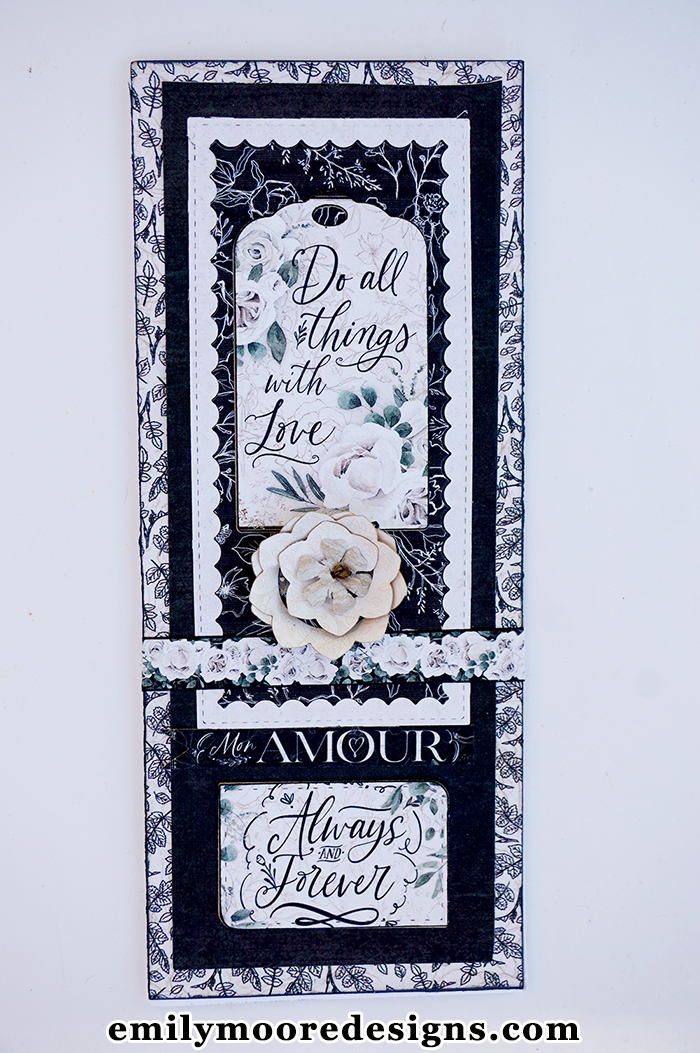
Slimline Wedding Card
Supplies Needed for Crafting a Wedding Card Like This One
I recommend the following craft supplies for making these cards:
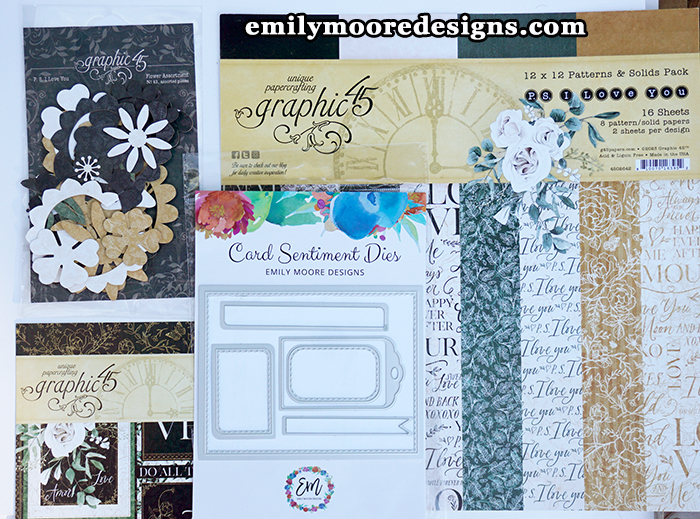
- Patterned Papers: If you have your heart set on getting the look pictured here, use patterned papers from Graphic 45’s “PS I Love You” paper collection; otherwise, feel free to choose other patterned papers that you love.
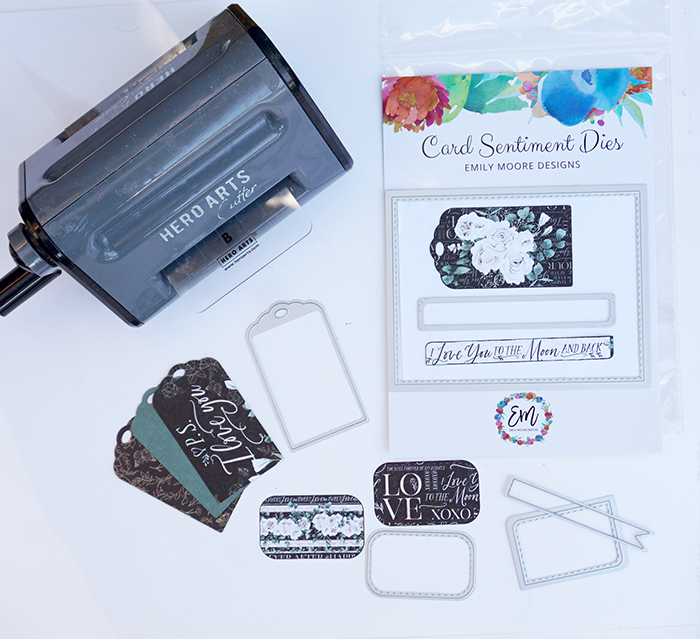
- Dies: To make the card front, you’ll need the Card Sentiment Die Set by Emily Moore Designs.
- Mini Slimline Scalloped Frame Die by Pinkfresh Studio
- Black Ink Pad and / or Black Marker: I used black marker and / or Tim Holtz’s Distress Oxide in the Black Soot color for inking and drawing around most of the edges of my die-cut shapes and cut-out paper pieces on this card. The Black Soot color looks fantastic with the papers and embellishments from Graphic 45’s PS I Love You collection, but if you are using a different paper line, you’ll want to use an ink color and marker that complement the papers and embellishments you’re using; in that case, Black Soot might not be the right choice for that.
- Flower Embellishments: You’ll need some flower embellishments to create a card similar to the one pictured here. If you want to use the exact flowers I used, check out Graphic 45’s PS I Love You flower assortment and paper flowers by 49 and Market.
- Adhesive: I used Cherry Tape and Nuvo Deluxe Adhesive to make this card, but you can use any adhesive intended for paper.
- Cardstock: You’ll need a paper to use for making your card base. This can be light colored, not-too-busy patterned paper or cardstock. I used Neenah Solar White 110 lb. Classic Crest Cover cardstock, which I highly recommend getting if you do not already have suitable cardstock or paper available in your craft supplies stash. There are many different cardstocks and papers that would work well for this, so use what you have if you have one that’ll work.
How to Make This Wedding Card:
- Using the tag die from Emily Moore’s Card Sentiment Die set, consider where you will position the die on your patterned paper to get an appealing design. Emily’s tag die is designed with a “window” on it that allows you to see through to the paper underneath. This empowers you to easily place the die right where you want it, without having to guess if it’s in the right spot. I recommend moving the die around on your paper to get an idea of how your tag will look. Graphic 45’s cut-apart patterned papers give you many amazing options for making eye-catching tags.
- Once you’ve selected a suitable design to be the tag’s focal point, cut out a tag.
- Ink around the edges of your tag with an ink color that complements the colors of your patterned papers.
- Use the other Card Sentiment Dies to cut other shapes and embellishments from patterned paper. Then ink around the edges of the die cut shapes with contrasting but matching ink. Let the inky embellishments dry before using them.
- Die cut the mini slimline scalloped rectangle frame from patterned paper. You will use the inside piece and the middle piece, but not the outer piece; save that for some other project. When you attach these to the card front, you’ll turn the middle piece over to the back so you can use the contrasting designs together.
- To make your card front, cut one rectangle of patterned paper measuring 3.5″ x 8.5″. Ink around the edges of the rectangles with a coordinating ink color to add visual interest. Then set the piece aside in a spot where the ink can dry undisturbed.
- Cut another rectangle measuring 3″x8″ out of contrasting patterned paper. Ink around the edges and set the piece aside so the ink can dry.
- For the card base, cut a piece of patterned paper measuring 7″ x 8.5″. Score and fold down the middle so you end up with a card base measuring 3.5″ x 8.5″”.
- Layer your patterned paper rectangles on top of the card base and attach them both to the card front with adhesive.
- Arrange your tag, flowers and other elements on your card front. When you’re happy with the placement, attach them to the card front with adhesive.
- If you know who the card recipient is, personalize the card. It is ready for giving.
Where to Buy Emily Moore Designs Dies and Other Craft Supplies:
There are two places I know of where you can buy Emily’s craft supplies:
- You can buy the gift card holder die and the card sentiment dies directly from Emily’s website. This is the absolute BEST way to support her work and her small business!
- If you need one-stop shopping for these dies plus other types of craft supplies, I recommend shopping at A Cherry on Top Crafts. At a Cherry on Top, they stock a broad range of supplies for paper crafts, fine art, needlecrafts and other crafts. You can grab the gift card holder die HERE, and the card sentiment dies HERE. I am a regular customer at A Cherry on Top and highly recommend them!
So that’s one possible wedding card making idea you can try. I’ll leave you with a picture showing this one plus a couple of other similar wedding card making ideas.
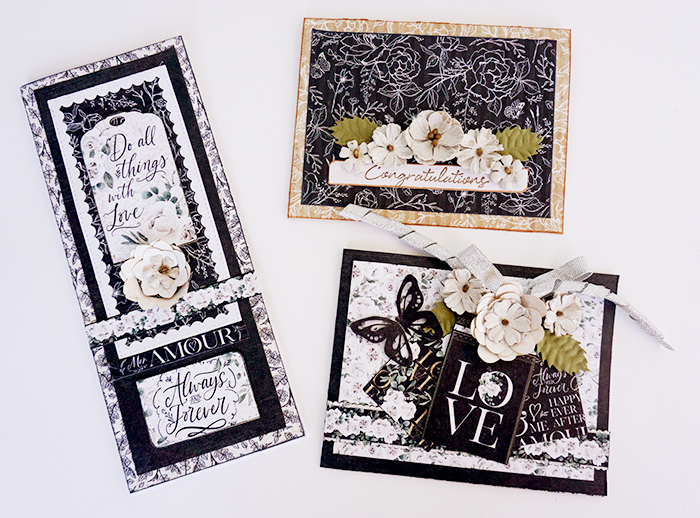
Find More Wedding Card Making Ideas From This Series:
You’ll find the free step-by-step instructions for making the “Congratulations” A2-sized wedding card posted at Emily’s blog:
Wedding card making idea with “Congratulations” sentiment and gift card holder inside, plus ideas for maximizing your craft supplies stash
Yesterday’s blog post here at KnittingCrochetCrafts.com gives you step-by-step instructions for how to make a wedding card with a gift card holder inside.
For an overview of these projects, and more details on why you might want to select a gift card as a wedding gift instead of selecting a gift from the happy couple’s gift registry suggestions, you’re invited to check out the following post at my other website:
Over to You:
The floor is open for comments! So if you have questions or insights to share, you’re invited to drop us a comment and let us know what’s on your mind.
Thanks so much for your presence here, and for your interest in these projects.
More Paper Craft Projects Featuring Craft Supplies by Graphic 45:
Posted By: Amy Solovay
This page was last updated on 12-21-2023.