Similar Crochet Patterns: Crochet Headband Patterns | Crochet Hat Patterns | Crochet Patterns for Accessories
Project Description:
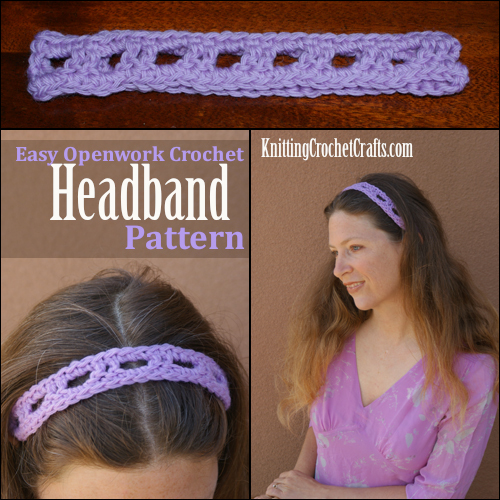
This headband is a quick project; my sample headband took only about twenty minutes to crochet. It doesn’t require much yarn and it’s a great scrap yarn pattern. The headband is crocheted using basic stitches and an easy, beginner-friendly stitch pattern.
Crochet Skill Level: Beginner
![]()
This easy openwork crochet headband pattern offers beginners a good opportunity to practice working their chains and double crochet stitches, and to get comfortable working turning chains. However, I hope this pattern will be of interest to crocheters of all skill levels.
Craft Supplies You’ll Need for Crocheting the Easy Openwork Headband Pattern:
- Worsted Weight Yarn: You’ll need Cascade 220 or a similar worsted weight yarn to crochet this headband. I suggest using a resilient wool yarn for this project, because you’ll need a yarn that stretches slightly. Fibers other than wool might not give you quite the right amount of stretch and recovery.
- Crochet Hook: Size J crochet hook
- Tapestry Needle: You’ll need this for finishing the headband after you have crocheted it.
- Safety Pins: These are helpful for pinning the sides of the headband together to try it on before you commit to sewing the final seam.
Crochet Abbreviations List for This Pattern:
- dc = double crochet
- ch = chain
- chs = chains / chain stitches
- ea = each
- sl st = slip stitch
- st = stitch
Gauge / Finished Size:
My headband measures 1 3/8 inches by approximately 19 inches (before finishing) and about 9 1/2 inches (after finishing, laid flat / doubled up on itself.)
I haven’t figured out a foolproof way to check gauge for this pattern. The size of the headband will change significantly between the first row and the last; the most accurate way to check gauge is to crochet the entire headband; then check the measurement. If it doesn’t fit, adjust accordingly.
For a looser fit, you could crochet a longer starting chain to accommodate extra stitches; if you want a tighter fit, crochet a shorter starting chain. If you do decide to adjust the starting chain length, you’ll want to either add or subtract groupings of 4 stitches. Alternately, you could change hook sizes instead; for a tighter fitting headband, use a smaller crochet hook; for a looser-fitting headband, use a larger crochet hook.
That aside, you can use row 1 as a bit of an indicator; my sample piece measured about 17 inches after completing row 1. It will get a little wider after adding the second and third rows.Please note that my sample headband was created with negative ease, meaning that the measurement of the headband is smaller than the head measurement of the intended wearer. If you crochet your headband using wool yarn, a bit of negative ease is ideal.
If you end up with a headband that doesn’t fit the intended recipient, please feel free to sell it on Etsy or another similar site — or at a craft fair. Of course, you could also unravel it and re-use the yarn to re-make the headband so that it fits. But PLEASE, if you do decide to sell your work, take your own pictures of it; you have my permission to sell items you make from this pattern, but you absolutely DO NOT have permission to use my pictures of it. Thanks for your understanding!
Design Note:
This headband is worked in long rows and then afterwards the sides are stitched together to form the shallow tube shape for the headband.
Headband Crochet Instructions:
Use a loose, easy tension throughout.
Ch 64. Place a marker in the third ch from your hook.
Row 1: skip the first 7 ch sts; the skipped chs count as the first dc st plus 2 ch sts at the top and 2 at the bottom. [Work 1 dc in ea. of the next 2 ch sts, skip next 2 ch sts, ch 2.] repeat sequence in brackets 13 more times across the row; end the row with a dc st in the last ch.
Ch 1, turn.
Row 2: [2 sc in next ch-2 space, work 1 sc into each of the next 2 dc sts.] Repeat sequence in brackets all the way across the row. Work 2 sc in the last space in the row. End the row by working 1 sc into the ch st that has the marker attached. Remove the marker. Rotate work clockwise if you’re right-handed; counter-clockwise if you’re left-handed, and work 1 sl st into each of the next 2 sts.
Row 3: You will work back across the starting chain to complete this row. [Work 2 sc sts into the space; work 1 sc into ea of the next 2 dc sts.] Rep the sequence in brackets all the way across the row. End the row by working 2 sc sts into the last space in the row, then working a sc into the last st.
If you would like to do a quick fitting before you seam the sides of the headband, put a safety pin in your active loop and use a few more to pin the sides of the headband closed. Try it on the intended wearer.
Finishing the Headband
When you are satisfied that the headband is the size you want it, cut the yarn leaving a very long tail of yarn (perhaps around ten inches long) and end off. Thread your tapestry needle using this end of yarn; with right sides together, use the tapestry needle to stitch the ends of the headband together. Weave in your ends. Turn the headband right side out. If you want to dress it up a bit more, you could add a crocheted flower as an accent. I didn’t do this with my sample headband, but I think it would be a nice touch.
The headband is now ready to wear and enjoy, or to give as a gift.
Check Out More Crochet Patterns for Hair Accessories:
References:
You might not make this connection by looking at it, but this headband was inspired by a stitch called “string network” which I found in a crochet stitch dictionary:
- The Harmony Guide to Crochet Stitches
Compiled by James Walters and Sylvia Cosh
1986 Lyric Books Limited
ISBN# 0 7111 0028 4
This pattern went through several revisions and by the time I was finished with it, the headband didn’t look much like this stitch, although there are vague similarities. Nevertheless, this stitch did provide the inspiration for the headband pattern.
Crochet Accessory Patterns
- Best Crochet Accessory Pattern Books
- DIY Jewelry Making: Crochet Jewelry Patterns and More
- Crochet Hat Patterns
- Crochet Flower Patterns
- Flower Applique — Free Crochet Pattern
- Colorful Scrap Yarn Flower — Free Crochet Pattern
More Crochet Resources
- The Best Crochet Books for Beginners
- How to Crochet (For Total Beginners)
- Best Crochet Stitch Dictionaries
- Best Crochet Womenswear Pattern Books
- Best Crochet Edging Pattern Books
- Learn Different Crochet Stitches
- Discover Interesting Crochet Techniques.
More Crafts, Hobbies and DIY Projects:
- Best Christmas Craft Books for the 2024 Holiday Season
- Craft Supplies
- Knitting
- Knitting Books
- Speed Knitting
- Knitting Supplies
- Lace Knitting
- Knitting Techniques
- Yarn for Crochet and Knitting
- Quilting
- Sewing
- Guide to Basic Hand Sewing Stitches
- Sewing Appliques
Check Out More Craft Techniques and Project Ideas HERE!
Posted By: Amy Solovay
This page was last updated on 10-7-2024.