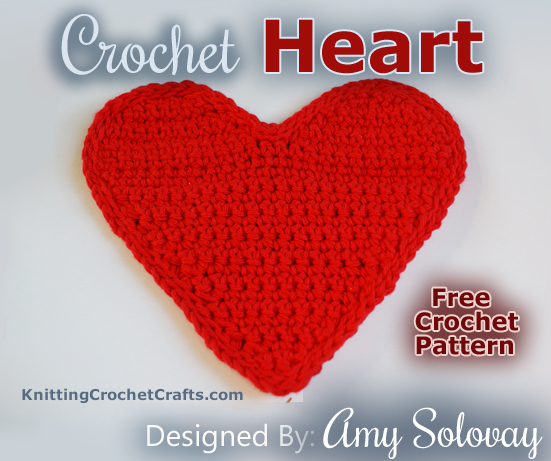
This crochet heart shape is a variation on a two-color heart square design. In this variation, instead of crocheting the entire square, you omit the background and only crochet the areas that form the heart shape. Then you work a round of slip stitch all the way around the outer edges of the heart.
Supplies Needed to Crochet a Heart Shape:
Yarn:
I used red worsted weight cotton yarn to crochet my heart motif. You can use any yarn or thread you like; this design should work just fine if you work it in other fibers, weights or colors.
Crochet Hook:
I used a size H / 5.0 mm crochet hook to make the sample heart motif, but please don’t feel like that’s the exact hook you have to use to crochet your own hearts. You can use any hook that works well with your chosen yarn or thread.
Other: Tapestry Needle for weaving in ends
Gauge: In my sample heart, 10 sts and 12 rows= 3″.
Gauge will vary widely, depending on the materials you use and other factors. If you want your heart to measure exactly the same size as mine, try to match my gauge as closely as possible. If you need a larger or smaller heart, feel free to adjust hook and yarn sizes accordingly.
Finished Size:
My sample heart measures about 7 3/4″ wide by about 6 1/4″ high. This heart could be useful in a variety of different sizes, depending on what you want to do with it.
Crochet Abbreviations List for This Pattern:
- ch = chain
- dec = decrease
- sc = single crochet
- sl st = slip stitch
- st = stitch
- YO = yarn over
Design Notes:
- You can work from either the charts or the written instructions below, or both – whatever is easier for you.
- You start crocheting at the widest point of the heart, which is marked as row 1 on the chart posted below. Work that chart from the bottom up.
- Then you flip your crocheted piece upside down and work from the next chart.
- Each block on these charts corresponds to one single crochet stitch or one decrease.
- Consult either the written instructions below, or the charts, to determine where the decreases are. When using the charts, if you’re working a row that has fewer blocks than the previous row, you need to decrease. Where decreases are required, work them at the beginning and / or end of the row.
Heart Charts:
Heart Chart #1
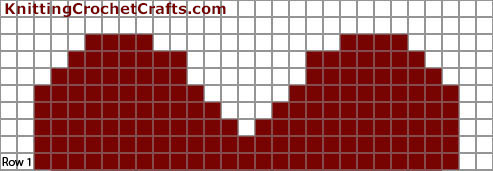
The lower row on this chart is row one. The row directly above it is row two, and so on.
After you’ve crocheted a row, compare it with the row above it on the chart. If there are fewer stitches on the row above, you’ll need to decrease. If there are the same amount of stitches, you don’t need to decrease.
Starting with row 3, I found it easiest to split the heart in halves and only work half at a time.
After you’ve completed this chart, you’re going to flip your crocheted piece upside-down and start working heart chart #2, below.
Heart Chart #2
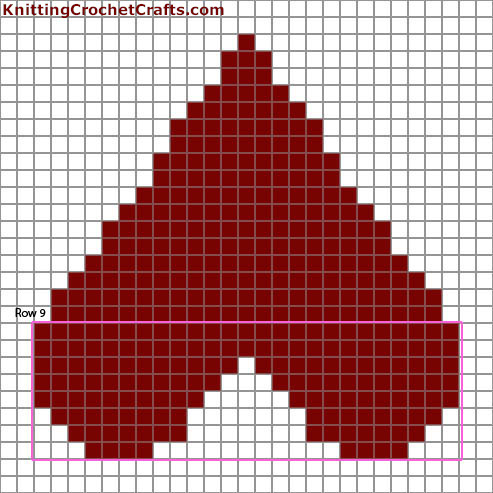
This version of the heart chart is upside-down, with rows 1-8 marked – they are the rows inside the pink rectangle area. Before working this chart, you should have already crocheted rows 1-8.
Then at that point you flip your work upside down and begin working row 9 on this chart. You’ll work row 9 into the foundation chain of the crocheted piece.
Why do it this crazy way?
Well, I found it easier to crochet the heart motif starting with the widest point of the heart. I made that row 1, even though it wouldn’t have logically been row one on the original heart chart. Then I worked from the bottom up.
If you do it this way, after crocheting from row 1 to the top , you still need to work the rest of the heart. So that’s why you flip it upside down and start working in the other direction.
How to Crochet the Heart:
Ch 26.
Row 1: Sc in 2nd ch from hook, and in each ch after across the row. (25 sc.)
Ch 1, turn.
Row 2: Sc in each sc across the row. (25 sc.)
Ch 1, turn.
Row 3A: Begin working left side of heart. Work 12 sc – one sc in each of the first 12 sc across the row. (12 sc.)
Ch 1, turn.
Row 4A: Work 1 decrease: draw up a loop in the first sc st. Draw up a loop in the second sc st. YO and draw through all 3 loops on hook. 1 dec worked. Work 1 sc in each of the remaining sc sts across the row. (10 sc.)
Ch 1, turn.
Row 5A: Work 9 sc and then 1 decrease.
Ch 1, turn.
Row 6A: Work 1 dec, 6 sc and then 1 dec.
Ch 1, turn.
Row 7A: Work 1 dec and 6 sc.
Ch 1, turn.
Row 8A: Work 2 decs at the beg of the row, then work 1 sc and 1 more dec.
Attach yarn to row two. Rows 3B to 8B are going to be exactly the same as rows 3A to 8A, except they are a mirror image.
Row 3B: Begin working right side of heart. Starting at left, work 12 sc across the row. (12 sc.)
Ch 1, turn.
Row 4B: Work 1 decrease: draw up a loop in the first sc st. Draw up a loop in the second sc st. YO and draw through all 3 loops on hook. 1 dec worked. Work 1 sc in each of the remaining sc sts across the row. (10 sc.)
Ch 1, turn.
Row 5B: Work 9 sc and then 1 decrease.
Ch 1, turn.
Row 6B: Work 1 dec, 6 sc and then 1 dec.
Ch 1, turn.
Row 7B: Work 1 dec and 6 sc.
Ch 1, turn.
Row 8B: Work 2 decs at the beg of the row, then work 1 sc and 1 more dec.
End off.
Flip work upside down. Attach yarn to row one of work. Follow chart #2 when working the rest of the pattern. Note that row 9 will be worked into your starting chain.
Row 9: Work 23 sc across.
Ch 1, turn.
Row 10: Work 23 sc across the row.
Ch 1, turn.
Row 11: Work 1 dec at the beg of the row, then work 19 sc and 1 more dec at the end of the row.
Ch 1, turn.
Row 12: Work 1 dec at the beg of the row, then work 17 sc and 1 more dec at the end of the row.
Ch 1, turn.
Row 13: Work 1 dec at the beg of the row, then work 15 sc and 1 more dec at the end of the row.
Ch 1, turn.
Row 14: Work 17 sc across the row.
Ch 1, turn.
Row 15: Work 1 dec at the beg of the row, then work 13 sc and 1 more dec at the end of the row.
Ch 1, turn.
Row 16: Work 1 dec at the beg of the row, then work 11 sc and 1 more dec at the end of the row.
Ch 1, turn.
Row 17: Work 1 dec at the beg of the row, then work 9 sc and 1 more dec at the end of the row.
Ch 1, turn.
Row 18: Work 11 sc across the row.
Ch 1, turn.
Row 19: Work 1 dec at the beg of the row, then work 7 sc and 1 more dec at the end of the row.
Ch 1, turn.
Row 20: Work 9 sc across the row.
Ch 1, turn.
Row 21: Work 1 dec at the beg of the row, then work 5 sc and 1 more dec at the end of the row.
Ch 1, turn.
Row 22: Work 1 dec at the beg of the row, then work 3 sc and 1 more dec at the end of the row.
Ch 1, turn.
Row 23: Work 1 dec at the beg of the row, then work 1 sc and 1 more dec at the end of the row.
Ch 1, turn.
Row 24: Work 3 sc across the row.
Ch 1, turn.
Row 25: Skip 1st sc, work 1 dec across next 2 sts.
Finishing the Heart Shape
You now have a heart, but the chances are good that the edges of your heart look somewhat jagged, and possibly even a bit messy. To fix that, work slip stitches all the way around the outer edges of the heart. This isn’t going to be a precise or scientific process; there isn’t any obvious formula for where to put each stitch.
Try to place your stitches as evenly and carefully as possible, keeping them close to the outer edges of the heart shape. This will tidy up the crooked-looking edges so the outer edge of your heart has a smooth, uniform appearance.
When you’ve worked sl sts all the way around, pull the loop left on your hook through the middle of your first sl st to the back of the work. Then cut the yarn and end off.
Weave in all your loose ends securely using a tapestry needle.
Ideas for What to Do With Your Crocheted Heart Shapes
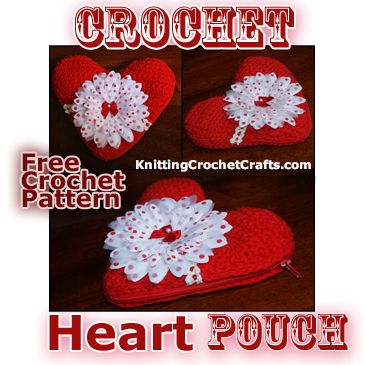
You could transform 2 of these heart shapes into a beautiful heart-shaped pouch for Valentine’s Day (or, really, for any day).
See more ideas below: check out several suggestions from our readers for how to use this heart pattern.
Got ideas for what to do with a crocheted heart motif? Share them! The floor is open for comments, and we welcome your ideas.
Decorating Your Crochet Hearts
After you crochet your hearts, remember that it might be fun for you to decorate ’em. If you want to give that a try, you’ll find plenty of ideas, inspiration and patterns for this on our website, and the Internet. We invite you to look at the following pages:
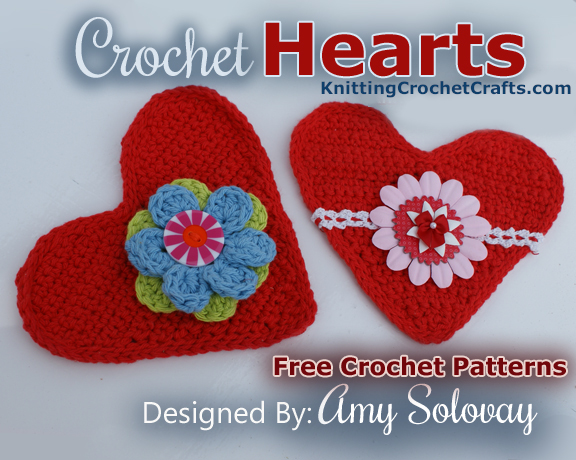
Trims and Edgings — If you’re clever enough to figure out how to add an edging around your hearts, the effect will likely be gorgeous. I didn’t get that far with mine, but I’ll let you in on a secret for a trick that to me seems much easier: crochet a straight piece of trim or edging the same width as your heart, then stitch it to the heart close to the center.
You can place additional embellishments overtop of the trim. An example of this strategy is pictured in the heart on the right side of the photo above. This is a relatively quick way to add visual appeal.
If you want to save even more time, you could do the same with store-bought ribbon, lace or trim.
If you want to use the exact same edging I used for decorating my heart, check out this free crochet trim pattern. Otherwise, you might find trims you like on this page of trim and edging patterns; I also recommend checking out this list of the best crochet edging pattern books.
Check Out More Crochet Heart Patterns HERE:
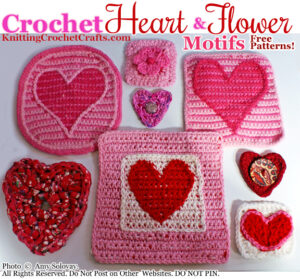
You can find even more inspiration on this page of Valentine’s Day craft ideas.
More Crochet Resources
By Amy Solovay
This page was last updated on 5-12-2024.
Dish Cloth
I like to crochet this in cotton yarn with colors to match my kitchen and I have a heart dishcloth (or pot holder/trivet). You can make larger by using a larger hook. You can make in lots of colors and use as hostess gifts.
Thanks for the comment, Helena. I think it’s a great idea to make these as dishcloths and use them as hostess gifts. I appreciate the insights.
Best wishes,
Amy
i loved this heart pattern!!
I crocheted the chart with a G-hook, twice. Sewed together both panels, added a crocheted strap to make a small purse. Used your free pattern for two small amigurumi bunnies which I tucked inside. This will be a perfect Easter gift for my daughter. Thank you.
—pcuevas223
What a great idea! Thanks so much for sharing it. I really appreciate your interest in our patterns.
I want to make a purse like that. So how would I go about making a strap? What about a closure — is that something that could even be done or would the purse just have to stay open? Thanks for any help or insights, I know that wasn’t how you meant the heart to be used but I just love the idea.
Hi Wendy, Have you seen the pouch you could make using this basic heart shape? It doesn’t have a strap, but it does have a zippered closure. I chose to put the zipper on the side to make it easier to insert. However, you could put the zipper on the top if you’re skilled enough with zipper insertion to figure out how to install a zipper over a curved area. You can check that out here: Zippered heart pouch
As for a strap, there are bunches of ways you could do that. Perhaps you could use knitted icord for making a short strap. Another option could be chaining to approximately the length you want the strap, and then for row 2 working one slip stitch into each chain stitch. There are many possibilities.
Ooh, pretty!!! I can think of dozens of uses for this heart. Thank you for the free pattern.
You’re welcome, Eleanor. Thanks for your interest in our patterns.
Like!
Thanks for the free pattern!!!
You’re welcome, Sally. Thanks for the comment! I appreciate your interest.