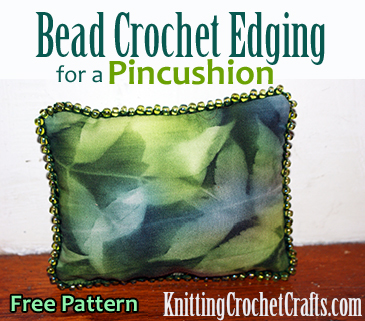
Learn How to Make a Pincushion With a Pretty Beaded Edge Using Our Free Pincushion Pattern and Instructions

Do you have homeless pins that you need a place to stick? If you have a few fabric scraps, some fiberfill, a package of beads and a few other common items hanging around your craft supplies stash, you can make a beautiful pincushion to stick them in.
Related Resources: Bead Crochet for Beginners | Bead Crochet Patterns
The Story of This DIY Pincushion Pattern With Bead Crochet Edge
Doesn’t it seem like truly exquisite fabric costs a fortune these days? I thought of the idea for this pincushion because I had fabric scraps left over after I was finished making a different project using some lovely, expensive sun-painted fabric with a natural leaf design. The scraps were too pretty to throw away, so I wanted to find a creative use for them.
This little object has a number of possible uses. Because I have zillions of homeless pins hanging around my craft supply stash, mine is going to become a pincushion. For those of you who enjoy making dollhouse miniatures, I think this would also be a cute doll pillow; it’s about the right size for Barbie or other 11.5″ fashion dolls. With some adapting, and different color choices, you could also make it into a ring bearer’s pillow.
Craft Supplies Needed to Make This Pincushion:
- Fabric: You’ll need 2 small fabric scraps cut into identical rectangular shapes.
- Sewing Thread: Choose a thread color that matches your fabric scraps. Alternately, you can pull some of your embroidery floss apart and use a single ply of the floss for the tasks that ordinarily require sewing thread.
- Beads: I used 6/0 seed beads in a pale green color. I used approximately 94 beads total, but you may need a different amount depending on your individual way of crocheting as well as the exact mix of supplies you use.
- Embroidery Floss or Crochet Thread: I used less than one 8 m skein of embroidery floss to crochet the edging on my pincushion. I used DMC floss color #890. You’ll want to use floss or thread in a color that complements your fabric.
- Crochet Hook: I used a size B / 1 – 2.25 mm crochet hook. Feel free to adjust as necessary; most importantly, you’ll want to work with a hook that’ll feel comfortable to you when you’re crocheting this pattern.
- Stuffing: I used a polyester fiberfill for stuffing my sample pincushion, but wool or other stuffing material could work just as well.
- Tapestry Needle and Straight Pins
- A Sewing Machine is optional. I didn’t use one to make my sample pincushion, but you can use one to speed up your sewing if you have a machine handy.
- A Beading Needle is also optional. I was able to use my tapestry needle for all the needle-related tasks in this project, but you might find a beading needle helpful for getting your beads threaded onto your floss.
How to Sew the Pincushion:
Pin your fabric scraps together with the right sides facing each other. You can either machine stitch or hand sew the pincushion seams. If you’re hand sewing, thread your tapestry needle and use it to stitch most of the way around the outside edge of the rectangle shape, leaving an opening to add the fiberfill.
You can clip the corners to make the next steps easier.
Turn right side out. Press the piece with a hot iron. Stuff your pincushion and stitch the opening shut. Set the piece aside.
Bead Crochet Edging Instructions:
Wind your embroidery floss into a small ball. Thread your beading needle or tapestry needle with the floss and then string your beads onto the embroidery floss.
Make a slip knot. [Slide a bead right up close to your crochet hook. Reach around the bead and grab the floss with your hook; pull it through your active loop to create a chain stitch with a bead trapped inside.] Repeat the sequence in brackets until your piece is long enough to go all the way around your pincushion. End off.
Using sewing thread or a single ply of the embroidery floss, stitch the beaded edging in place around the outside edge of the pincushion. When you are finished, you can weave the ends in and then hide them inside the pincushion. To accomplish this, thread the ends onto your tapestry needle; after doing your weaving, you can insert the needle into the center of the pincushion. Be careful not to lose it! Once it’s in the pincushion, wiggle it a bit so the ends of the embroidery floss work loose, then make sure to get the needle back out.
Next comes the other fun part: stick all your pins into the pincushion and enjoy using it. Happy stitching!
Reference and Recommendation:
The Beaded Edge is an inspiring crochet pattern book filled with patterns for gorgeous beaded trims and edgings. If you’d like to delve into more beaded crochet edgings, all of which are fancier and more intricate than this one, I think you’ll really enjoy this book. It’s one of my favorites. There’s also a sequel to this book called The Beaded Edge 2, pictured at right.
See Also: The Best Bead Crochet Pattern Books
More Sewing Pages and Ideas
More Crafts, Hobbies and DIY Projects:
- Beadwork
- Button Crafts
- Learn How to Do Wire Crochet With Beads
- 8 Crochet Necklace Patterns
- Beaded Gadget Cozy — Free Crochet Pattern
- Craft Supplies
- Knitting
- Knitting Supplies
- Quilting
- Jewelry Making
- Best Tools for Jewelry Making
- Home Decor Crafts and DIY Project Ideas
Find More Craft Project Ideas HERE!
Posted By: Amy Solovay
This page was last updated on 8-11-2021.