There are zillions of possible ways to tie dye a stripe. This is one of my favorite stripe tie dye ideas; it results in a horizontal stripe across the chest area.
Craft Supplies You’ll Need for Tie Dyeing a Striped Design on a T-Shirt
- A white or very light-colored shirt made of 100% cotton
- Latex gloves
- Dyes (I prefer fiber reactive dyes, but you could also use Rit dye or a similar product. You could also purchase a tie dye kit.)
- Squirt Bottles
- A bucket
- A Drop Cloth to protect your work area
- Rubber Bands
If you are using fiber reactive dyes, you will also need the following supplies:
- Dust mask or respirator to wear while mixing dye powders
- Soda ash. (Mix up soda ash solution according to the instructions included with your dyes, and soak your shirt in the solution ahead of time, before following the rest of the instructions in this guide.)
- Synthropol detergent for washing your dyed shirt
How To Create and Tie Dye the Stripe
Before you start, put on old clothes that can get stained. If you have long hair, tie it back out of the way. Spread your drop cloth over your work area to protect it. Put on your gloves.
Keep in mind that there are probably dozens or hundreds of different ways to tie dye a stripe. This is only one option of many. Please do not feel limited to doing it the way you see pictured here. You can also come up with your own ideas as well!
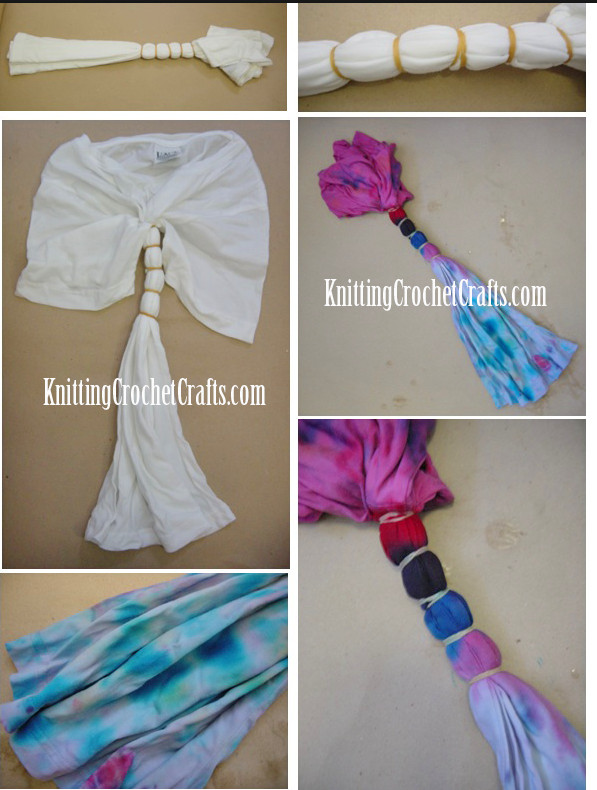
Place the shirt on a flat surface, and lay it as flat as possible. Fold the shirt into lengthwise accordian-style pleats that are as even as possible. (I do this by folding the shirt in half lengthwise first and then doing the pleats on that side, and then flipping the shirt over while still maintaining those pleats, and folding the other side.
Then place rubber bands at even intervals over your folds. In the example project, I used 5 rubber bands. You can use as many rubber bands as you want to. The rubber bands begin at approximately parallel to the t-shirt’s underarm area.
Plan a color scheme for your design, and mix your dyes up accordingly.
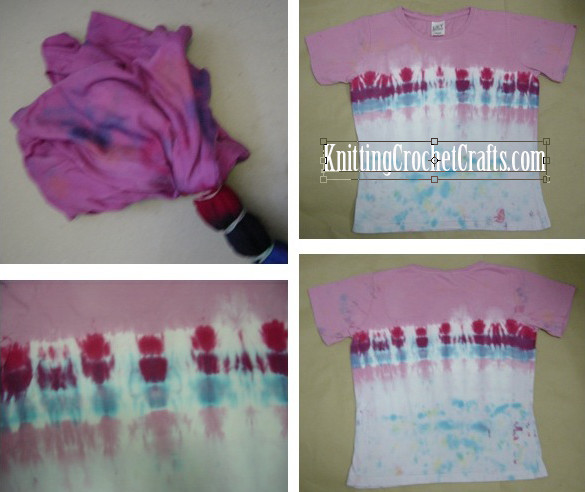
Apply the dyes to the shirt. Keep in mind that the shirt will remain white in any area that dye does not penetrate it. So, if you do not want white areas in your shirt, make sure that you get the dyes down deep into the folds of the shirt. You might have to move the rubber bands around a little as you work. In my example project, there are white areas as part of the design, which works well with this design and these particular colors.
You can see that in this example, I used shades of pinks, plums, and blues to create the design. The end result also has shades of purple, since when the pinks and blues were mixed together it created purple. A good color theory book can help you if you aren’t sure how to mix colors to your satisfaction.
After your shirt has been dyed, you will want to be very careful when you move it, because it will be saturated with dyes. You don’t want the colors to contaminate each other. From this point on, you will want to refer to the manufacturer’s instructions in order to know how long to let the dyes penetrate, and how to properly care for it.
If you are using fiber reactive dyes, you will want to carefully place the shirt inside a plastic bag and set it aside out of the way for approx. 24 hours. Then you can unwrap it, remove the rubber bands, rinse it and wash it with synthropol. Experienced dyers often wash & rinse 3 times in order to make sure the excess dye is fully removed. You can then dry it.
I hope you will enjoy your new tie-dyed shirt!
More Tie Dye Patterns, Ideas, and Instructions

- Heart Tie Dye Pattern: How to Tie Dye a Heart T-Shirt (Free Instructions)
- Upcycling Clothes Is Easy With Tie Dye Techniques
- Spiral Tie Dye: Free Photo Tutorial and Instructions
- A Butt Ugly Tie Dye T-Shirt: A Case Study of What Not To Do
See Also: How to Dye Clothes
Posted By: Amy Solovay
This page was last updated on 5-25-2023.