Project Description:
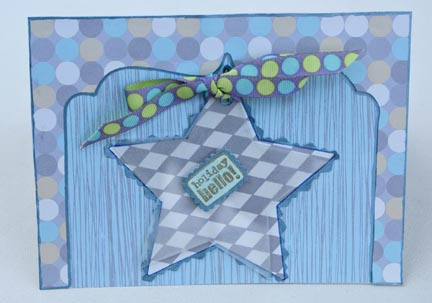
This Christmas card features a star motif plus several different patterned papers and some eye-catching dotted ribbon.
The greeting on the card front says “Holiday Hello,” which is a greeting that you would be safe in giving to just about anyone. Of course, feel free to choose a more “Christmas-y” greeting if you know the recipient celebrates Christmas. Alternatively, you could take this card in a different direction by stamping a different greeting, such as “Thank You” or “Happy Birthday” instead.
Tools and Supplies You Need to Make This Card:
- Clear acrylic star shape — The star shape in my sample is a page from a Clear Scraps acrylic mini scrapbook album.
- Paper scraps — I used scrap papers left over after a session of cutting out papers using various shapes for templates. Most of these scrapbooking papers are by Moxxie.
- An interesting chipboard, acrylic or other shape to use as a template. I used a bracket shape, but there’s no need to limit yourself if you have a different shape on hand that could be interesting.
- Adhesive
- Paint markers
- Scissors and paper trimmer
- “Pinking” scissors with zigzag edges
- Strathmore bristol board
- Cardstock
- A scoring tool such as a bone folder or Scor-Pal tool
- Ribbon
- A sentiment stamp and stamping ink — I used a stamp by Studio G in the sample card.
- Pencil
Card-Making Instructions:
Make your card base using Bristol board; fold it in half using the scoring tool.
Attach various patterned papers to the card base in a pleasing arrangement using adhesive. You can draw around your chipboard or acrylic shape on patterned paper to get an interesting motif to use prominently on the card front.
Use the clear star shape as a template for drawing a star in pencil onto the back of a piece of cardstock. Use “pinking” / zigzag-edged scissors to cut around the pencil lines to create a star shape with zigzag edges.
Apply ink around the zigzag edges of the star shape to add emphasis.
Flip a piece of patterned paper onto the back and trace around the star shape again using pencil. This time, cut the shape out using straight-edged scissors. Layer this star on top of the other star shape using adhesive.
Outline around the outside edges of the clear acrylic star shape with paint marker.
Tie ribbon into a bow and attach it to the clear acrylic star shape.
Layer the clear acrylic star shape on top of the paper stars and attach them together using small dots of glue.
Attach the layered star shape to the card using adhesive.
Stamp the greeting, cut it out and attach it to the card.
Outline the outer edges of the card with either ink or marker.
If you’re ready to give the card to someone, be sure to fill in the inside with a note or greeting. Otherwise you can add it to your card stash and keep it until you need it.
Here’s hoping the recipient will enjoy it!
Click Here to Find More Christmas Card Making Ideas
CLICK HERE to find the best craft supplies:
By Amy Solovay
About the Author: Amy Solovay is a freelance writer with a background in textile design. She holds a bachelor’s degree with a studio art minor; and she has also obtained another degree in textile design.
This page was last updated on 5-21-2021.