Free Crochet Pattern With Corner Instructions for Finishing Blankets, Bedspreads, Linens and Other Projects
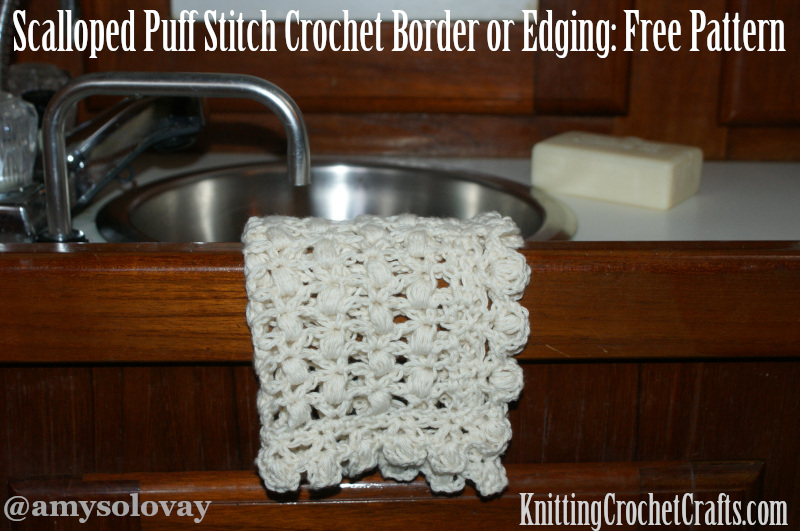
Scalloped Puff Stitch Crochet Border or Edging: Free Pattern
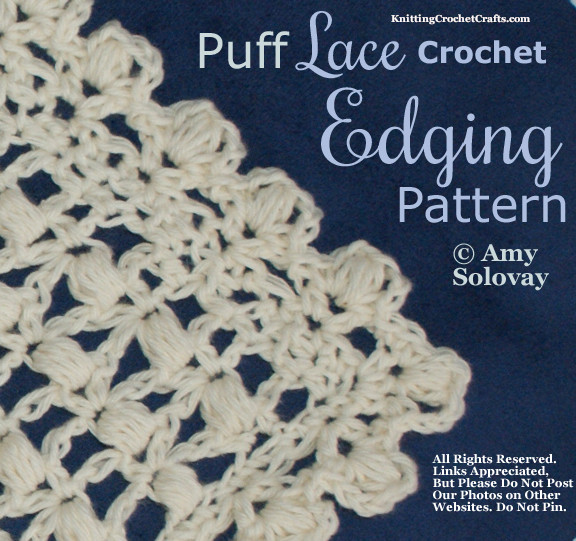
Puff Lace Crochet Edging Pattern
Crochet is the ideal medium to use for creating frilly, fancy edgings to accent your craft projects and finish them off beautifully. This particular edging makes a lovely coordinate for a wide variety of different projects; it looks pretty on lacy projects, and on plainer projects too.
This edging is appropriate for use on crochet projects that are square or rectangular. It’s ideal for finishing off blanket edges, rectangular placemats, dishcloths, washcloths, and similar projects. With slight modifications, you can also use this design to finish off knitted or sewn projects, or even store-bought items.
See More About: Crochet Blanket Border Patterns | (Mostly) Free Crochet Edging Patterns
Project Description: This appealing puff stitch border is heavy on texture – literally. It’s not a deep border, but it’s substantial enough to use on blankets, bedspreads and large crochet (or knitting, or sewing) projects. The pattern directions include instructions for how to turn the corner, making this design useful for finishing a wide variety of different projects.
The edging shown here finishes off a puff stitch lace crochet dishcloth / washcloth design. I crocheted my sample using Knitpicks “Simply Cotton” yarn in the sport weight, which is also the material used for crocheting the main body of the dishcloth / washcloth.
Crochet Skill Level: Easy
Tools and Supplies You’ll Need for This Project:
- Yarn or Crochet Thread: The amounts needed will vary greatly depending on the project and the materials you’ve selected. I was able to make the entire project sample, including both the dishcloth and edging, using less than one 50 gram ball of sport weight Simply Cotton yarn. Larger projects will obviously require much more yarn than that.
- Crochet Hook: Use a crochet hook that’s well-suited for working with your chosen yarn or crochet thread. If in doubt, I encourage you to check the yarn label or visit the yarn manufacturer’s website for a suggested hook size.
- Tapestry Needle: This is optional, but it’s helpful to have a tapestry needle for weaving your loose ends in after you’ve finished crocheting your project.
List of Crochet Abbreviations:
- beg = beginning
- ch = chain
- ch-2 space = chain-2 space, meaning the space created when you crocheted 2 chain stitches in the row below
- ea = each
- hdc = half double crochet
- hdc v st = half double crochet v stitch; see special stitches below for instructions
- rep = repeat
- sc = single crochet
- sl st = slip stitch
- st = stitch
Special Stitch: The Puff Stitch There are different ways to crochet a puff stitch. In this pattern, you’ll be using the following puff stitch instructions:
- Wrap the yarn over your crochet hook.
- Insert the hook into the next stitch to be worked.
- Wrap the yarn over your crochet hook again and pull up a loop. (3 loops on hook.)
- Do not complete the stitch. Instead, wrap the yarn over your crochet hook another time.
- Insert the hook into the same spot again.
- Wrap the yarn over your crochet hook again and pull up a loop. (5 loops on hook.)
- You still don’t want to complete the stitch yet. Instead, wrap the yarn over your hook another time.
- Insert the hook into the same spot again.
- Wrap the yarn over your crochet hook again and pull up a loop.
- Count the loops on your hook. If you have 7 of them, it’s finally time to complete the stitch. If you don’t have 7 loops total, something went wrong somewhere and it’s time to start over.
- To complete the stitch, wrap the yarn over your hook and carefully pull it through all 7 loops on your hook.
- Chain 1 to close the stitch.
Special Stitch: The Half Double Crochet V-Stitch (abbreviated “hdc v st”.) There are different ways to crochet a v-stitch. In this edging pattern, you’ll be using the following v-stitch instructions:
- hdc in next st to be worked.
- ch 1.
- hdc in same st to complete the v.
Design Notes: This edging is a multiple of 3 stitches, not counting the corners.
If you are crocheting this edging to go with the puff lace dishcloth or another project made using the puff lace stitch with half-double crochet vs, please note that this version of the puff stitch is different than the version specified in those pattern instructions. This version is less “puffy,” because in my opinion the puffier version is a little too heavy to be appealing in this particular edging design.
Instructions for Crocheting the Scallop Puff Stitch Border:
Round 1: sc all the way around your project, increasing or decreasing if necessary to end up with a multiple of 3 sts on each side (not counting the corners.) in the corners, work 2 ch sts ea.
Important: Make sure to finish with the same number of sc sts on opposite sides — for example, if you have 30 stitches down 1 side of your project, you should also have 30 stitches up the opposite side of your project. Same goes for your upper and lower edges; if you have 60 stitches across your lower edge, you should also have 60 stitches across your upper edge.
Round 2: ch 3, skip next st, [hdc v st in next st, ch 1, skip next 2 sts.] Rep the sequence in brackets across the side you are working. At the end of the side you are working, after your last hdc v st, work the corner as follows: ch 1. Skip any remaining stitches before the corner space. Work 3 hdc sts into the ch-2 corner space. ch 1, skip next 2 sts, then rep the sequence in brackets until you get to the next corner. Continue working in this manner all the way around. In the last corner, you only need to work 2 hdc sts and then sl st to join to the beg of the round.
Round 3: In each v-stitch, work the following sequence: [sc, ch 2, puff stitch, ch 2, sc.] Then sl st in ea space between v-stitches.
Round 3 Corner Instructions: In the corners: sl st in next sp. In the row below, there are 3 hdc sts in ea corner. Sc in first hdc. In next hdc: sc, ch 2, puff stitch, ch 2, sc. Sc in next hdc. Sl st in next space.
Continue working in this manner all the way around.
Finishing:
Block your project if desired.
Get More Crochet Edging Patterns:
- Best Crochet Edging Pattern Books
- The Beaded Edge 2: Spectacular Beaded Crochet Edging Patterns
- Crochet an Easy Lacy Shell Edging
More Crochet
- Crochet Stitches
- How to Crochet a Granny Square: Free Step-By-Step Tutorial
- Crochet Granny Squares
- Crochet Tutorials
- Crochet Techniques
- Free Crochet Patterns
More Crafts You Might Enjoy
- Knitting
- Christmas Crafts
- Holiday Crafts
- Kids’ Crafts and Activities
- Sewing
- Kitchen Crafts
- Quilting
- Paper Crafts
- Card Making
This page was last updated on 4-30-2023.