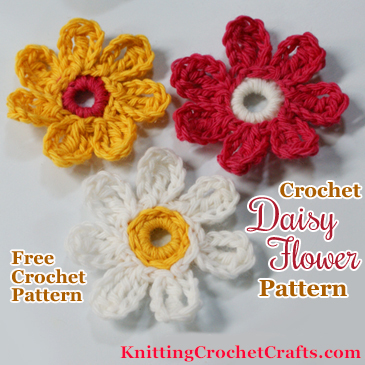
Are you wondering how to crochet a daisy? If so, I’m delighted that you found this free crochet daisy flower pattern — because I’ll give you the instructions you need for exactly how to do it.

Well, at least, I’ll give you the instructions for one possible way of doing it; there are gazillions of different methods you could use for crocheting a daisy, and there are bunches of different daisy crochet patterns out there. If this particular daisy isn’t exactly what you have in mind for your project, I invite you to check out this list of 9 crochet daisies, which includes other options besides this one.
This particular pattern results in a daisy applique that lies flat — which means that you can stitch it, glue it or attach it to other projects or surfaces easily.
Ideas for Using These Pretty Crochet Daisy Flowers:
- These little daisies make fantastic accents for knitted or crocheted headbands.
- If you want to make a blanket with a daisy theme, you could stitch these little daisies onto the centers of some of the granny squares or other crocheted squares you want to use in your blanket design.
- Make several of these and sew them to baby clothes or kids’ clothes for a special handmade touch.
- Glue your daisies onto paper craft projects, handmade greeting cards, scrapbook albums or scrapbook pages to use as embellishments.
- Decorate everyday items to make them cuter: a recipe file box, the cover of a school notebook, a pencil holder, etc.
- I’m sure you can think of plenty more creative project ideas!
Selecting Colors for Your Daisy Designs
Most of the time, if your goal is to crochet a flower that resembles a daisy, you’ll want to select gold or yellow yarn or crochet thread for the flower center, and a white, cream or off-white colored yarn or thread for the flower petals.
However, a traditional daisy-ish color combination is not mandatory. You can crochet this design in other fun color schemes, too. Why not?
For Valentine’s Day, I thought it would be nice to make up this sort of flower in pink and white. While I’m thinking it doesn’t look quite so much like a daisy when worked in these colors, I do think it’s delightfully simple and pretty.
I’ve tried other color combinations, too, and the experiments have resulted in some beautiful crocheted flowers.
To make the flowers you see in these pictures, I used Cascade 220, which is a medium weight yarn, and a size 5.50 mm crochet hook.
How to Crochet a Daisy Flower:
Work using the color you’ve chosen for your flower center.
Begin by crocheting 5 chain stitches, then joining the end of the chain to the beginning with a slip stitch. This will form a ring that you’ll work your first round of stitches into.
First Round: Work 1 chain stitch; then work 14 evenly-spaced single crochet stitches into the ring.
Change colors before working the last step of the last single crochet stitch; you’ll want to switch to using the color you’ve chosen for your flower petals. However, DO NOT CUT THE YARN YET on your first color, and do not end off yet.
Second Round: Working in the new color, make 7 flower petals as follows.
Work this entire sequence in the same stitch:
- Make 4 chain stitches.
- Work 1 treble crochet stitch.
- Then work 1 slip stitch.
Next, work another slip stitch into the next stitch.
Repeat the above directions over and over again until you’ve finished making all 7 flower petals.
Cut color #2, leaving a long tail of yarn. If you’re planning to glue the flower to a hard surface, you should leave at least 6″ of yarn for weaving in the end. If you want to sew the flower to another project, leave a much longer tail of yarn. It’s good to have a length of yarn that’s long enough for stitching your flower to the project of your choice. That way, you’ll be able to just thread a tapestry needle with the long tail of yarn, and do your stitching with it, eliminating the need to weave in that end. fasten off.
Third Round: Remember that yarn color you dropped after you finished the first round? This is the time to pick it back up and use it again.
Find the spot where your two yarn colors touch each other, right in between the first row and the second row. Find where the yarn is on the back of the work, then insert your crochet hook into a spot that’s both close to the yarn and right where the colors touch each other. Wrap the yarn around your crochet hook and pull a loop up through the flower.
Your goal here is to outline the flower center with a round of slip stitches that are worked right onto the surface of the fabric. In general, crocheting on the surface of the fabric like this is a technique known as “surface crochet”.
To accomplish this, insert your hook into the next stitch, still sticking closely to the area where the colors touch each other. Wrap the yarn over the hook, grab it and pull it up through the flower again.
Continue doing this all the way around, until the flower center has been outlined. Then you can end off and weave in your ends.
Stitch or glue the flower to the project of your choice. Enjoy!
So there you have it: That’s your free crochet daisy flower pattern. I hope you’ll find this pattern useful in case you need some crochet daisies to use in your projects.
Over to You:
Did you crochet this pattern? If so, how did it turn out? What did you use your crochet daisies for?
I welcome your feedback. The floor is open for comments — so if you have insights to share, let’s discuss your experiences with this pattern in the comments section.
More Crochet Flower Patterns:

- Quick Crochet With Flowers: EASY Flower Patterns You’ll LOVE!
- Sunflower Patterns
- 3d Sunflower Crochet Granny Square Pattern
- Sunflower Applique Pattern
- Crochet Flowers Step-By-Step
More Free Crochet Applique Patterns
- Fast, Easy Crochet Circle Pattern for Total Beginners
- Basic Crochet Heart Applique
- Crochet Heart Applique With Beads
Learn More About Crochet:
- Click here to find our picks for the best crochet books.
- Click here to find crochet stitch tutorials and instructions.
- Click here to learn more crochet techniques.
- Click HERE to Find Fabulous Yarn for Crochet and Knitting
- Click here to learn about crochet hooks.
- Click here to find my favorite crochet project bag.
Learn About Other Crafts: Knitting, Sewing, Quilting, Paper Crafts and More
- Click here to get updated on the latest craft supplies.
- Click here to learn about knitting.
- Click here to find our beginner’s guide to knitting needles.
- Click here to find outstanding craft project ideas.
Posted By: Amy Solovay
Page last updated on 11-10-2021. Thanks for visiting!