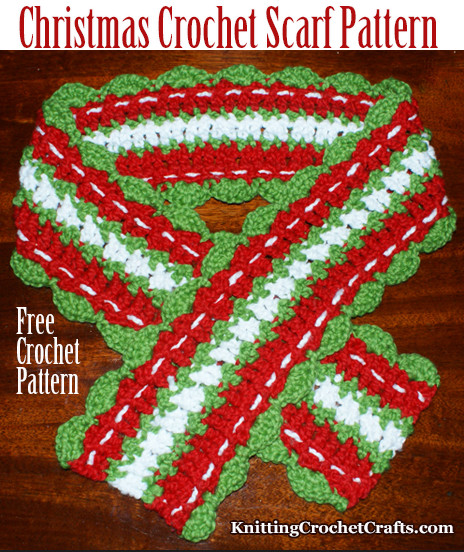
Free Christmas Crochet Scarf Pattern
Would a festive Christmas scarf put you in the mood for the holidays? If so, check out this free crochet Christmas scarf pattern featuring red, white and green yarns. For those of you who celebrate Christmas and enjoy crocheting your Christmas gifts, this is a great pattern to have in your stash; it’s a pattern you can work during the spring or summer to get a jump start on your holiday crafting.
This scarf design is quick to crochet, thanks to chunky yarn and the use of easy crochet stitches.
Skill Level: Easy
Materials:
Yarn:
For my sample scarf, I used Sprout organic cotton yarn by Classic Elite. This is a chunky textured yarn that is machine washable. I used the following colors of Sprout yarn to crochet the sample scarf:
- Salvia red, color #4358
- Galapagos green, color #4335
- Summer cloud, (white) color #4301
One hank of each color was more than enough to crochet the sample scarf. The total scarf weight is about 2.25 ounces / 63.5 grams.
Sprout yarn has now been discontinued, so you will need to substitute yarns if you’d like to crochet a scarf similar to this one. Many other yarns could work well in this pattern.
Crochet Hook:
I used a size J / 6.0 mm crochet hook to crochet the sample scarf. Use either this size hook, or whatever size you need to get the correct gauge.
Other:
Other: Tapestry Needle for weaving in ends and adding hand-stitched details to the scarf
Finished Size / Gauge:
The finished scarf measures approximately 4.5 inches by approximately 38 inches. The row gauge is not critical for this pattern; the stitch gauge is more important. To crochet a scarf measuring 38 inches long, you’ll have a gauge of approximately 13 stitches per five inches.
If you’d like to crochet a shorter scarf, measuring approximately 36 inches, you could work at a gauge of 11 stitches per 4 inches.
I wouldn’t recommend making the scarf any shorter than that; it could be made longer if you like, assuming you have enough yarn to crochet a longer scarf. Be sure to check your gauge to make sure your scarf will turn out to be a usable size.
Abbreviations Used in This Pattern:
- ch = chain
- dc = double crochet
- hdc = half double crochet
- sc = single crochet
- sl st = slip stitch
- st = stitch
Pattern Design Notes:
To change colors, work up through the last step of the last stitch in the old color, then complete the last step of the last stitch in the new color.
After each color change, you’ll want to cut the old color.
How to Crochet the Christmas Scarf:
Using red yarn, ch 100. When you work row 1, you may wish to crochet into the backs of these chain stitches, leaving both the front and back loops free; I mention this because later when you add the edging, this will make it easier for you to work back across your starting chain.
Row 1: sc in 2nd ch from hook and each st after.
ch 3, turn.
Row 2: Work entire row in dc. At the end of the row, change colors to green.
ch 1, turn.
Row 3: dc in first st, sl st in next st, (dc in next st, sl st in next st,) repeat sequence in parentheses all the way across the row. At the end of the row, change colors to white.
ch 3, turn.
Row 4: Work entire row in dc. At the end of the row, change colors to green.
ch 1, turn.
Row 5: Repeat row 3. At the end of the row, change colors to red.
ch 3, turn.
Row 6: Work entire row in dc.
ch 1, turn.
Row 7: Work entire row in sc. At end of row, change colors to green for edging.
ch 1, turn.
Scarf Edging:
Row 8: sl st in first st. (Skip next st, 5 hdc in next st, skip next st, sl st in next st.) Repeat sequence in parentheses all the way across the row. You’ll end this row with a sl st. End off and weave in the end.
Row 9: Turn the scarf over so that you can work back across your starting chain. Attach the green yarn with a slip knot. Repeat row 8, except that you can skip making the first slip knot in the first stitch; after that, just copy row 8 all the way to the end of the row.
How to Finish the Christmas Scarf:
End off; weave in any remaining loose ends.
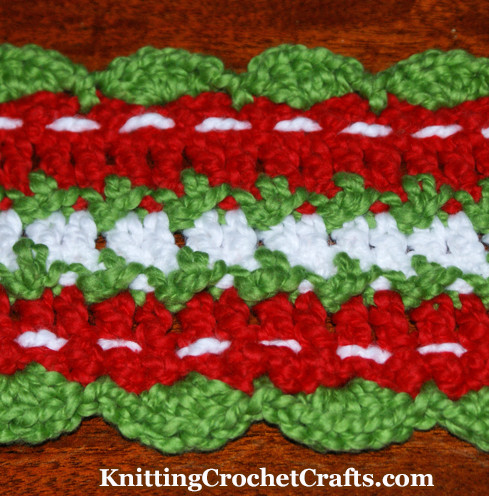
Close-Up Photo of the Crochet Christmas Scarf
Thread a tapestry needle with a long length of white yarn; for best results, use a length that is at least 10 or 12 inches longer than the scarf. When you begin stitching, leave a tail of at least 5-6 inches hanging at the end of the scarf; when you are finished stitching, you will weave this end in as you would with any other loose end.
Working between rows 6 and 7, hand stitch as evenly as possible along the entire length of the scarf. I used a modified version of running stitch; I did my running stitches by weaving the yarn over one crochet stitch and under the next crochet stitch. Feel free to experiment with this if you want to; I purposely chose a simple stitch to keep things quick and easy, but would love to work this pattern again in order to try out a few other interesting stitches and effects. Whichever stitch you choose, repeat it again on the other side of the scarf; note that an exact mirror image is challenging to achieve due to the way the rows are structured; in the end, I gave up on getting an exact mirror image, and ended up working between rows 1 and 2. You can find a guide to hand sewing stitches HERE.
Weave in these ends and any other remaining loose ends.
Block if desired. The scarf is now ready for wearing, or gift-giving. Enjoy!
Related Crochet and Craft Patterns to Explore:
Classic Christmas Crochet Pattern Book: Traditional Danish Holiday Decorations and Gifts, by Heidi B Johannesen and Pia HH Johannesen, Published by Trafalgar Square Books
- Similar Holiday Scarf Patterns to Crochet
- Crochet Scarf Patterns
- Christmas Crafts
- Another Christmas Crochet Scarf Pattern
- Best Christmas Craft Books for the 2023 Holiday Season
References:
When designing and writing up this Christmas scarf pattern, I used the following resources:
- The Harmony Guide to Crochet Stitches
Sylvia Cosh and James Walters
1986 Lyric Books Limited
ISBN# 0 7111 0028 4
Rows 3 and 5 of the scarf are a stitch they present in this book, called “floret stitch.” - Weaving yarn through your stitches isn’t a new idea, and I wasn’t the first to come up with it. It’s been awhile since I first learned about the idea, but I think I first discovered it in some of the old Mon Tricot stitch dictionaries and manuals. The Mon Tricot Special Knit and Crochet book refers to this technique as “horizontal weaving.”
- There are other ways to approach woven crochet as well. There was also an entire book devoted to woven crochet, which I believe was a Mon Tricot publication. I can’t remember the exact name of it, and can’t find any copies for sale online at the moment. I used to own a copy of the book, but sold it because I thought it was rather boring. In hindsight I wish I had it back because I’d love to revisit the projects included in the book.
- Crochet Master Class is another great resource for learning about woven crochet. The book covers many different topics, but the relevant article and pattern given in the book are by Jenny King.
- Sprout yarn labels
Posted By: Amy Solovay
This page was last updated on 11-13-2023.