Free Jewelry Making Instructions: Get the Free Crochet Bracelet Pattern Here

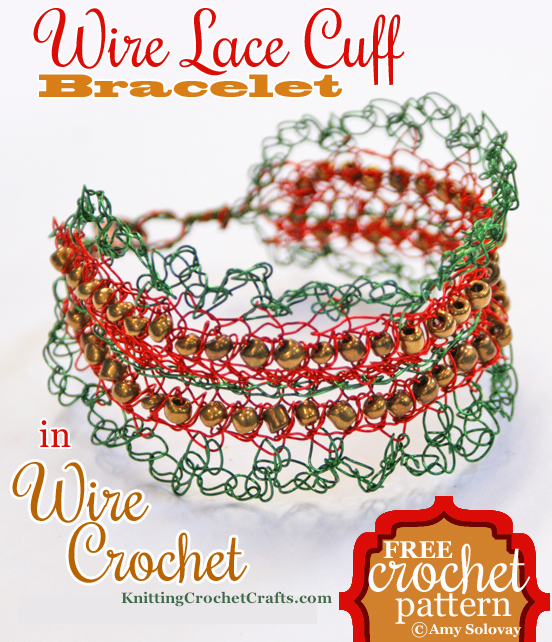
This wire cuff bracelet looks dainty and delicate, almost resembling lace. Beads accent the lacy look, adding visual appeal and a point of focus.
Crochet Skill Level: My opinion is that this is a beautiful project, and worth the effort it takes to make it; but you should be aware that it is not an easy project. I recommend it to experienced, patient crocheters who have some previous experience with wire crochet.
A Note to Beginners: If you are brand new to wire crochet, this is not the ideal project for jumping in and getting started with the technique. There are several other projects I’d recommend trying before you attempt this one.
- These wire crochet napkin rings are a straightforward, basic project that will introduce you to the wire crochet technique.
- These beaded wire crochet napkin rings are also easier to make, and there’s a step-by-step photo tutorial with many tips and hints for crocheting with beads and wire.
After you’ve successfully completed another wire crochet project, I think you’ll be better equipped to succeed with this one.
Supplies Needed for Crocheting This Wire Lace Cuff Bracelet:
- Colored Copper Craft Wire: I used two kinds of wire to crochet the cuff bracelet you see pictured above. The green wire is Darice’s 26 gauge permanently colored copper wire. The red wire is a mystery wire that I don’t think was originally intended for crafting. It’s slightly softer, finer and more flexible than the 26 gauge wire I used in the same project. If you take a close look at my sample bracelet, you can observe how the green edges are slightly ruffled in comparison to the red center of the bracelet. The differences in wire gauge cause this ruffled effect. I think this bracelet would turn out lovely if you were to use two different colors of wire in the same gauge; however, your bracelet will lay flatter and will not have this sort of ruffling. If you want to get the same slightly-ruffled look you see in my project sample, try using a wire that’s very slightly finer for color A than what you use for color B.
- Beads: My sample bracelet incorporates 62 bronze colored 6/0 seed beads. If you string your beads onto wire by themselves, without crochet work, there should be approximately 8-9 beads per inch total.
- Jewelry Findings: You’ll need a bracelet closure to elegantly finish your wire lace cuff bracelet. I used a lobster claw clasp as my bracelet closure. I’m betting you could find a more suitable closure than the one I used; I used it because I had it on hand and was not inclined to make a trip to the craft store just for a better closure. If you’re buying all new supplies to make your bracelet, I encourage you to find a more elegant closure.
- Crochet Hook: I used a size B / 2.25 mm aluminum hook to crochet my sample bracelet.
Finished Size: When laid flat, my project sample measures about 7.5″ from tip to tip when laid flat. That measurement includes the closure. The crocheted part alone measures about 5.75″. If you’d like to make the crocheted portion of your bracelet longer or shorter, you can do so by adding or subtracting multiples of 2 stitches from the foundation chain.
List of Crochet Abbreviations
- BLO = back loop only
- ch = chain
- rep = repeat
- sc = single crochet
- sl st = slip stitch
- st = stitch
Design Note: Whenever you begin, join new wire, or end off in this pattern, leave a long tail of wire free and unworked. These will be used to attach your bracelet closure when you are finished crocheting. I suggest leaving at least 5 inches, but it’s possible that your particular closure could require an even longer length of wire. If so, be sure to make your tails even longer.
How to Crochet the Bracelet:
Begin using color A (corresponds to the red wire used in my project sample.) String your beads onto your wire.
Leave at least 5+ inches of wire unworked before making your slip knot to begin. Ch 30. Leave at least 5+ inches of wire unworked at the end; cut wire. Pull wire through active loop to end off.
Row 1: Re-attach the same color of wire in the first ch. sc in first ch, slide a bead close to your work, [sc in next ch, slide a bead up close to your work.] rep sequence in brackets all the way across the row. sc in last ch. ch 1, turn.
Row 2: sc in BLO of each sc st across the row. Ch 1, turn.
Row 3: sc in BLO of 1st st. [Slide a bead right up close to your crochet hook. sc in back loop only of next st.] Rep the sequence in brackets all the way across the row. End off, leaving a tail of at least 5+ inches of wire at the end.
Center Embellishment: Using color B (Corresponds to the green wire in my sample project,) work a single row of surface crochet slip stitches down the center of the piece, in between the beadwork.
Edgings: Flip piece over to the back. Attach color B (green wire.) Ch 1 to begin (counts as first sc st.) [ch 3, skip next st, sc in front loop only of next st.] Rep the sequence in brackets all the way across the row. sl st in last st. end off. Rep the edging instructions on the other side so that the other side is a mirror image of the side just completed.
Finishing: Attach your closure. If you’re using a lobster claw-style clasp, do this by gathering all the long tails of wire towards the center and twisting them together, then stringing the closure onto the ends and twisting the ends onto themselves bunches of times, cutting off the excess.
The bracelet is now ready for wearing or gift-giving. Enjoy!
If you found this page helpful, I invite you to return to this site often for more craft tutorials, project ideas and inspiration! You can make sure you keep this site on your radar by signing up for my newsletter and community at Substack. .
Basic subscriptions are free; I send out regular newsletters to let my subscribers know about new craft articles and tutorials as they are posted. I also share details about the craft projects I’m working on, and invite my readers to share their projects, too. So there is no need to feel like it’s just you, crafting all alone at home. I’d love to have you join us! You’re invited!!
By Amy Solovay
Please Visit My Ko-Fi Shop HERE to Find My Sample Sale, Destash Sale and Digital PDF Pattern Downloads for Sale.
Please Visit My Ravelry Store HERE to Find Digital PDF Pattern Downloads for Sale.
About the Author:
Amy Solovay is a real, live, human content creator and educator who holds a Bachelor of Arts degree in mathematics from Sweet Briar College; she has also earned a separate Associate of Arts degree in textile design from FIDM LA (The Fashion Institute of Design and Merchandising, Los Angeles). She is NOT a robot and does not use artificial intelligence (AI) to write book reviews or articles for this website.
Amy learned to crochet as a small child, and she still enjoys crocheting all these years later.

As an educator, Amy Solovay used to teach in-person college courses in trend forecasting, marketing and surface design at California Design College in Los Angeles.
If you’re interested in reading Amy’s personal blog, she invites you to visit her official website, AmySolovay.com.
More Advanced Wire Crochet Projects for Experienced Crafters
- So far, this gorgeous afghan stitch bracelet is the most difficult wire crochet project I’ve attempted.
- These pull tab napkin rings are challenging, but worth the effort.
More Jewelry-Making Instructions and Ideas
- Jewelry Tools for Beginners to Jewelry Making
- Crochet Bracelets
- Elegant Trios Bead Crochet Necklace Pattern Designed by Amy Solovay
- Crochet Necklace Patterns
Learn More About Crochet:
- Click here to see more crochet lace patterns, instructions and ideas
- Click Here to Learn How to Crochet.
- Check out our picks for the best crochet accessory pattern books.
- Take a look at our suggestions for the best womenswear pattern books.
- Click here to find crochet stitch tutorials and instructions.
- Click here to learn more crochet techniques.
- Click HERE to Find Fabulous Yarn for Crochet and Knitting
- Click here to learn about crochet hooks.
- Click here to find my favorite crochet project bag.
Learn About Other Crafts: Knitting, Beadwork and More
- Click here to find beadwork projects, tutorials and ideas
- Click here to find our suggestions for the best beadwork books
- Click here to get updated on the latest craft supplies.
- Click here to learn about knitting.
- Click here to find our beginner’s guide to knitting needles.
- Click here to find outstanding craft project ideas.

This page was last updated on 11-9-2025.
