Related Resources: Patterns for Crocheting Women’s Accessories | Crochet Scarf Patterns | Crochet for Beginners
What You’ll Learn From This Crochet Pattern:
- How to crochet a neck warmer
- How to double crochet; if you don’t already know the double crochet stitch, this pattern is a great way to learn and practice it.
Project Description:
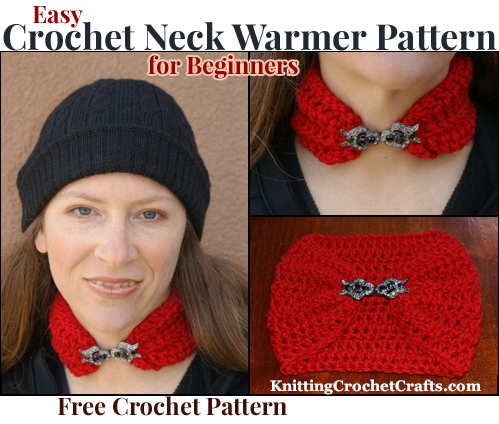
If you’ve ever wanted to create a hybrid project combining a scarf and a necklace, this pretty neck warmer offers you one possible way to approach the idea; it’s an interesting accessory that’s part jewelry and part outerwear.
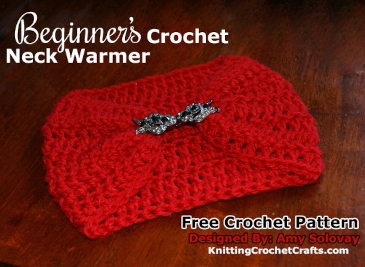
The focal point of the design is an eye-catching jeweled clasp, which fastens in front. The rest of the neck warmer is a simple rectangle comprised of easy double crochet stitches. To work this pattern, you’ll also need to know how to crochet the chain stitch.
Crochet Skill Level: Beginner
![]()
This neck warmer is easy enough for someone who has never completed a crochet project before. Choose this project when you’re ready to learn double crochet stitch, because this is a fantastic project for practicing the stitch. Even if you aren’t a beginner at crochet, this is a good pattern to grab when you want to work on a project that isn’t too intensive. For experienced crocheters who enjoy multi-tasking, this is a project you can do while riding in the car, hanging out with friends or talking on the phone.
Required Time Commitment — The sample neck warmer took me about an hour to crochet and finish. That estimate is a best-case scenario, which be most relevant for an experienced crafter who crochets quickly. Actual crochet times will vary. If you’re a beginner to crochet, expect this project to take longer. Also keep in mind that I made the size medium; if you are making a larger neck warmer, yours will likely take longer to complete.
List of Supplies
Yarn:
I used worsted-weight Patons classic wool yarn in the color known as “Bright Red” to crochet the sample neck warmer. Feel free to substitute yarns or yarn colors, taking care to check your gauge to be sure of obtaining the right fit. When substituting yarn colors, if you are a beginner, please keep in mind that dark colors will be more challenging to work with because it can be hard to see your stitches when crocheting with dark colored yarn.
I used significantly less than one ball of yarn. The total weight of yarn I used is about 33 grams; if you buy the 100 g. package of Patons classic wool yarn, you’d be able to crochet several of these in the medium size or smaller.
Crochet Hook
I used an I / 9 – 5.50 mm crochet hook to crochet my sample neck warmer.
This hook size is just a suggestion. Your way of crocheting is unique, and a hook size adjustment might be necessary for you to achieve the required gauge for this pattern.
Other Materials Needed:
- Tapestry needle for finishing
- Jeweled clasp, or any similar frog-style closure. I used a clasp from the La Mode Collection, style #4521; Blumenthal Lansing Co is the manufacturer. I found it at my local JoAnn craft store in the section with the buttons. You’ll want to be able to hand wash your finished neck warmer, so be sure to choose a clasp that can get wet. Hand washing is the suggested way to care for the recommended yarn.
Crochet Gauge — 3 double crochet stitches per inch; row gauge is not critical for this project.
Finished Neck Scarf Sizes / Starting Chain Lengths
Note that these sizes are not necessarily the same as the clothing size you wear; please be sure to measure your neck (or the neck of the intended wearer) and choose a size accordingly.
- Extra Small: 11 inches wide by 5.5 inches high; fits neck circumference of 11 inches.Begin by crocheting a starting chain of 35 stitches.
- Small: 12 inches wide by 5.5 inches high; fits neck circumference of 12 inches. Begin by crocheting a starting chain of 38 stitches.
- Medium: (pictured) 13 inches wide by 5.5 inches high; fits neck circumference of 13 inches. Begin by crocheting a starting chain of 41 stitches.
- Large: 14 inches wide by 5.5 inches high; fits neck circumference of 14 inches. Begin by crocheting a starting chain of 44 stitches.
- Extra Large: 15 inches wide by 5.5 inches high; fits neck circumference of 15 inches. Begin by crocheting a starting chain of 47 stitches.
- 2XL: 16 inches wide by 5.5 inches high; fits neck circumference of 16 inches. Begin by crocheting a starting chain of 50 stitches.
- 3XL: 17 inches wide by 5.5 inches high; fits neck circumference of 17 inches. Begin by crocheting a starting chain of 53 stitches.
If your neck is in between sizes, you can either choose the next largest measurement, or else use the smaller size but add a stitch or two onto your starting chain.
How to Crochet the Neck Warmer:
Measure your neck and choose the appropriate size.
Before you begin crocheting your foundation chain, pull out and leave a long tail of yarn unworked at the beginning. This length should be at least 10 inches. You’ll do the same at the end; when you are finished crocheting, leave a tail of at least 10 inches before you cut the yarn. These long tails will be used as part of the finishing process.
After you crochet your starting chain, work a double crochet into the fourth chain from your hook. Working in rows of double crochet stitch, crochet a rectangle of as many rows as it takes to make your piece about 5.5 inches tall, or your desired size. If the intended wearer has a long neck, you could make the piece a bit taller — maybe 6 inches or so.
For this pattern, it’s easiest to work an even number of rows, so that you have long tails of yarn at either side, rather than two long tails of yarn on the same side. My sample project is 10 rows tall.
Between rows, crochet a turning chain of 3 stitches.
When you’re finished crocheting, thread a tapestry needle using one of the long tails of yarn you left at either the beginning or end of the piece. You’re going to use this length of yarn to create the gathered effect you see in the picture; then you’ll attach the clasp close to the center of the gather.
To accomplish this, sew a running stitch down the side of the neck warmer, as close as you can get it to the edge. You want this stitch to be sewn in the vertical direction. There’s no set-in-stone place for each stitch, but overall you’ll basically place a couple of stitches in each turning chain or double crochet stitch along each side.
After you’ve completed your stitching, hold the end of yarn securely and scrunch the entire piece down the length of yarn, gathering the edge of the piece into as small a space as it will go. Using your tapestry needle, still threaded with the same length of yarn, stitch the gathers together so they stay in place. Then attach one half of your closure to that side. Place the closure in the direct center of the gathered edge.
Repeat this sequence of instructions on the other side.
Here’s how the finished neck warmer looks:

Neck Warmer Pattern Variations:
There are approximately one zillion different variations of this pattern you could try — that is to say, the possibilities are almost limitless. While my double crochet version is attractive, there are many options for crocheting fancier versions.
To crochet your rectangle, you could use just about any weight of yarn (thinner yarn would be better than bulkier, in my opinion) or any crochet stitch you like. One of the best things about crochet: you can customize your projects in infinite numbers of ways, making them unique and one-of-a-kind.
Do keep in mind that the gauge and starting chain lengths given above are only applicable for a neck warmer crocheted using double crochet stitch and medium / worsted weight yarn. The gauge and starting chain length would differ significantly if using a different stitch or different weight of yarn.
More Crochet Resources:
Want more project ideas, crochet patterns, or more information on the topic of crochet or knitting? You’re invited to check out more of our related resources, linked below:
Beginner Crochet
- How to Crochet a Granny Square — Free step-by-step photo tutorial with pattern included
- How to Crochet — If you haven’t yet learned how to crochet, don’t worry; we’ll teach you! For free!
- Best Crochet Books for Beginners — Find clear crochet instructions and easy patterns for beginners.
Learn More About Crochet:

- Click HERE to find more fabulous crochet scarf patterns.
- Click here to find our suggestions for the best crochet scarf pattern books.
- Click here to find our main directory of all the best crochet books.
- Click here to find crochet stitch tutorials and instructions.
- Click here to learn more crochet techniques.
- Click HERE to Find Fabulous Yarn for Crochet and Knitting
- Click here to learn about crochet hooks.
- Click here to find my favorite crochet project bag.
Learn About Other Crafts: Knitting, Sewing, Quilting and More
- Click here to get updated on the latest craft supplies.
- Click here to learn about knitting.
- Click here to find our beginner’s guide to knitting needles.
- Click here to find outstanding craft project ideas.
Posted By: Amy Solovay
Page last updated on 1-20-2026. Thanks for visiting!