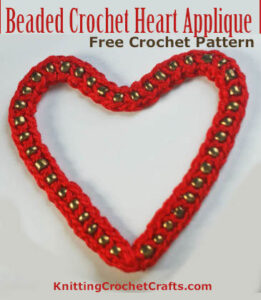
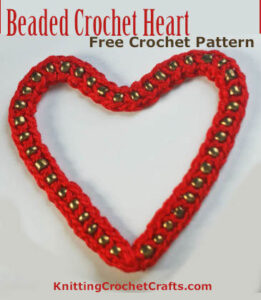
Enjoy this free pattern for a crochet heart shape with beads. This little heart makes a great applique, and is a fantastic Valentine’s Day craft project.
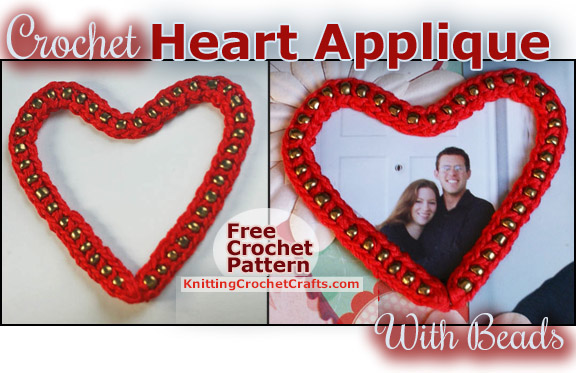
Sometimes you might want a heart design that has some stiffness, but you might not enjoy hassling with starching or gluing your project to achieve that stiff quality. This little heart applique is an example of a project you can make that doesn’t require gluing or starching, yet it’s stiff enough to use as a photo frame, ornament or other standalone item. You can also use it as an applique.
The trick to doing this: You crochet the heart shape using beads and wire — a combination which makes the heart turn out stiff, yet still flexible.
The wire provides the stiffening effect, making starch or glue unnecessary. You create the heart shape by doing your bead crochet around a base of wire. Then the wire takes care of the stiffening aspect for you all on its own.
There are many different ways you can use this little heart. I used mine to frame a picture of myself and my husband on a scrapbook layout. (You can see the finished scrapbooking layout here on this page.) I’m planning to make a few more of these to use as appliques — one for embellishing a purse and some for decorating various other craft projects I have hanging around.
I can think of bunches of other ways to use it as well. I think it would make interesting hanging ornaments, although I probably won’t get around to making those any time soon. Please feel free to make some for yourself, though, if you are so inclined.
This design is flexible, both literally and figuratively; there are many different ways you could use it or incorporate it into other projects. It’s an ideal Valentine’s Day project.
Check Out a Free Tutorial for Learning This Bead and Wire Crochet Technique:
This technique is probably different than any other you’ve seen on the topic of beaded crochet; you’ll combine the wire, beads and crochet thread in a way that’s a little different than usual. Click here to go to the tutorial and give it a try.
Want to see a similar motif made using the same wire technique? Check out this snowflake ornament pattern.
You’ll Need the Following Craft Supplies to Make a Crochet Heart Applique with Beads
Beads:
To make a heart applique just like the sample pictured, you’ll need bronze colored 6/0 seed beads. You can check if you have the right sized beads by stringing a bunch of your beads on a wire by themselves, without any crochet work; then measure them. You should have approximately 8-9 beads per inch.
Embroidery Floss / Fiber:
To crochet a beaded heart applique exactly like the sample, you’ll need less than one full skein of red DMC embroidery floss. However, you also have the choice to use different supplies if you’d be interested in achieving a different type of look for your heart. This design could work just as well with other beads and fibers, as long as you are careful with your choices of coordinating supplies. You might want to use crochet thread or fine yarn instead of the floss. (This tutorial offers you some more info about choosing beads and fiber that will work well in this project.)
Craft Wire:
You’ll need a small amount of craft wire in a color that complements your embroidery floss or crochet thread. To make the project sample pictured, I used a deep red colored wire. The wire color isn’t that critical, because it will mostly be hidden by your beads and stitches.
I used about 12″ of wire. The amount you need might vary depending on your individual style of crochet, and the other supplies you use for this project. If you use larger beads / thicker thread or yarn, you’ll need more wire.
The wire I used was thin enough to be cut with ordinary scissors. You don’t need to use a hefty wire for this project, but if you do, you might need wire cutters to cut it.
Crochet Hook:
I used a size D/3 – 3.25 mm crochet hook. Feel free to adjust your hook size as necessary.
Other: Needle for weaving in ends
Size of the Finished Heart Applique:
My sample heart applique measures about 3″ high. Expect that some variation in size will be likely when you make yours.
Crochet Abbreviations List for This Pattern:
- ch = chain
- sc = single crochet
- st = stitch
How to Crochet the Heart Applique with Beads
String 40 beads onto wire. Make a temporary stopper by winding the wire around a safety pin, paper clip or similar small object. Do not detach the wire from its spool yet.
Wind your skein of embroidery floss into a small ball. Use the free end to make a slip knot, leaving a tail of at least 6″.
Position the slip knot underneath of the wire, so that when you make your first chain stitch, the wire will be secured inside the stitch.
Ch 2 – The first chain will count as your first single crochet stitch. The second chain is going to go overtop of the bead to accent it and hold it in place.
Slide the first bead so that it is right next to your chain stitches. Next, while still holding the bead in position, work a single crochet stitch on the other side of the bead. To form the stitch, reach underneath the wire with your hook, and grab the yarn. Bring it back underneath the wire, the same way you would work into a space, and complete your stitch as usual.
(Ch 1, slide your next bead close to the previous sc and work another sc.) Repeat sequence in parentheses until all the beads have been worked.
Ch 1.
Flip work upside down without turning. The next step is to work back across the row so that the beads and wire will be sandwiched in between two rows of crochet stitches.
Work another chain stitch, at the same time, securing the stitch to the wire. Do this by placing the wire in between your last stitch and the thread; then draw the thread through your active loop to form the chain stitch.
Ch 1, sc in between the first two beads. (Ch 1, sc in between the next two beads.) Repeat sequence in parentheses until you’ve worked all the beads. End with a sc st.
How to Finish Your Heart
You now have a straight piece of beaded crochet. The next step is to join the ends together. There are different ways you could do this.
I followed these steps to do mine:
- Detach the temporary stopper. Detach the wire from its spool.
- Twist the two ends of wire together.
- Snip the excess wire, leaving enough twisted wire to keep the piece secured permanently.
- Thread the first loose end through the needle.
- Wind the floss around the end of wire and secure it with an unobtrusive stitch in the back. Repeat several times, then weave the remaining floss into the back of the piece.
- Repeat for the other loose end.
- If the floss-covered wire still sticks out and looks weird, you can bend it backwards so that it is hidden in back.
Alternatively, you could work another stitch or few stitches over the join before you cut off your thread.
Or, you could twist the ends of wire together, fold them up into one of the sides, and use the loose ends to help camouflage the join.
After you’ve dealt with joining the ends, the last step is to bend and shape the piece to form a heart.
What to Do With the Finished Heart Shape
Now you can use your heart shape in the craft project of your choice.
Keep in mind that, depending on the beads and the wire you used, the heart might not be machine washable. Plan accordingly. If you want it to decorate a washable project, you’ll need to make it removable; attach it to the project using snaps, velcro, pins or some other impermanent fastener. Otherwise, you’ll need to spot clean it or maybe dry clean it.
Enjoy your handiwork!
Whether you want to find similar crochet heart patterns or you’re ready to try working in a different craft technique, we have you covered either way. You’re invited to stay and browse through our related resources to find even more fantastic craft ideas and projects to work on:
More Free Crochet Heart Patterns
- Valentine Heart Pouch — Free Crochet Pattern
More About Crocheting With Beads
- Check Out Spectacular Bead Crochet Edging Patterns in the Beaded Edge 2
- Learn How to Do Wire Crochet With Beads
- Rose Chip Bead Necklace in Wire Crochet
- Learn More About Bead Crochet
- Find More Beadwork Techniques, Ideas and Projects.
Valentine’s Day Crafts
- How to Crochet
- Find the Best Yarn for Crochet and Knitting
- Learn Different Crochet Stitches
- Discover Interesting Crochet Techniques.
- Best Christmas Craft Books for the 2024 Holiday Season
- Craft Supplies
- Knitting
- Knitting Books
- Speed Knitting
- Knitting Supplies
- Lace Knitting
- Cable Knitting
- Knitting Techniques
- Knitting Yarn
- Quilting
- Jewelry Making
- Best Tools for Jewelry Making
- Sewing
- Guide to Basic Hand Sewing Stitches
- Sewing Appliques
- Button Crafts
- Kitchen Crafts
- Home Decor Crafts and DIY Project Ideas
- Holiday Crafts
- Christmas Crafts
- Paper Crafts
- Illustration
- Fine Art
More Crochet:
More Craft Resources You Need to Know About:
Check Out More Craft Techniques and Project Ideas HERE!
Posted By: Amy Solovay
Page last updated on 9-10-2024. Thanks for visiting!