There are zillions of different ways you can crochet various shapes such as hearts, triangles, squares and snowflakes. The most familiar way is to begin crocheting in the center of the shape, as you do with granny squares, and to work outward from there.
But that isn’t what I’m going to teach you in this tutorial. I’m going to teach you a different method that hardly anybody else is using. This method is sort of like tapestry crochet, but there are a couple of important differences between tapestry crochet and the technique I’m about to show you.
The first difference is that you’ll be crocheting overtop of wire instead of yarn or crochet thread.
The other difference? Well, the entire point of tapestry crochet is to facilitate color changes; you crochet overtop of an inactive color of yarn or thread, keeping it hidden until you need it.
The point of this technique is entirely different.
I developed this technique because I wanted to crochet shapes like snowflakes without having to bother with using sticky spray starch or messy sugar solutions or glue to stiffen them. With this technique, the crochet work will hold its shape because of the wire hidden inside the piece. The whole point of this technique is to make stiff crocheted shapes without also having the hassle of doing the stiffening separately. So, with that in mind, the projects I made aren’t focused on color changes the way tapestry crochet projects are.
If that sounds interesting to you, I invite you to grab a crochet hook and give this technique a try. There are 3 different projects I’ve posted that you can use with this technique:
- An apple
- A snowflake
- A heart
At the time I originally posted this tutorial, I had also planned to make other projects such as flowers and leaves. If you need a leaf, you can take a peek at the apple project, which also includes a leaf. I never got around to posting the flower, but you could easily make different flowers using this technique if you are so inclined. Also feel free to use it for making any other shapes you might want to try.
Craft Supplies You’ll Need for Working Through This Tutorial:
- Yarn, crochet thread, embroidery floss, or other fiber
- Craft wire or thread for stringing the beads
- Beads
- Crochet hook
- Scissors
- Tapestry needle
Crochet Instructions:
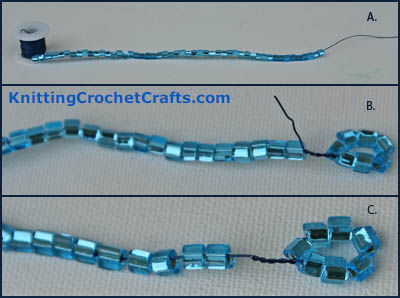
- String your beads onto craft wire or thread. I’m using wire. (See view A in the photo above.)
- The advantage to using wire: If you’re making a motif, wire enables you to shape your motif easily when you are finished making it.
- The disadvantage: Your item will probably not be machine washable, depending on its construction and the wire you use. You may need to dry clean it or spot clean it.
- If you’re making a necklace, you might want to try this with thread instead of wire.
- Don’t detach the spool of wire yet.
- Create or attach a “stopper” at the end that will keep the beads from falling off. The stopper can be either temporary or permanent, and it can be pretty much anything you want it to be. Here are a few ideas:
- Jump ring
- Jewelry clasp or finding
- A button, jewel, or other pretty bauble
- A loop consisting of 5+ beads, with the wire twisted around itself to secure it at the base of the loop (See views B and C in the photo above. If you are going to make this kind of stopper, be sure to cut off the excess wire as shown in view C.)
- If you want a temporary stopper, you can attach a paper clip or safety pin. Alternatively, you can form a loop in the wire and twist it around on itself a few times.
Positioning the Thread and Wire
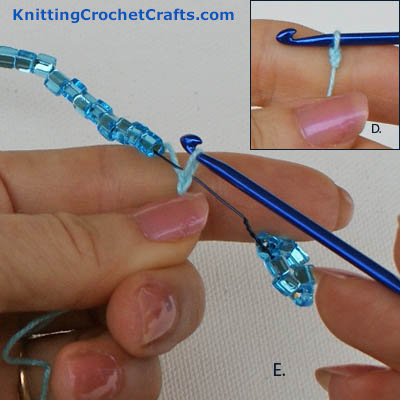
- Make a slip knot with your thread, yarn or fiber. (View D.)
- Position the slip knot underneath of the wire, so that when you make your first chain stitch, the wire will be secured inside the stitch. (View E.)
Crocheting the First Few Stitches
- Chain 2 (Views F and G.) The first chain will count as your first single crochet stitch. The second chain is going to go overtop of the bead to accent it and hold it in place.
Note that this number of chains is not set in stone, and you can adjust it if you want to. The number of chains will depend on the beads and thread you are using. If you’re using large beads and fine thread, you might need a few more chains. Feel free to experiment.
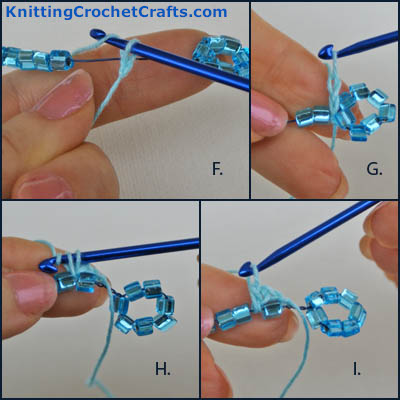
-
Slide the first bead so that it is right next to your chain stitches. Work a single crochet stitch in between the first bead and the second bead.
You’re probably used to making a stitch in either another stitch or a space. Since there are no stitches or spaces to work into, this might seem like a bit of a mystery, but it’s actually pretty simple. Just reach underneath the wire with your hook, and grab the yarn. Bring it back underneath the wire, the same way you would work into a space, and complete your stitch as usual.
- View I shows the completed single crochet stitch.
In this sample, I’ve only worked one single crochet stitch in between each bead. You can increase the number of single crochet stitches between beads if you want to. For that matter, you could work other stitches in between the beads if you want to.
Crocheting the Top of the Row
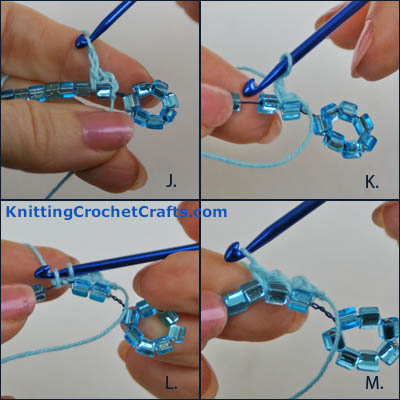
- Chain 1. (View J.)
- View K shows my hook pointing to the spot to work the next single crochet stitch.
- Single crochet. (Views L and M.)
Incorporating Your Crochet Work Into the String of Beads
Finishing the Top of the Row
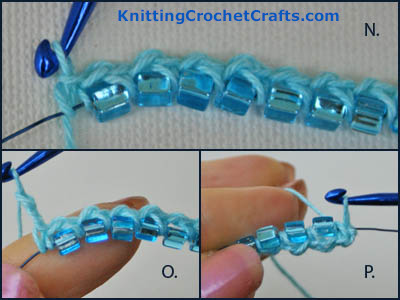
- Continue working one chain stitch overtop of each bead, and one single crochet stitch in between each bead, for every bead on your string. When you’ve worked all your beads, finish up the top part of the row by working a single crochet stitch after the last bead. (View N.)
- Work 1 or 2 chain stitches. (View O.)
- The next step: flip the work over so that you can work back across the row of beads on the other side. (View P.)
Ending the Top of the Row, and Flipping the Work Over
Work the Reverse Side of the Row
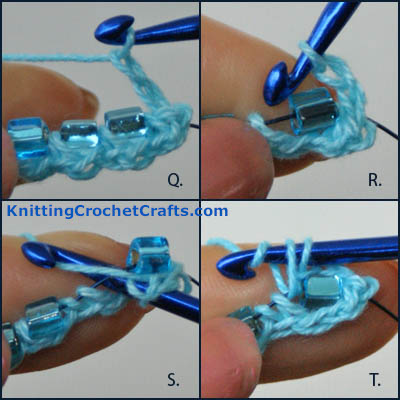
- Work another 1-2 chain stitches. (View Q.) When you work the next chain stitch, you may want to secure it to the wire. Do this by placing the wire in between your last stitch and the thread; then draw the thread through to form the chain stitch.
- View R shows my crochet hook pointing to the spot where you will work the next single crochet stitch.
- Work the single crochet stitch. (Views S and T.)
Finishing
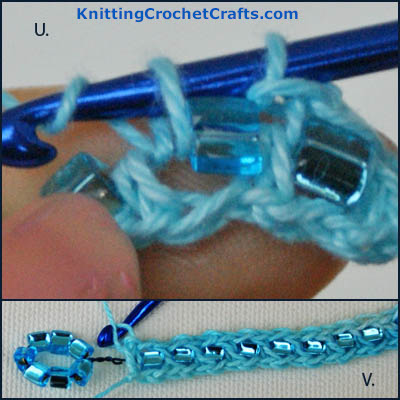
- Continue working a chain stitch over each bead, and a single crochet stitch in between each bead, all the way across until the end of the row.
- End the row with a single crochet stitch.
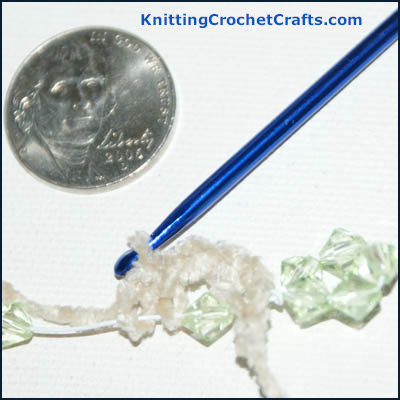
- View V shows what the work looks like at this point. Notice that there is still a bit of wire showing between the stopper and the beadwork. If you attached a permanent stopper, you’ll want to deal with that next:
- If your beads have holes that are large enough to accommodate the twisted wire, this part is easy. Just slide the entire row of beadwork over the twisted wire, as close to the stopper as you can get it.
- If there is still a large amount of wire showing, you can work another stitch or two overtop of it to cover it up.
- Alternately, you could un-twist the wire, slide the beads closer to the crocheted beadwork, and then re-twist the wire.
- You could also wrap the yarn around the exposed wire a few times before you cut the yarn and weave in the loose ends.
If you attached a temporary stopper, you can remove it now.
What About the Other End?
At this point, your spool of wire or ball of yarn is still attached at the other end. Go ahead and cut it, leaving enough space to finish the project:
- If you’re making a piece of jewelry, add the other clasp, jump ring or closure you need.
- If you’re making a snowflake or similar project, create another beaded loop as shown in views B and C earlier in the tutorial.
- If you’re making a motif that is a closed shape, such as a heart or circle, you can join the ends of the beadwork together. One method of doing this: twist the ends of the wire together. Crochet another stitch, or a few more stitches over top of it; alternately, you can twist your yarn or thread overtop of the join to hide it. Then cut the yarn and weave in the ends.
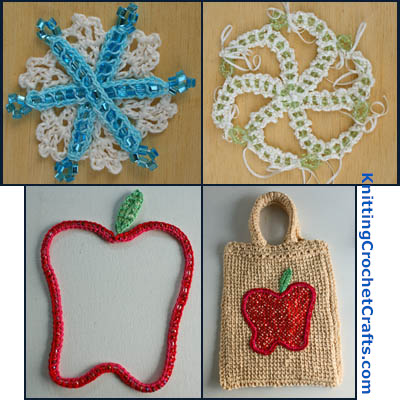
Beaded Crochet Examples
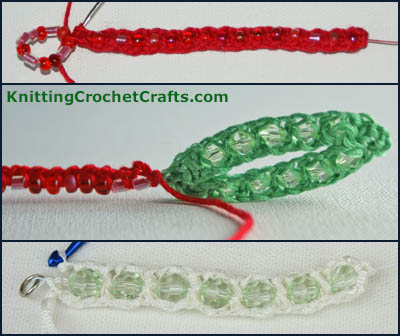
Beaded Crochet Examples: The top frame shows you a practice piece I worked on before designing the beaded apple project. The middle frame shows you a work-in-progress picture of the beaded crochet apple motif. The lower frame shows you a work-in-progress photo of the beadwork on the whirling snowflake design. - Upper Left Photo: Small pink and red mixed beads paired with red embroidery floss. I used a size 6 / 1.80 mm steel crochet hook to make this sample.
- Middle Photo: This sample features the same supplies used above, plus additional green beads and green embroidery floss.The green beads are significantly larger than the red and pink beads are. Don’t be afraid to try some out-of-the-box combinations! I used this sample to create an apple applique; you’ll see a photo of it below.
- Lower Photo: Large pale green faceted beads paired with acetate ribbon yarn. I used a size d / 3-3.25 mm crochet hook to get this look.
Beaded Crochet Project Ideas
Projects Crocheted Using This Technique: Snowflakes Plus Apple Shape - Upper Left Photo: Beaded snowflake motif
- Upper Right Photo: Whirling snowflake with ribbon yarn
- Lower Left Photo: Beaded apple applique
- Lower Right Photo: Beaded apple applique applied to a Tunisian crochet bag
More Free Project Ideas for Using With This Beaded Crochet Technique:
- Alternate red and white beads for a Christmas candy cane.
- Make beaded flowers using this technique plus a flower loom or daisy loom.
- Make other beaded motifs: hearts, pumpkins, spirals.
- Make letters or numbers to spell out names, dates, etc.
- Make beaded jewelry: bracelets, chokers and necklaces.
Choosing Beads, Yarns and Threads
This Photo Shows an Example of What Not to Do. See How the Chenille Yarn Overwhelms the Bead and Obscures It? This Is Not an Ideal Combination; Either Choose Larger Beads to Go With the Chenille, or a Finer Yarn to Go With the Beads. Do you need some help choosing beads and yarn to use with this technique? Here are some suggestions:
- Study the photo above for an example of what not to do. See how the yarn overwhelms the beads? I thought this chenille would be a delightful yarn to use for beaded snowflakes- and it would be, but the beads I chose are not ideal. They are too small. I will try again with some larger beads.
- If you decide to use small seed beads, you’re going to need a very fine thread, and a tiny steel crochet hook. You’ll probably want to consider using a magnifier too.
- If you want to use worsted weight yarn, choose some big beads to match.
Colors:
Feel free to be creative and experiment with color combinations.
I didn’t get too crazy with colors in this tutorial; I stuck with safe colors – teal beads with aqua thread, red beads with red thread, green beads with green thread, etc. If you don’t have a lot of color confidence, these tonal color combinations are pretty safe; there’s no need to worry that the colors will clash or look weird together if you match them closely in this way.
Remember that you can also create interesting combinations using dramatic contrasts between the beads and the thread.
So there you have it: That’s how to crochet shapes using beads and wire. We’d love to see any projects you make using this tutorial; if you have questions or insights to share, please feel free to leave a comment in the comments area below. Thanks for dropping by!
Find More Bead Crochet Projects, Instructions and Ideas:
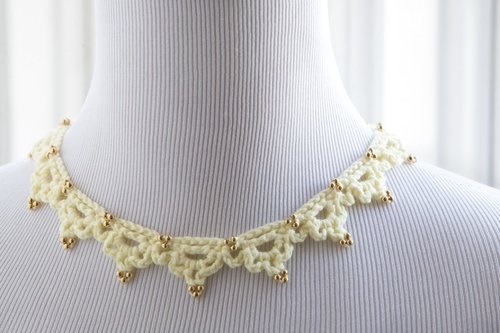
Elegant Trios Bead Crochet Necklace Pattern by Amy Solovay from the Book Delicate Crochet by Sharon Hernes Silverman, Published by Stackpole Books - Elegant Trios Crochet Necklace Pattern
- Best Beadwork Books
- How to Wire Crochet With Beads: Free Pattern and Tutorial
- Beaded Christmas Napkin Rings (Free Crochet Pattern)
- How to Make a Beaded Cotton Candy Necklace in Wire Crochet
- Crochet Bead Necklace Pattern
More Crafts, Hobbies and DIY Projects:
The Beaded Edge 2: A Bead Crochet Pattern Book Published by Interweave - Beadwork
- Learn How to Make Jewelry With Free Instructions
- Learn About Tools for Jewelry Making
- Button Crafts
- Craft Supplies
- Knitting
- Knitting Supplies
- Knitting Techniques
- Yarn for Crochet, Knitting and Loom Crafts
- Quilting
- Sewing
- Sewing Appliques
- Kitchen Crafts
- Home Decor Crafts and DIY Project Ideas
- Holiday Crafts
- Christmas Crafts
- Paper Crafts
- Fine Art
Find More Craft Project Ideas HERE!
Posted By: Amy Solovay
This page was last updated on 8-12-2021.