Need some Mother’s Day craft ideas? Perhaps you’d like to make a Mother’s Day scrapbook for your mom, stepmom, grandma, mother-in-law or other mother figure. Check out this circle-shaped Mother’s Day scrapbooking layout idea for inspiration. We’ve included free step-by-step instructions in case you’d like to make a Mother’s Day scrapbooking layout similar to this one.
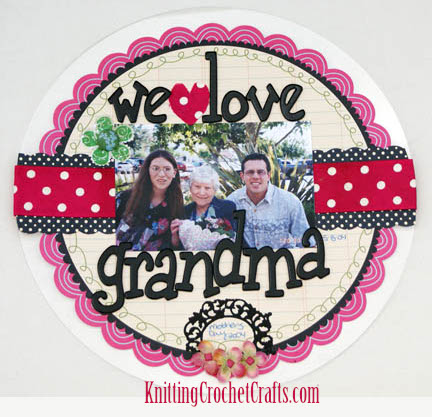

Here’s an idea for a circle-shaped scrapbook layout. Feel free to use this idea for inspiration when you create Mother’s Day scrapbook pages. It could also be adapted for other occasions. I created this page to commemorate our family’s Mother’s Day brunch from a few years ago. I used some circle-shaped supplies and a bold pink, black and cream color scheme.
The title on my scrapbooking layout says “We love grandma,” but you could change that to “Mom” or “Dad” or a family member’s name, if you prefer. With a subtle change like that, you could use this idea for creating birthday pages too.
Craft Supplies You’ll Need for Creating a Similar Mother’s Day Scrapbooking Layout:

Optional: Clear Acrylic Circle Shape I originally used a clear acrylic circle shape by Clear Scraps as the base for this layout. To the best of my knowledge, they are no longer making this particular shape — but you can buy one of their 12″ x 12″ clear acrylic sheets and cut it into a circle shape if you want to achieve this exact effect on your page layout.
Scrapbooking Paper: You’ll need multiple patterned scrapbooking papers to make this layout. At the time I originally made this scrapbooking layout, die-cut papers were a huge fad. Since then, the trend has passed, and this particular scrapbooking paper is no longer available; but don’t worry, you can still achieve this effect if you’re willing to do a little paper cutting. Here’s what you do:
- Take any ordinary 12″x12″ piece of scrapbooking paper plus a large circle template that’s as close to 12″ in diameter that you can find. If you don’t have a suitable circle template, you might have a plate or dish in your kitchen cabinets that you could trace around.
- Trace around your template.
- Use scalloped scissors or ordinary scissors to cut out the circle shape you traced.
- Voila! You now have circle-shaped paper to use for making your layout.
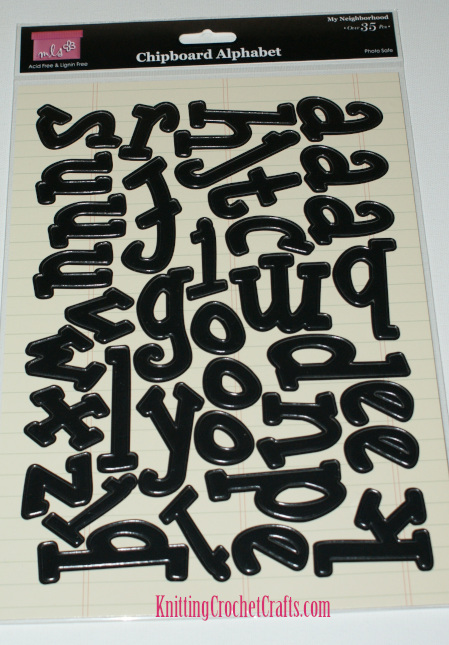
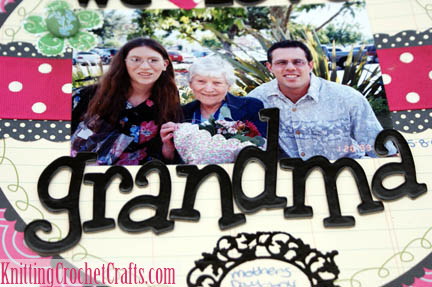
Stickers or Another Solution For Creating the Page Title: Above, you can see a picture of the chipboard stickers I used for creating the page title on the sample scrapbooking layout. These stickers are now discontinued — but you can use any large-sized letter stickers to create a similar look on your own layout. If you want the same three-dimensional effect, it’s ideal to use chipboard letter stickers. You could also use a different solution such as die-cut letters. You could create your page title on the computer and print it out. You have many options.
Ribbon: Pink and white polka dotted ribbon measuring 1.5 inches wide. These days, it can be a little hard to find ribbon that’s this wide, but CreateforLess has bunches of options in stock.
Rubber Stamp Plus Ink: You’ll need a flower stamp and stamping ink to create the small hand-stamped flower embellishment on the layout.
Brads: I used multiple brads in this layout — a green brad and some pink square metal brads. These exact designs aren’t still available, but you can find bunches of creative brads you could use on your page instead of these.
Scalloped Decorative Scissors: Paper Edgers in the “Clouds” and “Mini Scallop” designs by Fiskars.
Journaling Spot: I used a small rub-on transfer to create the journaling spot at the bottom of the page where I noted the occasion and date. You can find similar rub-on transfers available at Scrapbook.com, or you could use another solution such as a sticker or a hand-stamped journaling spot.
Faux Flowers: The exact flowers I used on this layout are no longer available, but you can use any similar Prima flowers or other flowers if you want to have similar three-dimensional flowers on your scrapbooking layout.
How to Make Your Mother’s Day Scrapbooking Layout:
- If you’re using a clear acrylic sheet, cut it into a 12″ diameter circle shape using a circle template or a plate as your guide.
- Glue your circle-shaped paper to the Clear Scraps acrylic circle using Zip Dry paper glue.
- Cut a 2.5 inch band of patterned paper using Fiskars Paper Edgers in the “Clouds” design.
- Glue the paper band you cut to the base of the layout.
- Glue the ribbon onto the layout on top of the paper border.
- Adhere your photo on top of the ribbon and paper border.
- Cut a heart-shaped piece out of the ribbon.
- Attach the alphabet letters and your heart-shaped ribbon cutout for your scrapbooking page title.
- Stamp the flower stamp onto a scrap of light-colored patterned paper. Cut around the edges of it with Fiskars Mini-Scallop Paper Edgers. You’re invited to check out our article about how to make paper flowers for more information that will help you create similar flowers for using in your own scrapbook pages.
- Attach a brad in the center of the hand-stamped flower.
- Glue the flower to the layout.
- Apply the rub-on journaling spot / sticker / stamp, and add your journaling inside it.
- Attach brads to the centers of your Prima flowers, and adhere them to the layout.
- Add the layout to your scrapbook album, and enjoy!
So there you have it: That’s how one possible Circle-Shaped Mother’s Day Scrapbooking Layout Idea. We hope you found this idea and the corresponding instructions inspiring. Happy crafting!
Need Some More Inspiring Paper Craft Ideas?
Here are some suggestions:
More Free Scrapbooking Ideas:
- Rose Garden Scrapbooking Layout Idea
- Document Your Hawaiian Vacation With These Hawaii Scrapbook Ideas
- Scrapbook Mini Albums
- More Scrapbooking Layouts
More Mother’s Day Crafts and Ideas:
- How to Make a Mother’s Day Card With a Floral Theme and a Bow
- How to Make a Turquoise Happy Mother’s Day Card
- How to Make a Bohemian Floral Mother’s Day Card
Find More Craft Project Ideas HERE!
Posted By: Amy Solovay
This page was last updated on 9-21-2021.