Updated for 2025!
Wondering how to make paper flowers?
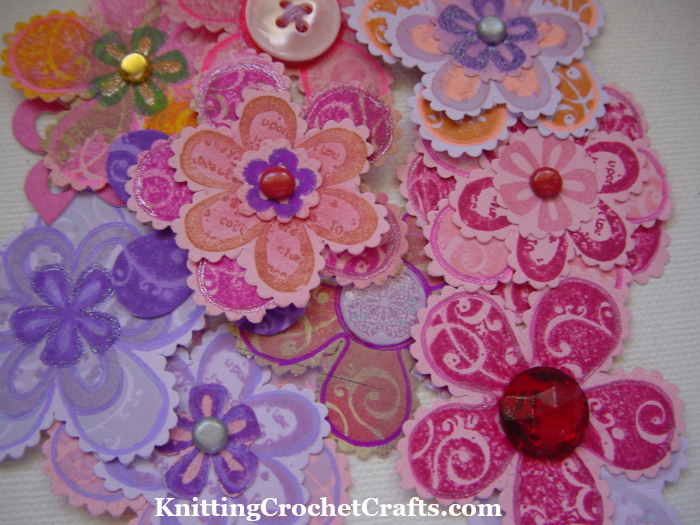
There are a zillion possible ways to do it. The following is a step-by-step tutorial for learning my favorite method to make paper flowers like the ones pictured above:
Step 1: Use clear stamps or rubber stamps to stamp a flower image onto paper.
Step 2: (Optional) Color your flowers using colored pencils, Copic markers, Altenew Artist markers, watercolor paints or any other coloring media you like. You don’t have to do this. If you start with light-colored paper and an ink that’s at least a few shades darker, you don’t need to color the image. But you can stamp onto white cardstock if you like, and then color the floral image the way you want it.
Step 3: Cut out the floral image using whatever cutting method suits you:
- You can use ordinary scissors.
- You can use fancy decorative scissors. To create the flowers shown above, I used scalloped scissors.
- If the floral stamps you’re using have coordinating dies available, you can use a die to cut out your flower shape.
Step 4: (Optional) Add layers. You can create multi-layered paper flowers by repeating the above steps with different sizes of flower stamps and then stacking them on top of each other.
Step 5: (Optional) Add a flower center. There are many different ways you could do this. My favorite: stick a paper fastener or brad through the center of your flower. If you have more than one layer of flower petals, it’s ideal to pierce the centers of every layer before you open the prongs on the paper fastener.
There are other ways to add flower centers; you can glue a jewel to the flower. If you want to do this with a multi-layered flower, you glue the jewel to the top layer and use adhesive to attach the flower’s layers to each other.
Examples of Projects You Can Make Using Paper Flowers
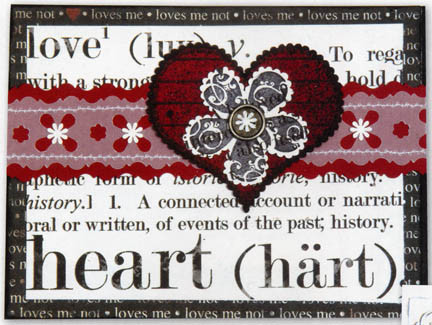
Slimline Card Making Idea Featuring Paper Flowers and Washi Tape

This red, black and white slimline card is an updated version of a couple of older projects that I made years ago that were published in The Stamper’s Sampler magazine:
How to Make a Be Mine Card for Valentine’s Day

Black, White and Red Handmade Greeting Card Featuring Hearts and Paper Lace
You can click or tap here to get the instructions for making the most up-to-date version of these designs, but feel free to use any of the above projects as a jumping-off point for your own card making ideas.
Create Gorgeous Hand Stamped Flowers for All Your Paper Crafts Projects
Why Learn How to Make Paper Flowers? What Can You Do With Paper Flowers, Anyway?
Floral embellishments are popular with paper crafters, who are using them for every possible paper crafting technique including card making, mixed media art, collage art, scrapbooking, art journaling, planner layouts and bullet journals. Paper flowers can add interest and texture to scrapbook layouts, mini albums, handmade greeting cards, art journals, art trading cards, and mixed media art projects.
Unfortunately, floral embellishments can be expensive. If you use lots of paper flowers, you can enjoy a sizable cost savings by making your own paper flowers instead of buying flower embellishments such as Prima flowers.
This guide’s methods are delightfully easy, fuss-free and cost-effective so you don’t have to spend a fortune making paper flowers for art and paper crafts.
A couple of the best things about this method:
- You’ll be able to make paper flowers that precisely match the look of your projects. No more searching around for just the right flower (and sometimes not finding one that will work).
- You can save a bundle with this method as compared against the costs for buying packaged paper flowers like Prima flowers.
Choosing Stamps to Use for Making Paper Flowers:
If you aren’t sure which stamps to use for making your flowers, here are some tips:
You can use any kind of stamps as long as the design is appropriate- rubber stamps, clear stamps, foam stamps, and woodblock stamps will all work. The image is the important thing.
If you already own stamps, take a look through your stamp stash to see if you have any that can be used. Collect them together in a pile close to your work area.
If you don’t already have some appropriate stamps to use, perhaps you can borrow some from a creative friend who does. If not, you may want to consider buying some flower stamps of your own.
In scrapbooking’s heyday, when I originally posted this article, premade flowers were a huge fad, and there were numerous manufacturers offering them for sale. Nowadays, they aren’t as popular, and the prices for them are relatively high.
This article originally included a section where I compared costs between buying stamps and buying ready made flower embellishments. It was helpful at the time, but I decided not to continue updating it because prices keep going up faster than I can keep up with them. My conclusion: If you have more time than money, make your own flowers. If you have more money than time, buy your flowers premade.
If you do decide to buy new stamps, I recommend looking at coordinated sets of stamps that have 2 or more flower designs that can be layered on top of each other. My top current recommendation for this is the Fancy Florals Mini Stamp Set from Gina K Designs. The other stamp sets I have used to create the other projects on this page have been discontinued and are no longer available new, but you might be able to find them for sale at secondary market websites.
If you don’t like that recommendation, no worries — you could easily find hundreds more possibilities that would work just as well. I recommend checking out stamps by Pinkfresh Studio and Altenew. Both of these manufacturers make lovely, high quality floral stamp sets available.
You will also need ink pads in colors that match your intended projects. If you need to buy some ink, please be sure to check out the inkpad product reviews I’ve written for Tim Holtz Distress Inks, Stazon Inks, Brilliance inks and Catherine Pooler’s Premium Dye Ink Pads. Those are all fantastic inks; in my opinion, they are well worth the money.
Choosing Papers For Your Flowers:
After you’ve chosen your stamps, the next step is to pick papers to stamp on. The most cost effective thing to do is to use paper scraps left over from other layouts, cards and projects you’ve already made. You won’t need much paper for these stamped images.
I enjoy stamping flowers onto patterned paper, but I also use solid papers and cardstock as well.
Stamping the Flowers:
Choose several different colors of ink that will look good with the papers you’ve selected. Stamp multiple flowers onto your chosen papers using the inks of your choice. You are going to want to stamp a variety of sizes and colors of flowers.
Cutting Out the Stamped Flowers:
You have several options for cutting out your paper flowers. If you buy a stamp set that has coordinating dies, you can use the dies to cut out your finished flowers.
I like to use decorative scissors to cut out the stamped flowers. I usually use Fiskars Mini Scallop Paper Edgers for cutting out small flowers. I like the small-scale design of the Mini Scallop. There are plenty of other designs available, but the Mini Scallop ones are my favorite for this purpose. If you don’t have any decorative scissors, you could raid your sewing basket and use pinking shears, or you could use regular scissors instead.
Layering the Flowers and Attaching the Flower Centers:
Choose a small flower and a large flower to layer on top of each other. You might even want to choose a medium sized flower to put in the middle; that’s up to you. Go with what looks good.
For the flower centers, there are a myriad of possibilities. You can use brads, buttons, eyelets, more hand stamped images, rhinestones, crystals, cabochons, or charms. Your choice of flower center will affect the next step in the process. If you use buttons, choose coordinating thread and sew hand stamped flowers together with the button on top. If you choose a brad, you can use a paper piercing tool to make a hole through all the flowers and attach the brad through the hole. If you use a rhinestone, crystal, or cabochon, you can attach all the layers together using the adhesive of your choice.
The flower is now ready to use and enjoy!
Make Your Own Flowers and Save Money on Scrapbooking Supplies:
Many scrappers throw their scraps away when they are finished scrapping. If you consistently use your paper scraps for making flowers instead of throwing the scraps away, you’ll save quite a bit of money on scrapbooking supplies. I make an effort to make a few flowers after every scrapping session so that I can use up my scraps. Then I add the stamped flowers to my stash of supplies so that I have them handy when I need them.
Color Choices:
One other consideration is colors. Whether you choose to buy your flowers or stamp them, you have to make an investment. If you buy flowers, you have to invest in a whole bunch of different flower colors, unless you plan on making every project the same color. If you choose to stamp your flowers, you’ll have to invest in a rainbow of different ink colors. Personally, I think inks are a better investment, because inks are more versatile than jars of flowers are. Inks also last a long time once you’ve made the initial investment. Once you’ve spent the money to have a good variety of inks in your stash, you’ll love the convenience of being able to whip up any color of flower you need to match a project. It beats running out to the store to buy supplies every time you need a flower in a color you don’t have on hand.
Lots of Possibilities For Making Paper Flowers:
There are hundreds, maybe even thousands, of different techniques for making paper flowers. This technique only demonstrates one possible way of doing it. Keep in mind that you can probably find other flower making techniques that would save you even more money, so don’t be afraid to explore the possibilities. Happy crafting!
I invite you to return to this site often for more craft tutorials, project ideas and inspiration! You can make sure you keep this site on your radar by signing up for my newsletter and community at Substack. .
Basic subscriptions are free; I send out regular newsletters to let my subscribers know about new craft articles and tutorials as they are posted. I also share details about the craft projects I’m working on, and invite my readers to share their projects, too. So there is no need to feel like it’s just you, crafting all alone at home. I’d love to have you join us! You’re invited!!
By Amy Solovay
Please Visit My Ko-Fi Shop HERE to Find My Sample Sale, Destash Sale and Digital PDF Pattern Downloads for Sale.
Please Visit My Ravelry Store HERE to Find Digital PDF Pattern Downloads for Sale.
About the Author:

Amy Solovay is a real, live, human content creator and educator who holds a Bachelor of Arts degree in mathematics from Sweet Briar College; she has also earned a separate Associate of Arts degree in textile design from FIDM LA (The Fashion Institute of Design and Merchandising, Los Angeles). She is NOT a robot and does not use artificial intelligence (AI) to write book reviews or articles for this website.
Amy learned to stamp and color as a small child, and she still enjoys stamping techniques all these years later.

As an educator, Amy Solovay used to teach in-person college courses in trend forecasting, marketing and surface design at California Design College in Los Angeles. Nowadays she uses online platforms for sharing her knowledge about textiles, crafts, current color trends and current design trends.
This page was last updated on 7-19-2025.