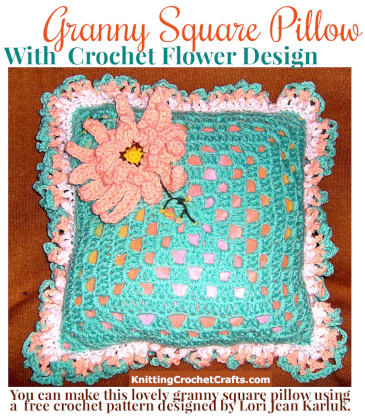
This pillow combines two of the all-time most popular types of crochet pattern designs: granny squares and a crochet flower motif. It’s fun to crochet either type of pattern, but when you combine the two types of designs together it makes for a project that’s hard to resist.
Lori Jean Karluk designed this easy pillow, which features a basic granny square, a three-dimensional flower design, a fancy loopy edging and a silky fabric lining. Embroidered details complete the look.
Lori Jean suggests using this pillow design for decorating a baby’s nursery. With that in mind, she crocheted her project sample using baby-friendly yarn colors. However, this sort of pretty decorative throw pillow would make an appealing accent in a girl’s room, the master bedroom, a guest bedroom, a sunroom or just about anywhere you’d like to place a pretty cushion.
If you want to learn how to crochet a pillow like this one, Lori gives you complete instructions online — for free!
Skill Level: Easy
Materials Used in This Example:
- Worsted weight yarn: I used Red Heart Classic yarn colors: about 5 oz. light seafoam No. 683 (A), about 2 oz. sea coral No. 246 (B), yellow No. 230 (C), bronze No. 286 (D), white No. 001 (E) and dark sage No. 633 (F). You can also use a similar yarn in the colors of your choice.
- 19 inch by 37 inch piece of fabric in color of your choice for lining. I used a tie-dyed cotton fabric in shades to match the colors of yarn used.
- 12 inch square pillow insert or polyester stuffing
- sewing thread to match fabric
- sewing needle
- tapestry needle for weaving in yarn ends, sewing and embroidery
- US Size I hook
Finished Size: 18 inches square including trim
Gauge: 8 dc = 2 inches; 3 dc rows = 2 inches
Abbreviations
- ch = chain
- dc = double crochet
- ea = each
- hdc = half double crochet
- sl st = slip stitch
- sc = single crochet
Special Stitches:
Back Loop Only – Instructions link, with photos
Directions:
Pillow:
Square (Make 2):
To begin: With color A, chain 4, slip stitch in first chain to form a ring.
Round 1 (right side): ch 3, 2 dc in loop, ch 3, * 3 dc in loop, ch 3; repeat from * 2 times; join with sl st in 3rd ch of beg ch-3.
Round 2: sl st in ea of next 2 dc. sl st in next space, ch 3, (2 dc, ch 3, 3 dc) in space, ch 1, * (3 dc, ch 3, 3 dc) in next space, ch 1; repeat from * 2 times; join with sl st in 3rd ch of beg ch-3.
Round 3: sl st in ea of next 2 dc, sl st in next space, ch 3, (2 dc, ch 3, 3 dc) in space; ch 1, 3 dc in next space, ch 1, * (3 dc, ch 3, 3 dc) in next space, ch 1, 3 dc in next space, ch 1; repeat from * 2 times; join with sl st in 3rd ch of beg ch-3.
Round 4: sl st in ea of next 2 dc, sl st in next ch, ch 3, (2 dc, ch 3, 3 dc) in space; (ch 1, 3 dc in next space) 2 times, ch 1, * (3 dc, ch 3, 3 dc) in next space, ch 1, (3 dc in next space, ch 1) 2 times; repeat from * 2 times; join with sl st in 3rd ch of beg ch-3.
Round 5: sl st in ea of next 2 dc, sl st in next ch, ch 3, (2 dc, ch 3, 3 dc) in space; (ch 1, 3 dc in next space) 3 times, ch 1, * (3 dc, ch 3, 3 dc) in next space, ch 1, (3 dc in next space, ch 1) 3 times; repeat from * 2 times; join with sl st in 3rd ch of beg ch-3.
Round 6: ch 3, dc in ea of next 2 dc, * (2dc, ch 3, 2 dc) in ch-3 space, (dc in ea of next 3 dc, dc in next ch-1 space) 4 times, dc in next 3 dc; repeat from * 3 times; join with sl st in 3rd ch of beg ch-3.
Round 7: (ch 3, 2 dc) in same dc as join, ch 1, sk next 3 dc (3 dc, ch 3, 3 dc) in next space; *(ch 1, sk next 3 dc, 3 dc in next dc) 5 times, ch 1, (3 dc, ch 3, 3 dc) in next space; repeat from * 3 times; join with sl st in 3rd ch of beg ch-3.
Round 8: sl st in ea of next 2 dc, sl st in next ch, (ch 3, 2 dc) in space; ch 1, * (3 dc, ch 3, 3 dc) in space, ch 1, (3 dc in next space, ch 1) 6 times; repeat from * 2 times; (3 dc, ch 3, 3 dc) in next space, ch 1, (3 dc in next space, ch 1) 5 times, join with sl st in 3rd ch of beg ch-3.
Round 9: sl st in ea of next 2 dc, sl st in next ch, ch 3, dc in ea of next 3 dc, * (2 dc, ch 3, 2 dc) in ch-3 space, (dc in ea of next 3 dc, dc in next ch-1 space) 7 times, dc in next 3 dc; repeat from * 2 times; (2 dc, ch 3, 2 dc) in ch-3 space, 3 dc in ea of next 3 dc, dc in next space, join with sl st in 3rd ch of beg ch-3.
Round 10: (ch 3, 2 dc) in same dc as join, ch 1, sk next 3 dc, (3 dc, ch 3, 3 dc) in ch-3 space; * (ch 1, sk next 3 dc, 3 dc in next dc) 8 times, ch 1, (3 dc, ch 3, 3 dc) in next ch-3 space; repeat from * 2 times; * (ch 1, sk next 3 dc, 3 dc in next dc) 7 times join with sl st in 3rd ch of beg ch-3.
Fabric Liner:
Place one piece on a piece of paper. Trace around it to make a paper pattern as a guideline for cutting out fabric liner shape allowing a little extra around edges for seam. Cut two liner pieces from fabric. With right sides together, sew around three sides leaving top open. At this point, insert the pillow insert or fill the fabric liner pillow with stuffing now and sew closed. Set aside for later.
Assembly:
Holding two crocheted pieces together, matching stitches, join color E to corner stitch. Working sc through both pieces (to join the squares), sc in each st around three sides working 3 sc in each corner stitches leaving one side open. At this point, insert the pillow, sc along last side to close. Do not fasten off.
Trim:
Round 1: *ch 3, sc in next sc; repeat from * around; join with sc in center of beg ch-3.
Round 2: change to color B * ch 4, sc in center of next ch-3 space; repeat from * around; join with sc in center of ch-4 space.
Round 3: change to color A * ch 5, sc in center of next ch-4 space; repeat from * around; join with sc in center of ch-5 space.. Fasten off. Weave ends in.
Aster:
To begin: With color C, ch 2.
Round 1: 6 sc in 2nd ch from hook.
Round 2: * sc in next sc, 2 sc in next sc; repeat from * around (9 sc).
Round 3: change to color D, * sc in ea of next 2 sc, 2 sc in next sc; repeat from * around (12 sc).
You will now work on the petals of the aster.
Round 4: change to color B, * ch 13, sc in 2nd ch from hook, sc in next ch, hdc in ea of next 2 chs, dc in ea of next 6 chs, hdc in next ch, sc in next ch; sc in back loop of next sc of round 3, ch 11, sc in 2nd ch from hook, hdc in ea of next 3 chs, dc in ea of next 4 chs, hdc in next ch, sc in next ch, sc in back loop of next sc or round 3; repeat from * 5 times.
You were working in the back loops of round 3 for the back petals. Now you will work the front petals in the front loops of round 3.
Round 5: * ch 6, sc in 2nd ch from hook, sc in next ch, hdc in ea of next 2 chs, sc in next ch, sl st in front loop of Round 3, repeat from * 11 times. Fasten off leaving 12” yarn tail for sewing the aster to the square. Thread tapestry needle with yarn tail. Sew aster in desired position on pillow by stitching through round 5 at base of petals. Fasten off. Weave end in.
How to Finish the Granny Square Pillow
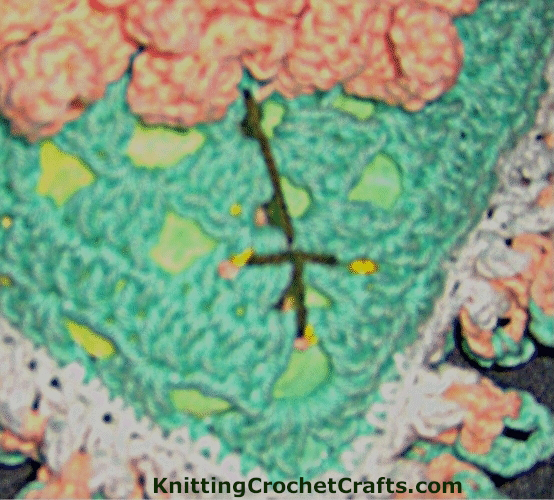
Thread the tapestry needle with a 15 inch single strand of yarn in color indicated in photo. Embroider bud details in straight stitches and french knots in colors C, D, and F.
The picture above shows the placement of the embroidery and French knots for the second stem with buds.
There you have it: a granny square pillow with crochet flower design. We hope you’ll enjoy this free crochet pattern. Happy crocheting!
Similar Crochet Patterns:
- Aster flower granny square— If you’d like to crochet just the granny square and flower without making it into a pillow, try this pattern.
- Aster granny square tote bag — Whip up a couple of the granny squares, then add straps and a lovely trim. Voila — you have a tote!
More Crochet Patterns for Home Decorating
- Crochet Pillow Pattern Designs
- Crochet Puff Stitch Christmas Tree Pillow — Free Pattern
- Free Patterns for Home Decor
Find More Crochet Granny Squares
- Check out our picks for the best crochet granny square patterns
- Discover 25 ways to crochet the classic granny square
This page was last updated on 6-19-2021.