All About Crochet Puff Stitch
Ready to dive in and learn all about the puff stitch in crochet?
Whether you’re curious about what a puff stitch is, or you want to learn how to crochet one, this page is a great place to find the info you seek.
You’ll also find puff stitch crochet patterns, so that once you’ve learned the puff stitch you can put your new crochet skills to good use.
What Is a Puff Stitch?
Puff Stitch Definition: A puff stitch is a more complex variation of the basic half double crochet stitch. This three-dimensional, textured crochet stitch is comprised of a grouping of unfinished half double crochets that are all completed together, at the same time, by pulling a loop through all of them at once.
Most of the time, crocheters put 3-5 half double crochets into each puff stitch. It’s technically possible to crochet groupings of more than 5, but it gets more challenging plus it uses more yarn.
Ideally, you want some visual contrast between the puff stitch and the stitches that surround it. To get the most visual appeal out of a puff stitch, it’s a good idea to combine the puffs with flatter, less textured basic stitches or grouping of stitches. Combinations such as these draw attention to the puff stitch’s “puffiness”.
Types of Projects to Crochet With Puff Stitches — There are many interesting things you can create with puff stitch. It’s an ideal stitch to use for creating textured visual effects. For example, if you want to crochet an alligator design, you could use puff stitch to portray the animal’s bumpy, textured skin. You can also arrange your puffs into interesting geometric patterns.
Puff stitch is reversible, which gives it a clear advantage over other textured stitches like popcorns.
A popcorn can be more challenging to use in patterns, because all the popcorns have to fall to one side of the work — and the back of the work doesn’t look as nice as the front does.
In contrast, a puff stitch looks gorgeously puffy and three-dimensional from either side of the work. This makes puff stitches ideal to use for crocheting scarves, wraps and similar projects. When you wear a shawl or scarf, either side of the design might be visible, so puff stitches have a clear advantage over popcorns in these sorts of reversible designs.
You can use puff stitches in a variety of gorgeous crochet flowers. Puffs make lovely flower centers, and they’re also fun to use as flower petals on smaller flowers.
You can incorporate puffs into just about any type of crochet project, including blankets, home decor projects, hats, clothing, accessories and baby projects.
What’s the Difference Between a Puff Stitch and a Bobble Stitch?
Crochet Puff Stitch vs Crochet Bobble Stitch: Puff stitches and bobble stitches are extremely similar. You work them almost the same way; the difference is that a puff stitch is based on half double crochet stitches, and the bobble is based on taller stitches — usually double crochet stitches. You can also make bobbles that are variations of treble crochet stitches, double trebles and even taller stitches.
Puff Stitch Instructions
If you want more details about how to crochet a puff stitch and many of its fascinating variations, these tutorials and instructions will get you started.
How to Crochet the Basic Puff Stitch
This link takes you to specific instructions for how to crochet the most basic puff stitch groupings. Once you have that mastered, the links below take you to tutorials and instructions for different ways you can incorporate the puffs into interesting crocheted fabrics and projects.
Puff Lace Crochet Stitch With Half Double Crochet V-Stitches
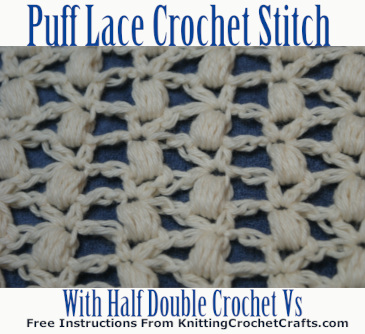
This is a pretty, lacy crochet stitch pattern which incorporates really puffy puff stitches with openwork half double crochet v stitches. The contrast between the two types of stitches results in an eye-catching design that is useful for making feminine, elegant crochet projects.
This is a reversible crochet stitch pattern. It’s suitable for use in making a number of different home décor projects, clothing designs and accessories. The reversible nature of this stitch pattern means that it is suitable for making scarves, shawls, and any other type of project where both sides of the design might be visible. I also successfully experimented with using this stitch pattern to make utilitarian projects like dishcloths and washcloths.
Puff Stitch Crochet Projects and Patterns

Puff Stitch Lace Crochet Placemat Edging Pattern — This pretty crocheted edging utilizes the puff stitch plus half double crochets and other stitches. The result is a decorative edging where the focal point is the puffy scallops that form the outer border.
The edging includes space for including ribbon or decorative yarn details if you like. In the project sample shown on this page, I don’t have any ribbon incorporated into the design, but you can certainly add ribbon if that idea appeals to you.
This pattern also includes corner instructions, enabling you to use it for finishing square and rectangular crochet projects including blankets, linens and similar projects that include corners.
Puff Stitch Lace Crochet Edging Pattern
 — This is a narrower variation of the placemat edging pictured above. The edging includes the same attractive scalloped design, but omits some of the depth found in the foundational rows underneath. If you ever have a need for a delicate, shallow yet eye-catching edging, this is a good pattern to add to your pattern stash.
This pattern also includes corner instructions, so you can use it on just about any type of project that include corners.
Puff Lace Crochet Washcloth or Dishcloth Pattern—  If you’re ever putting together a spa gift basket or bath basket that includes upscale scented soaps, body lotions, massage oils, body butters, bath bombs, or similar home spa essentials, this pretty washcloth would make a lovely and luxurious addition to the package.
This is also a design that would make a lovely addition to your own linen closet as well.
This page was last updated on 8-16-2018.