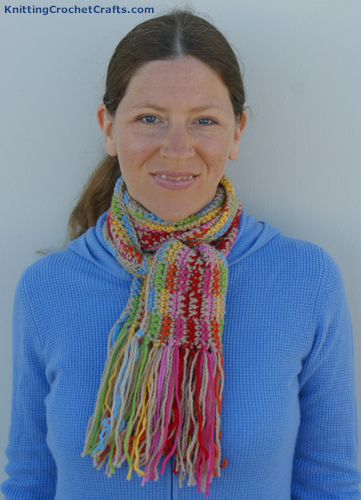
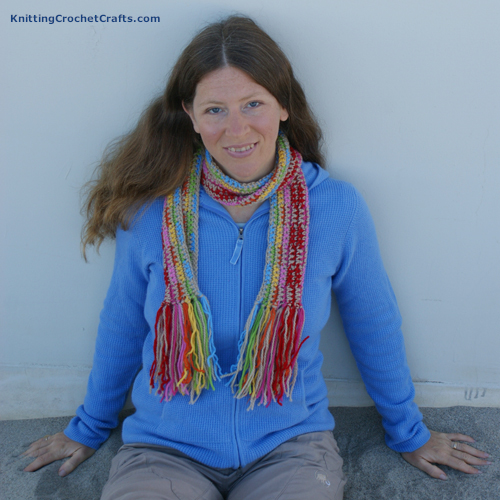
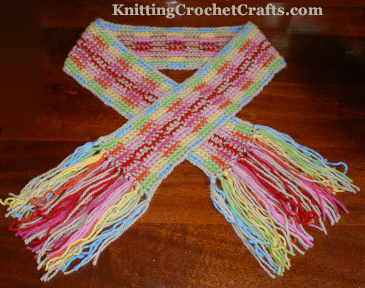
If you’d like to crochet a colorful scarf that’s suitable to wear with many different outfits, this rainbow tapestry crochet scarf pattern is exactly what you need to help you accomplish that goal. The pattern includes free charts for both right-handed and left-handed crocheters to use.
Crochet Skill Level: Intermediate
Supply List:
Yarn: I used worsted weight yarn to crochet my project sample. You’ll need 8 different yarn colors, as follows:
- Color A — Tan (Main Color)
- Color B — Blue
- Color C — Green
- Color D — Yellow
- Color E — Orange
- Color F — Medium Pink
- Color G — Dark Pink
- Color H — Red
Color A, the tan yarn, is the color you’ll need the most of. You can use scrap yarn for the other colors.
I used wool yarns for all the colors in my project sample. Colors B, C, D, E, F, G, and H are all Cascade 220 colors; color A in my sample scarf is a yarn I bought from a sheep farmer who had the wool from her sheep made into yarn. However, I also recommend using Cascade 220 yarn for the MC.
Crochet Hook:
Size I crochet hook, or size needed to obtain the correct gauge.
Gauge:
13 sts = about 4 inches when working single crochet stitches in the tapestry crochet colorwork pattern. Row gauge is not important for this pattern.
Finished Size:
This scarf measures 4 inches by 43 inches. If you’d like to make your scarf longer, feel free to add stitches in multiples of 8. If I make any more of these scarves, I plan to add at least 8 stitches to each so the scarves turn out a little bit longer.
Crochet Abbreviations:
- beg = beginning
- ch = chain
- ea = each
- MC = main color
- sc = single crochet
- sl st = slip stitch
- st = stitch
Design Notes: The brackets, [], denote a set of instructions within the pattern that needs to be repeated.
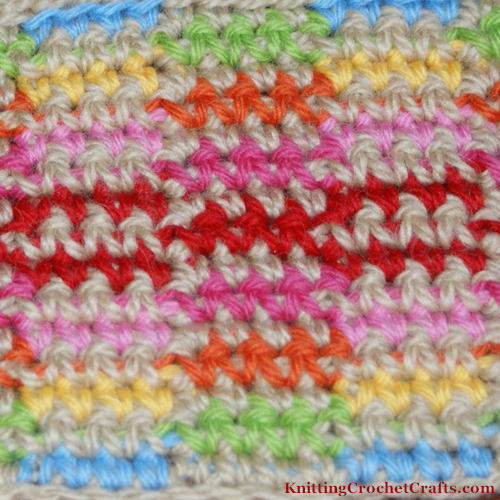
The Tapestry Crochet Technique: For this pattern, you’ll be working in single crochet stitch and crocheting overtop of your inactive color as you go.
Color A will be either carried or active throughout the entire design; do not cut color A until the last row has been finished.
There are two colors in every row of this pattern. Color A is used throughout, and the other color will be different in every row. The second color will alternate with color A every 4 sts.
To accomplish this, you’ll be joining a new color at the beginning of every row. When you begin, leave at least a 6 inch length of yarn to create the fringe. At the end of every row, cut the color, leaving a 6 inch length at the end.
How to Crochet the Scarf:
Use one or the other of the two charts below to help you understand when to change colors. You’ll use either the right-handed or left-handed version of the chart, depending on which hand you use for holding your crochet hook as you work. The charts are exactly the same except that they are mirror images of each other.
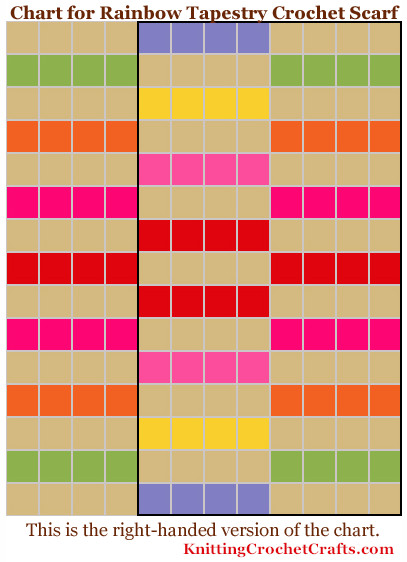

Using color A (MC), ch 141.
Row 1: Begin carrying color B from the beg of the row. Using color A, sc in 2nd ch from hook. sc in next 3 chs; change to color B before completing the 4th st. [Work 4 sc sts in color B, work 4 sc sts in color A.] Rep sequence in brackets across the entire row. At the end of the row, change colors to color C before completing the last step of the last st.
Row 2: [Work 4 sts using color C, then work 4 sts using color A.] Rep the sequence in brackets across the row. End the row by working another 4 sts in color C.
Row 3: [Work 4 sts using color A, then work 4 sts using color D.] Rep the sequence in brackets across the row. End the row by working another 4 sts in color A.
Row 4: [Work 4 sts using color E, then work 4 sts using color A.] Rep the sequence in brackets across the row. End the row by working another 4 sts in color E.
Row 5: [Work 4 sts using color A, then work 4 sts using color F.] Rep the sequence in brackets across the row. End the row by working another 4 sts in color A.
Row 6: [Work 4 sts using color G, then work 4 sts using color A.] Rep the sequence in brackets across the row. End the row by working another 4 sts in color G.
Row 7: Work 4 sts using color A, then work 4 sts using color H.] Rep the sequence in brackets across the row. End the row by working another 4 sts in color A.
Row 8: [Work 4 sts using color H, then work 4 sts using color A.] Rep the sequence in brackets across the row. End the row by working another 4 sts in color H.
This row is the center of the scarf. The upper half of the scarf is a mirror image of the lower half, as follows:
Row 9: Repeat row 7.
Row 10: Repeat row 6.
Row 11: Repeat row 5.
Row 12: Repeat row 4.
Row 13: Repeat row 3.
Row 14: Repeat row 2.
Row 15: Repeat row 1.
Cut both colors and end off, leaving a 6 inch length for the fringe..
Row 16: Flip work over to the other side. Leaving a 6 inch length of yarn unworked at the beginning, re-attach color A by pulling up a loop. Work 1 sl st in ea st, all the way across the row. End off, leaving a 6 inch length of yarn at the end for fringe.
Finishing the Scarf:
You will not need to weave in your loose ends (except for any you might have in the middle of the scarf.) The loose ends dangling from either sides of the scarf can be used as fringe.
I added a bit more fringe to my sample scarf simply by using my crochet hook to pull some loose strands of yarn through the end of the scarf.
After adding the fringe, I tied each grouping of fringe in a tight knot for a bit of additional security. I also think it looks nicer and neater that way.
If the lower edge of your scarf ends up looking messy or uneven, you may wish to add groupings of crochet flowers to this area to camouflage the imperfections. Even if there are no imperfections, that could still be a fun and creative way to make the scarf look extra special.
Free Tapestry Crochet Patterns
Related Resources:
- Crochet Accessory Patterns
- Scarf Patterns to Crochet
- Ideas for Using Up Leftover Yarn
- How to Make Fringe
- An Easy, Basic Crochet Scarf Pattern for Beginners
Posted by: Amy Solovay
This page was last updated on 7-22-2023.