You Can Combine Pretty Patterned Papers and an Embossed Cupcake Shape to Make This Fancy Greeting Card!
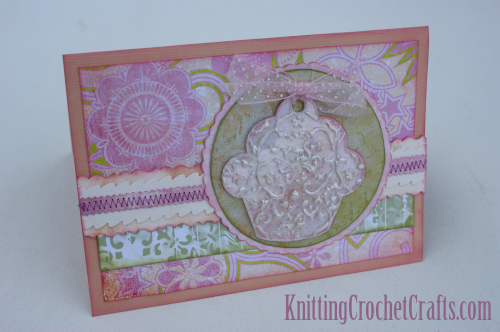
Want to make your own embossed cupcake greeting card?
These step-by-step instructions will show you how to make a card that’s similar to the one pictured here.
Cupcakes (and cake!) go hand in hand with a variety of different occasions; think parties, weddings, showers, etc. This card would be appropriate for use in connection with any kind of celebration or happy occasion. You could use it for a party invitation, wedding thank-you card, bridal shower invitation, baby shower invitation, or “thinking of you” card.
I didn’t include a card sentiment on the card front of this design; the lack of a specific sentiment makes this card design infinitely customizable for whatever occasion you might like to use it for.
And, keep in mind that you can use a different embossed shape in place of the cupcake, which makes the design even more customizable.
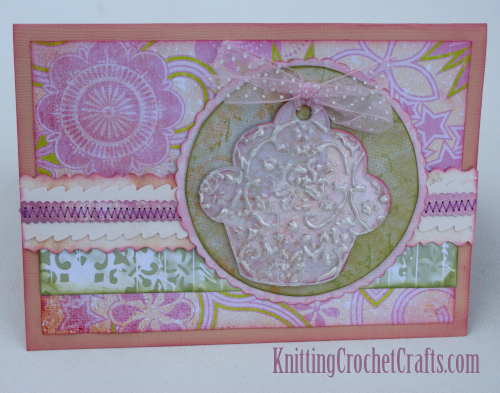
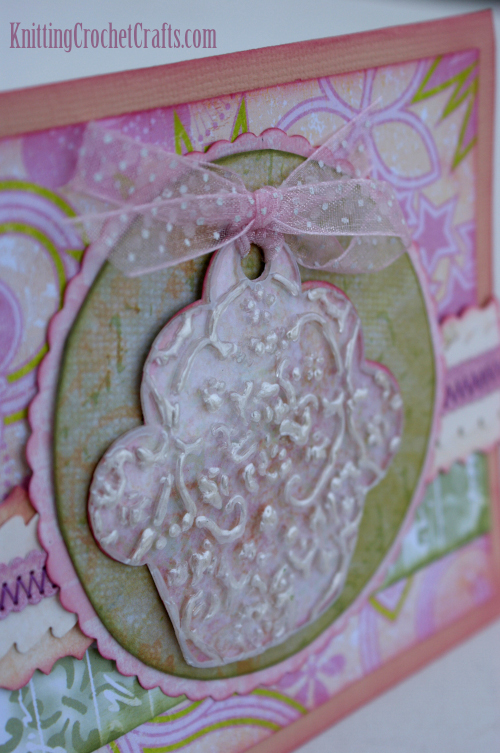
The embossed cupcake on the card front features shimmery, pearlescent Liquid Pearls “Frosting”.
You might be looking at that cupcake shape and wondering how on earth you can emboss plastic.
Well, you might not want to use a plastic cupcake shape for this. At this point, I’d recommend die cutting thin chipboard or heavy cardstock in place of the acrylic shape.
But if you really want to try this with acrylic, you have to be sure to use the right acrylic.
Most plastics cannot be embossed. So, please don’t try this with random plastic, because you could break your die cutting machine.
To do this, you need to use Clear Scraps acrylics.
This project is a very old one. I originally made this project using a Cuttlebug machine and Cuttlebug embossing folders. Those old machines haven’t been available in years, so if you like this idea, you will most likely need to find a substitute die cutting machine and embossing folder (unless you happen to have an old Cuttlebug hanging around in your craft supplies stash — and, maybe you do. There are still plenty of them out there.)
Craft Supplies You Need for Making This Embossed Cupcake Card:
- Cupcake: Clear Scraps (Remove and emboss one page from the Clear Scraps Cupcake Keychain Mini)
- Embossing Folder: I used the Cuttlebug “Textile” pattern for embossing the cupcake shown above in the sample card. This product has now been discontinued, but there are many other embossing machines and embossing folders you could use to achieve a similar effect.
- The “Frosting” on the cupcake was created using Liquid Pearls by Ranger (You can buy this product at Scrapbook.com) or A Cherry on Top Crafts.
- A border die or assorted decorative scissors; I used Fiskars Paper Edgers. The designs I used were Mini Scallop, Scallop, Heartstrings, and Colonial designs. This is for making the fancy scalloped edgings on the paper lace border. However, some of these have been discontinued, and you can use any similar
- Stamping Ink: Use inks that coordinate with your patterned papers but are slightly darker in color.
- Ribbon: The ribbon I used is a sheer, pale pink polka dotted ribbon, but you can use any ribbon that will coordinate well with your papers.
- Pink Textured Cardstock: Bazzill or any similar brand
- Heavy white cardstock or Strathmore Bristol Board
- Paints: Winsor Newton Gouache
- Thread: Vintage Coats & Clark
- Patterned Papers: You’ll need 5 patterned papers that look pretty together. the papers used in the sample are all made by different manufacturers, so don’t be afraid to mix and match if you like. The papers I used are by Basic Grey, Fancy Pants, Sharon Soneff for Creative Imaginations, and Daisy D’s. These have now been discontinued, but there are so many pretty patterned papers available that you will have no problem finding comparable substitutes for the papers pictured.
- Sewing machine to do the zigzag stitch on the paper border embellishment (although you can skip this and just glue your paper strips together if you’d rather not hassle with sewing).
- Adhesive — You can use any suitable paper adhesive for this project. If you don’t already own some adhesive, I recommend Zip Dry paper glue for this project.
- A paint pen or similar permanent marker in the color of your choice
- Circle die or, if you don’t have a die cutter, a circle template (I didn’t have a die cutter at the time I originally made this project, so I cut out the circle shape with an old-fashioned circle cutter tool that was long ago discontinued.)
- Bone folder or other scoring tool
- Sewing machine and thread in a color that coordinates with your papers; if you don’t have a sewing machine, you could substitute a rub-on or rubber stamp that imitates machine stitching.
- Paper Trimmer
- Round hole punch
How to Make the Card:
Cut a 7″ x 10″ piece of cardstock.
Using your bone folder or Scor-Pal tool, score the cardstock down the center and fold it in half to create a card base measuring 7″ x 5″.
Cut a piece of patterned paper measuring 6.5″ x 4.5″. Ink the edges with ink in a coordinating color. Apply adhesive, center the patterned paper over the base of the greeting card, and glue it down.
Cut a small strip of patterned paper measuring 6.5″ x approximately 1.5″. You can use a paper scrap for this if you have one handy that coordinates. The vertical measurement isn’t all that critical as your paper lace border will cover part of it.
Ink the lower edge and sides of the paper strip with a coordinating color of ink.
Adhere this strip of paper to the card base.
Create a lacy border using a border die or other technique. If you don’t have a border die, you can do this the old-fashioned way:
- Ink 3 different pieces of white cardstock using different colors of ink.
- Cut each piece using a different pair of decorative scissors.
- Sew the top 2 layers together using the sewing machine, and then attach them to the lower layer using glue.
Attach the border piece to the card base so that it overlaps and partially covers the last strip of patterned paper you attached.
Draw a 3.5″ circle on the back of one of your pieces of patterned paper. Cut around the outside of the circle with scalloped Paper Edgers / decorative scissors.
Ink the edges of the scalloped circle with a coordinating color of ink.
Attach the scalloped circle to the base of the greeting card.
Cut a 3.5″ circle out of patterned paper. Ink around the edges.
Adhere the circle so that it is centered on top of the scalloped circle you previously attached.
Turn one of your patterned papers over to the reverse side. Take your Clear Scraps cupcake shape and draw around it using a pencil. Be sure to also draw a circle where the hole in the top is. Cut out the cupcake shape you drew onto the paper and flip it over so that the right side is showing. Ink around the right side of the paper with coordinating ink. Using a hole punch, punch a hole where the circle at the top is. Put this cupcake shape aside momentarily.
Use your embossing machine and embossing folder to emboss a page from the cupcakes mini clear album by Clear Scraps.
Use Liquid Pearls and / or your paint pen or permanent marker to accent the embossed areas on the cupcake. Set the piece aside to dry.
Use ribbon to tie a bow at the top that holds the cupcake-shaped paper and the cupcake-shaped acrylic together.
Apply adhesive to the back of the cupcake-shaped paper, and attach it to the greeting card in the center of the circle.
Optional: You can add a paper liner to the greeting card if you like. Otherwise, it is ready to use.
Personalize the greeting, and send it to the recipient, or add it to your card stash in preparation for the next time you need a greeting card.
Thanks for your interest in this card making project idea. I appreciate it that you dropped by to check it out.
Want to learn more about card making? If so, I invite you to return to this site often for more paper craft tutorials, card making ideas and inspiration! You can make sure you don’t lose track of this site by signing up for my newsletter and community at Substack. .
Basic subscriptions are free; I send out regular newsletters to let my subscribers know about new craft articles and tutorials as they are posted. I also share details about the craft projects I’m working on, and invite my readers to share their projects, too. So there is no need to feel like it’s just you, crafting all alone at home. I’d love to have you join us! You’re invited!!
By Amy Solovay
Please Visit My Ko-Fi Shop HERE to Find My Sample Sale, Destash Sale and Digital PDF Pattern Downloads for Sale.
About the Author:

Amy Solovay is a real, live, human content creator and educator who holds a Bachelor of Arts degree in mathematics from Sweet Briar College; she has also earned a separate Associate of Arts degree in textile design from FIDM LA (The Fashion Institute of Design and Merchandising, Los Angeles). She is NOT a robot and does not use artificial intelligence (AI) to write product reviews or articles for this website.
Amy learned to stamp, color and collage as a small child — and these days, she still treats card making a lot like making a collage with stamping and coloring.
As an educator, Amy Solovay used to teach in-person college courses in trend forecasting, marketing and surface design at California Design College in Los Angeles. Nowadays she uses online platforms for sharing her knowledge about textiles, crafts, current color trends and current design trends.
Check Out More Wedding Card Making Ideas:
- How to Make a Wedding Card With a Gift Card Holder Inside: Free Step-By-Step Tutorial
- How to Make a Slimline Wedding Card
Discover More Lovely Paper Craft Ideas:
Important Disclaimer: I am a former member of the Clear Scraps design team. Clear Scraps gave me the cupcake mini album I used for making this card. I haven’t been on their design team in many years, and Clear Scraps isn’t paying me to recommend their products; they’ve actually never paid me to recommend their products. I’m recommending them to you because I like them, and I think you will like them, too.
Also, I want you to know that some of the other links on this page are affiliate links — which means that I will earn a small commission if you make a purchase within a short time after having clicked through the links — in much the same way that a commissioned salesperson earns their income from the products they introduce you to. If you make a purchase, this won’t cost you anything extra, same as it doesn’t cost you anything extra to ask an associate for help at your local store.
This page was last updated on 1-4-2026.