Do you need an all-occasion greeting card to send to someone special this winter?
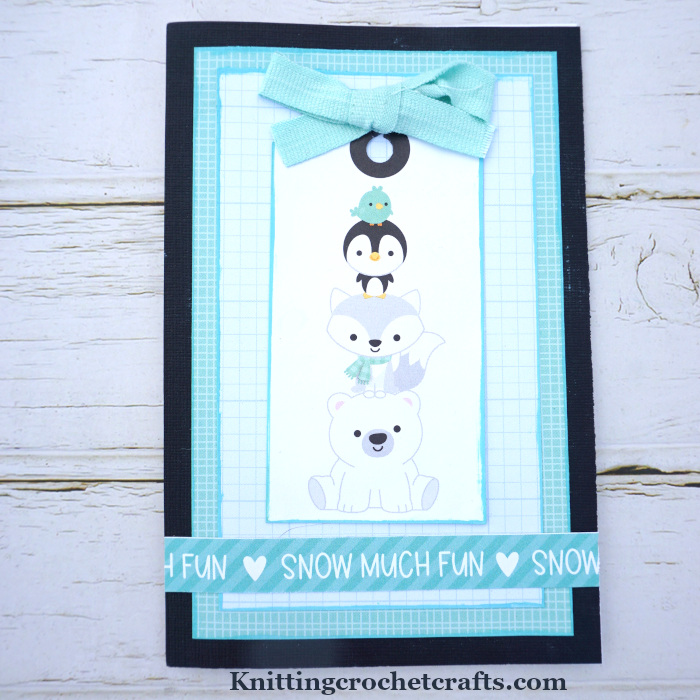
If you’re interested in making a seasonal greeting card featuring winter critters, including a polar bear, penguin and arctic fox, perhaps this card making idea will be of interest to you.
If you’re acquainted with the craft supplies manufacturer called Doodlebug Design, Inc., you probably know how their playful, lively paper collections are ideal for making amusing cards that are sure to bring smiles to your card recipients’ faces. Doodlebug’s colorful papers are a cinch to use for card making projects that come together easily and turn out delightful.
Craft Supplies You’ll Need for Making a Similar All-Occasion Greeting Card
You’ll need the following tools and supplies to make a card like the one pictured here:
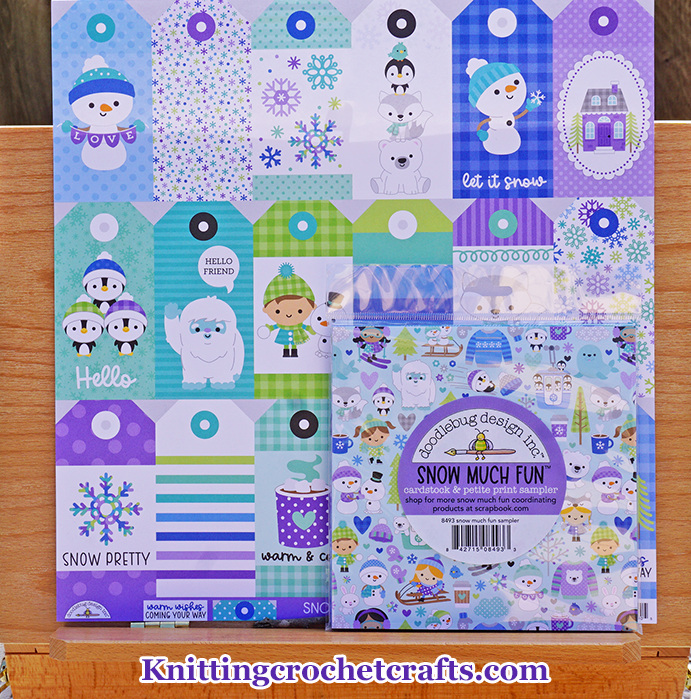
Cute Winter-Themed Patterned Papers: You’ll need 4 different patterned papers to create a card design like this one. If you want your card to be just like the project sample pictured above, I recommend selecting patterned papers from the “Snow Much Fun” paper collection by Doodlebug Design Inc.
This paper collection is available to buy online as of 12-2-2025 when I’m posting this project. However, this manufacturer offers a fantastic selection of adorable, seasonal patterned papers — so if you can’t find “Snow Much Fun,” or you’re looking for something a little different, you can create a very similar card design using any of Doodlebug’s winter-themed paper collections.
I used the following patterned scrapbooking papers to create the card front:
- The tag image with all the cute critters piled on top of each other is from the “Freeze Tag” 12×12″ patterned paper. You can see this paper design pictured above. As you can see from the picture, there are bunches of cute tag images printed on this paper — enough to make the focal points for 14 different cards. If you want to mass produce a bunch of cards to send to all your friends, you can make them just like this one, except you change out the tag images and use up all the different tag designs from the Freeze Tag paper. (There are actually 18 different tag designs all together, but some of them are too plain to be the featured images on card fronts, unless you add a cute sticker or die cut on top of the plainer designs.)
- I used a sentiment strip from the “All Bundled Up” patterned paper by Doodlebug. Again, this patterned paper would give you enough sentiment strips to make multiple card designs.
- You can find grid papers like these in many of the Doodlebug “Petite Prints” packs. For example, the Petite Prints pack from the “Let It Snow” collection has these two grid designs plus others. Or perhaps you’d prefer to substitute some of the coordinating prints from the Snow Much Fun Petite Prints Pack, if you can find it in stock.
Solid Black Textured Cardstock: You can use any black cardstock you like — but if you want your cardstock to match your other papers perfectly, it’s ideal to use the black cardstock from the coordinating “Snow Much Fun” cardstock pack by Doodlebug.
Smooth White Cardstock for the Card Base: You can use any smooth white cardstock to make your card base. I recommend smooth cardstock because that makes it easier to handwrite a personalized greeting on the inside of your card without your pen skipping, but it’s also possible to use textured white or light-colored cardstock if you prefer.
A Scoring Tool: If you’re serious about card making, and you plan to make cards frequently, it’s ideal if you can use a bone folder, scoring board or similar paper scoring tool to create crisp, perfectly even, professional-looking folds. This isn’t strictly necessary; you can fold your card without using any tools. However, I like the results much better when I use my bone folder and scoring board to create perfect folds — and I recommend doing it that way if you think it would be helpful to you to use scoring tools.
Adhesive: I used Cherry Tape to make this card. If you don’t already have any adhesive on hand that will work for this project, I definitely recommend Cherry Tape; it’s my favorite adhesive. However, there’s no need to buy Cherry Tape just for this; you can use any paper-friendly adhesive you like.
Ribbon: You can use any brand of craft ribbon in a color that complements your card design. I didn’t happen to have the right color of ribbon in my stash, and I didn’t want to make a special trip to the store just for that — so I improvised. My “ribbon” is actually a strip of fabric tied into a bow. Whether you use ribbon or fabric, either way, you only need a small bit of it — just enough to tie it into a bow that you’ll attach to the card front.
Ink Pads: You’ll need an ink pads in a color that coordinates with the colors of your patterned paper. You can use this to ink around the edges of your papers to add emphasis and give them a cohesive, finished appearance. I used Tim Holtz’s Distress Oxide Ink in the “Salvaged Patina” color, but there are many ink colors that would work well for doing this. So please use any similar ink color you might already happen to have on hand.
Once you’ve gathered your supplies, assembling the card is straightforward; you make a card base out of white cardstock, and create several layers using the specified papers, attaching them all to the card base using your adhesive. The ribbon bow and sentiment strip are the finishing touches for the card front, and you’ll also want to write a personalized note to the card’s recipient on the inside.
Thanks so much for checking out this card making project idea. I appreciate your interest!
I invite you to return to this site often for more craft tutorials, project ideas and inspiration! You can make sure you keep this site on your radar by signing up for my newsletter and community at Substack. .
Basic subscriptions are free; I send out regular newsletters to let my subscribers know about new craft articles and tutorials as they are posted. I also share details about the craft projects I’m working on, and invite my readers to share their projects, too. So there is no need to feel like it’s just you, crafting all alone at home. I’d love to have you join us! You’re invited!!
By Amy Solovay
Please Visit My Ko-Fi Shop HERE to Find My Sample Sale, Destash Sale and Digital PDF Pattern Downloads for Sale.
Please Visit My Ravelry Store HERE to Find Digital PDF Pattern Downloads for Sale.
About the Author:

Amy Solovay is a real, live, human content creator and educator who holds a Bachelor of Arts degree in mathematics from Sweet Briar College; she has also earned a separate Associate of Arts degree in textile design from FIDM LA (The Fashion Institute of Design and Merchandising, Los Angeles). She is NOT a robot and does not use artificial intelligence (AI) to write craft tutorials or product reviews for this website.
Amy learned to craft as a small child, and she still enjoys crafting techniques all these years later.

As an educator, Amy Solovay used to teach in-person college courses in trend forecasting, marketing and surface design at California Design College in Los Angeles. Nowadays she uses online platforms for sharing her knowledge about textiles, crafts, color trends and design trends.
Find More Winter Card Making Ideas HERE.
Related Resources:
- Winter Crafts
- Winter Knits from Scandinavia: Stranded Color Knitting Patterns
- Snowflake Crafts
- Card Making Ideas With Ribbon
This page was last updated on 12-2-2025.