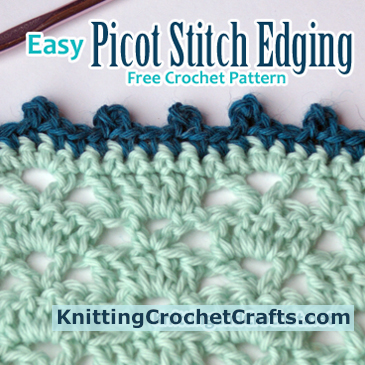
Easy Picot Stitch Edging — Project Photo

See More About: Picot Stitch | Borders, Trims and Edgings
This easy picot stitch edging is useful for finishing a variety of crochet, knitting or other craft projects. It’s appropriate to use anywhere you want a dainty, narrow edging that doesn’t add a significant amount of width to a project. It’s more visually interesting than an edging of plain single crochet stitch, but less dramatic than a deeply scalloped shell stitch edging.
Skill Level: Easy

Materials You’ll Need:
Yarn: You’ll need yarn in a color that complements the main colors of your project; you could use the same yarn or a contrasting yarn. The yarn should be the same weight and fiber contents as the other yarns you used in the project and should have the same care instructions.
Crochet Hook: Use the same crochet hook you used for crocheting the main body of your project.
Other: scissors; tapestry needle for weaving in ends
Gauge: Gauge will vary depending on the materials you use and other factors. You can successfully work this edging at any gauge, using the finest threads or the fattest jumbo yarns.
Special Stitch: The Picot Stitch — In this pattern, work a picot stitch as follows: Ch 3. Sl st in 3rd ch from your hook.
Crochet Abbreviations List
- ch = chain
- p = picot
- rep = repeat
- sc = single crochet
- sl st = slip stitch
- st = stitch
- Best Crochet Edging Pattern Books
- Learn More About Crochet
- Click here to find our picks for the best crochet books.
- Click here to find crochet stitch tutorials and instructions.
- Click here to learn more crochet techniques.
- Click HERE to Find Fabulous Yarn for Crochet and Knitting
- Click here to learn about crochet hooks.
- Click here to find my favorite crochet project bag.
- Click here to get updated on the latest craft supplies.
- Click here to learn about knitting.
- Click here to find our beginner’s guide to knitting needles.
- Click here to find outstanding craft project ideas.
This edging is a multiple of 4 + 3 sts.
If you plan to use it as a blanket edging or edging for a square or rectangular project, you’ll need to ensure that ea. side of the blanket is a multiple of 4 + 3. If that isn’t the case, one easy fix is to first crochet a round of plain sc st around the outer edge of the blanket, increasing or decreasing as necessary to achieve the correct st. multiple.
How to Crochet the Easy Picot Stitch Edging:
Before working the last st in the last row of your project, you may wish to change to using a contrasting yarn color. This is optional.
Using the yarn color you’ve decided to make the edging, ch 1. (Work 1 sc st in ea of the next 3 sts. Work 1 p in the next st.) Rep the sequence in parentheses all the way across the row.
If you need to crochet around a corner, you’ll want to ensure that you’ve worked 3 sc sts right before you reach the corner. Then work a p. in the corner, rotate the work, work 3 sc sts along the next edge, work another p. and then resume working in the established pattern.
There you have it: an easy picot stitch edging that you can use on virtually any type of crochet project, from baby clothes to afghans.
Related Resources
Learn About Other Crafts: Knitting, Sewing, Quilting, Paper Crafts and More
Page last updated on 6-6-2021. Thanks for visiting!