Use This Free Chart to Filet Crochet or Cross Stitch Lovely Heart Trims and Edgings for Your Craft Projects

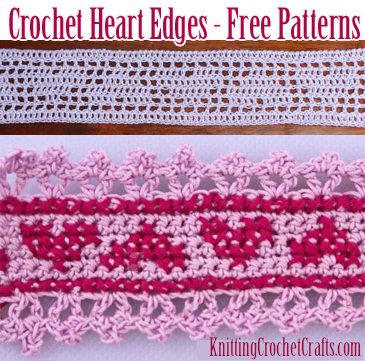
Do you have items that could benefit from a pretty heart edging? If so, you’ll want to grab these free filet crochet and cross stitch heart edging patterns from our website. Both of these edges can be crocheted from the same chart; the differences come about because you can get different looks if you crochet the chart using different crochet techniques.
Project Photos for These Free Crochet Heart Edge Patterns

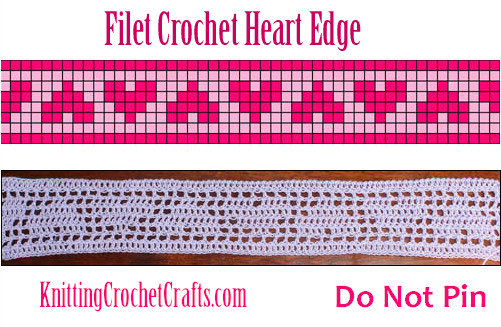
Here you can see an example of one possible way to use this crochet heart chart: It’s ideal for use with the filet crochet technique. This is a piece of filet crochet trim that I made using the chart. To achieve this look, you’d use 3 dc mesh. I worked the sample in a dusty lavender (light purple) mercerized cotton yarn. Crochet thread would also be a fantastic material to use for this purpose.

See More About: Filet Crochet | Valentine’s Day Crafts | Knit and Crochet Edging Patterns | Crochet Thread Patterns
Get the Free Crochet Heart Chart

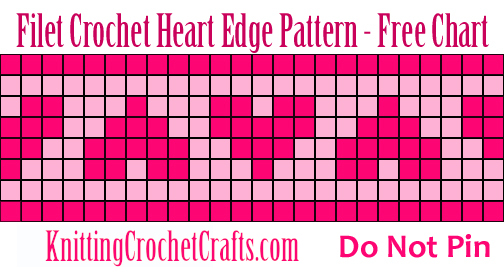
As you can see, the chart features repeating heart motifs that alternate, with one heart facing up, the next heart facing down, and so forth. This makes it easy to use the finished trim in either direction. This chart is in repeat, so you will easily be able to make each crocheted edge as long as you want it to be.
The finished crochet trim would be suitable for use as an edging on sheets, pillowcases, table runners, linens, towels, clothing, accessories, handbags, tote bags, or other craft projects.
It’s likely that you’ll be able to think of many other possible uses for this chart.
Variation 1: Filet Crochet Hearts Trim Worked in 3 dc Mesh
To make the filet crochet version of the heart edging pictured above, you simply follow the usual instructions for filet crochet, using solid blocks of double crochet stitch to form the hearts and open meshes to create the background.
Variation 2: Crocheted Edging With Cross Stitched Hearts
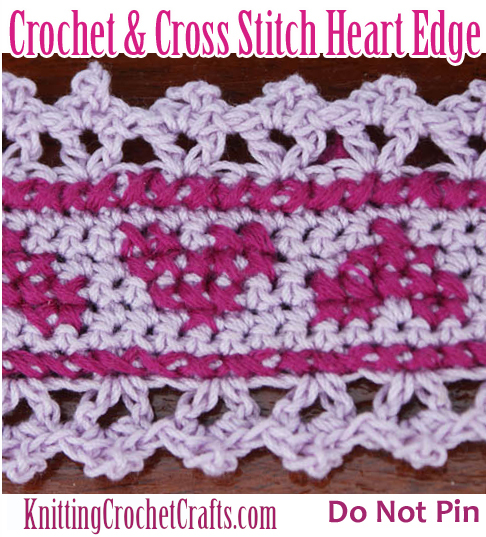
You can also use the chart with alternating heart motifs to work a crocheted edge where the hearts are cross stitched onto the crocheted fabric in a contrasting but complementary color. In this variation, you crochet the trim in single crochet stitch, and then you finish it off with lacy v stitches topped with fancy picots. Of course, the focal point of the design is the series of alternating hearts which you hand-embroider onto the trim using the chart as your guide for where to cross stitch. Here’s a free crochet pattern you can use if you would like to make some of this edging to use on your own craft projects:
Crochet Skill Level: Easy

Cross Stitch Skill Level: Easy
Craft Supplies You’ll Need for Crocheting This Version of the Heart Edge:
Yarn or Thread: I crocheted my sample trim using mercerized cotton yarn, but you could try making this trim with just about any relatively smooth fiber. Avoid using fuzzy fibers such as mohair; you need to be able to see your stitches clearly when you add the cross stitched details.
Embroidery Floss or Yarn for Stitching the Hearts: I used DMC embroidery floss to cross stitch the hearts onto the trim. Embroidery floss is a good choice if your yarn or thread is in the same general size range as the floss. If you choose a heavier yarn to crochet your trim, choose yarn in a comparable weight to do the cross stitching.
There should be enough contrast between your colors that the heart motifs will pop out from the background.
Crochet Hook: Choose a crochet hook that is a suitable size for the yarn or thread you want to work with. If you’re not sure which crochet hook to use, check the yarn label for recommendations. For this project, it’s OK to use a crochet hook that is a bit on the small side, so that your edging will be firm and sturdy.
Other Craft Supplies You’ll Need: Scissors, a tape measure and a tapestry needle.
Gauge — Gauge will be determined by many factors, including your choice of supplies and your individual way of crocheting. Gauge isn’t critical for success with this project, but if you need your trim to be a specific size or length, it’s a good idea to work a small sample and make any necessary adjustments / calculations before crocheting the entire piece.
Finished Size: My sample trim measures about 1 3/4 inches, but the finished size of yours is going to vary depending on the supplies you choose.
Crochet Abbreviations
- dc = double crochet
- ch = chain
- sc = single crochet
- sl st = slip stitch
- st = stitch
- v st = v stitch
Special Crochet Stitches:
V-Stitch Definition: Work 1 dc st, 1 ch st, and 1 more dc st in same st.
Picot Stitch Definition: sc in next v st, ch 3, sl st in 3rd ch from hook, sc in same v st.
How to Crochet This Variation of the Heart Edging:
Crochet a foundation chain using a multiple of 3 stitches + 7 additional stitches. (3 + 7.) To start row 1, sc in 2nd ch from hook.
Rows 1 – 8: Work the entire row in single crochet stitch.
Row 9: This is a v stitch row. Ch 3, turn, dc in next st. (Skip 2 sc sts, Work a v stitch in next st.) Repeat sequence in parentheses all the way across the row. When you get to the end of the row, end by skipping 2 sts after the last v st worked, then work 1 dc st in each of the last 2 sts in the row.
Row 10: Ch 1, turn. Work 1 sl st in each of the first two dc sts and 1 sl st in the space between the last dc and next v st. (Work a picot in each v stitch, and a sl st in each space between v stitches.) Repeat the sequence in parentheses all the way across the row. When you get to the end of the row, work 1 sl st in each of the last two dc sts.
End off. Weave in the loose ends.
Row 11-12 (Optional): You can skip these rows if you want to sew your trim to the upper edge of a sheet, the outer edges of a pillowcase or any other project where you only need the edge to be fancy on one side.
Flip the work 180 degrees so that the bottom of your piece becomes the top and the top becomes the bottom. Attach yarn so that you can work back across your foundation chain, and repeat rows 9-10 so that the top and bottom edges of your trim match each other.
End off and weave in the loose ends.
Stitch the Hearts Onto the Trim:
Next, thread a tapestry needle with the embroidery floss or yarn you will use to cross stitch the heart design. Follow the heart chart posted above. The chart is in repeat, so you can easily repeat out the design as many times as you need to for the length of trim you want to make.
When you are finished stitching, weave the loose ends into the back of your work.
Attach the finished heart trim to the craft project of your choice. If you make it in a lightweight cotton thread, this trim would make a fantastic addition to sheets, pillowcases, pillow shams, or other household linens. If you make it in a heavier wool yarn, it would make a delightful addition to wool blankets. It could also be a great trim to use on clothing, accessories, handbags, purses, totes, and other projects.
Over to You:
Did you try working this pattern? If so, how did it turn out? What are your ideas for using these edgings? You’re invited to share your experiences in the comments below.
Discover More Free Crochet Heart Patterns
- Heart Sampler Baby Blanket
- Free Pattern for a Crochet Heart Shape
- Beaded Crochet Heart Shape — Free Pattern and Instructions
- Fabric Crochet Heart Coaster — Free Pattern
Free Crochet Patterns for Trims and Edgings
See Also: Best Filet Crochet Books
Posted By: Amy Solovay
This page was last updated on 11-10-2021.
These are pretty!!! Thanks for the free pattern!!!
You’re welcome, Rose. Thanks for dropping by!